


Who can do this: Anyone at a device where the admission screen is open. No Clerestory login is needed on that device. Every role can open the "Visitor Dashboard".
Quick steps: on the admission screen, tap each visitor type › "Member lookup" › "Apply Member Benefit" (members only) › "Charge $…" › choose how they pay › confirm › "Start new sale". Numbers: Programs & Sales › Admission › "Visitor Dashboard".
Before you start
- The admission screen must be open on the desk's tablet or computer. See Launch the admission screen on a tablet.
- Prices and member benefits must be set up. See Turn on admission, set prices and member benefits.
- A visitor type (or price tier) is one kind of ticket, such as "Adult" or "Child". Each one is a button on the screen.
- For a member, have their full name or full email address ready.
Add the visitors
Page: /forms/admission/<orgSlug>?key=<key>
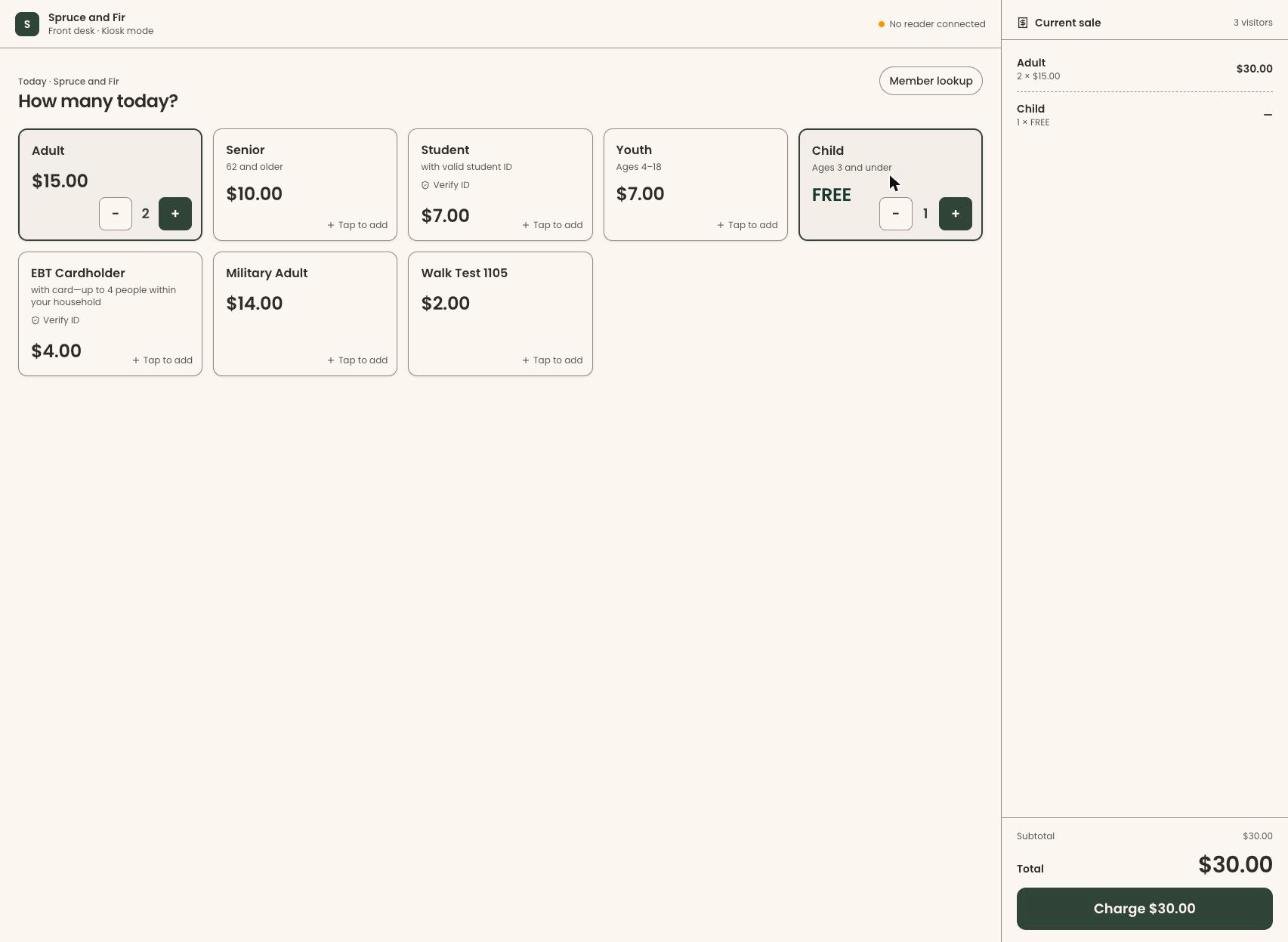
- The screen shows "How many today?" and a button for each visitor type, with its price.
- Tap a visitor type once for each person, for example "Adult" twice and "Child" once.
- Each tap adds one. After the first tap, the button shows the count between a minus (−) and a plus (+). To take one away, tap the minus.
- A button marked "Verify ID" means check something first, such as ID for a senior price.
- On the right, "Current sale" lists each visitor type, the number of visitors, the "Subtotal" and the "Total".
Give a member their benefit
Do this before taking payment.
- With at least one visitor added, tap "Member lookup" on the right, just above the visitor buttons. A box opens called "Look up a member".
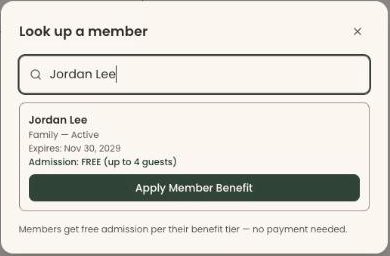
- In "Search by name or email...", type the member's full name or full email address. Part of an email address finds nobody.
- Each result shows the member's name, their membership level with "— Active", "Expires:" and a date, and "Admission:" with their benefit, for example "FREE (up to 4 guests)".
- Tap "Apply Member Benefit" under the right person. The box closes.
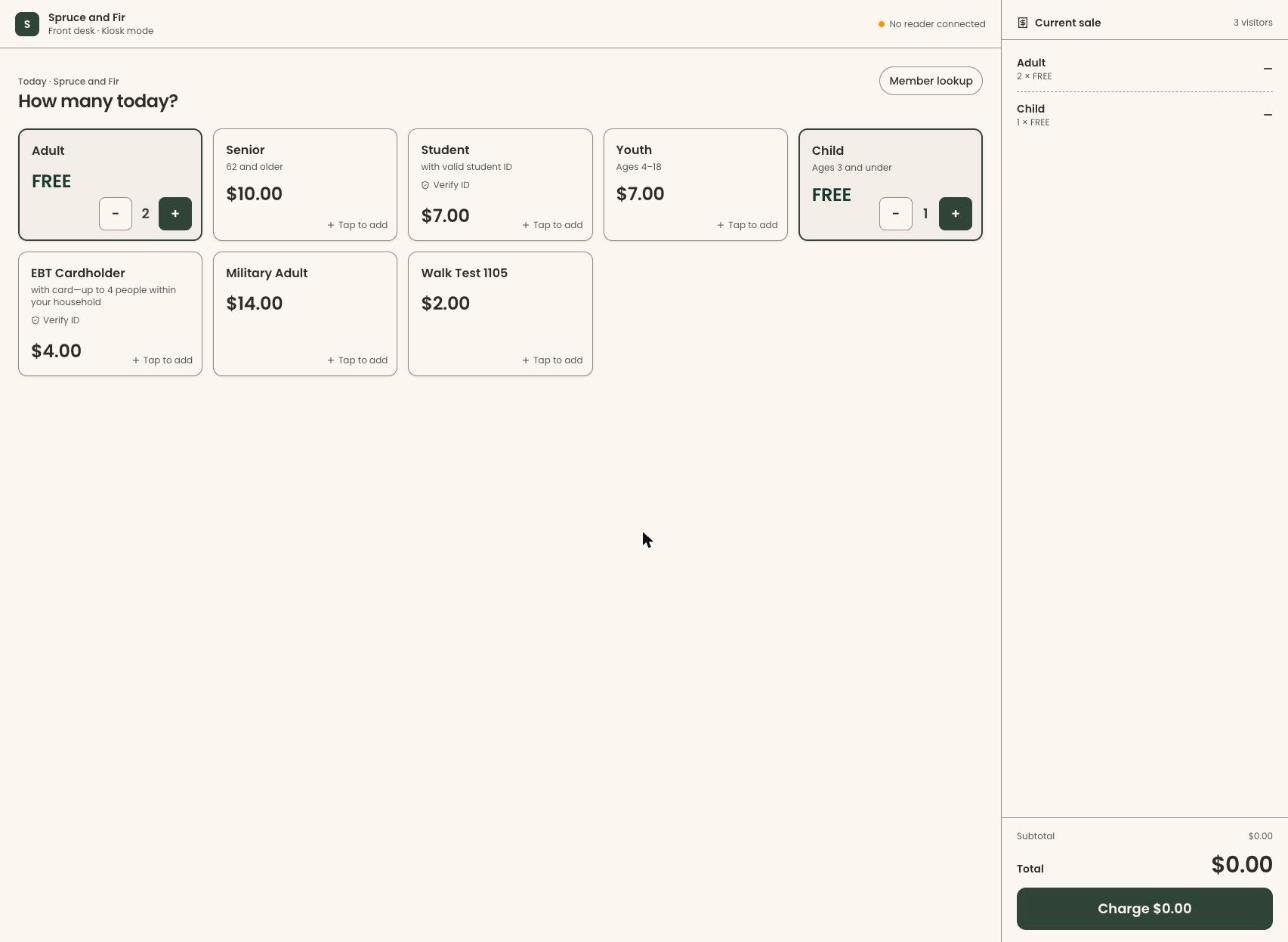
- The covered visitor buttons now show "FREE" (or "Member discount" for a discount), and "Current sale" shows the new prices, for example "2 × FREE". That means it worked.
If you see "No active members found for this search.", check the spelling or try their email. If the result says "No admission benefit configured for this membership tier", their level has no admission benefit.
To take the benefit off, open "Member lookup" again. The box says "Member benefit applied:" and the member's name. Tap "Remove Benefit" next to it.
Take payment
Important: If the total is $0.00 (for example, all free member visits), tapping "Charge $0.00" records the admission right away. There's no payment step.
- At the bottom right, tap "Charge" and the total, for example "Charge $38.00".
- The screen shows "Charging" with the amount, and a list of "Payment method" choices on the left.
- Tap how the visitor is paying. Without a reader, "Type card" starts chosen. The choices depend on whether a card reader is connected:
- "Credit/Debit Card" or "Apple / Google Pay": only with a reader.
- "Type card": type the card number by hand.
- "Cash" or "Check".
- If you see "Cover … in processing fees", check it if the visitor wants to cover the card fees.
- Follow the steps for the payment method, below.
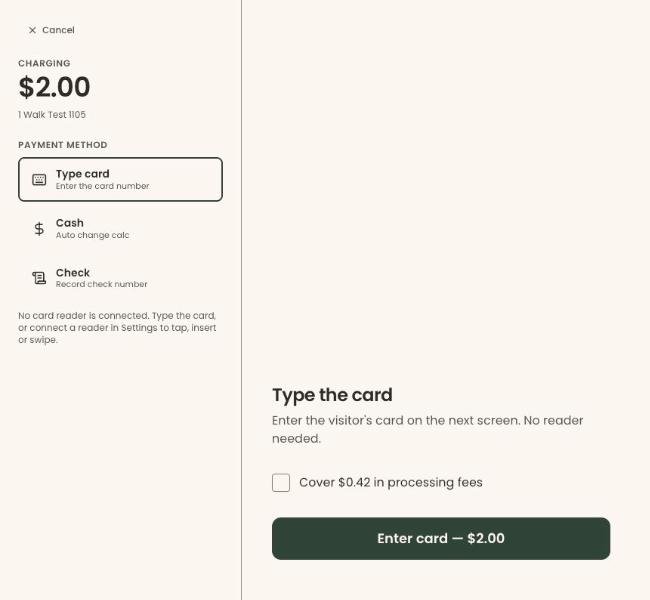
To go back and change the visitors, tap "Cancel" at the top left.
Card reader
Important: Tapping "Tap to Pay" sends the charge to the card reader.
- The screen says "Present card on the reader".
- Tap "Tap to Pay —" and the amount.
- The screen says "Waiting for card on reader...". Ask the visitor to insert, tap or swipe their card.
If you see "Could not connect to card reader. Please ensure the reader is powered on and connected to the internet.", check the reader and try again.
Type card
- Tap "Enter card —" and the amount. A screen opens called "Type the card".
- Type the card number, expiry date and security code.
Important: Tapping "Charge $…" charges the card.
- Tap "Charge $…".
If you see "That card was not charged." or "Check the card details.", check the numbers and try again.
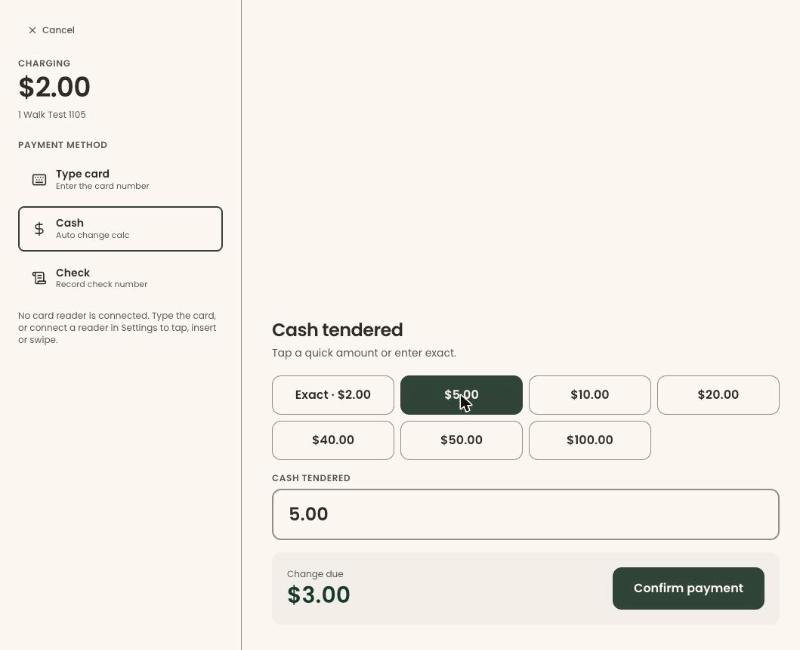
Cash
- The screen says "Cash tendered". Tap the amount the visitor handed you, for example "Exact · $38.00", or type it.
- "Change due" shows how much to give back. If it says "Need $… more", the amount is too low.
Important: "Confirm payment" records the sale right away. It can't be changed on this screen afterwards.
- Tap "Confirm payment".
Check
- The screen says "Record check".
- Type the "Check number", for example 1042. "Drawer name" is optional.
Important: "Confirm payment" records the sale right away. It can't be changed on this screen afterwards.
- Tap "Confirm payment ·" and the amount.
After the sale
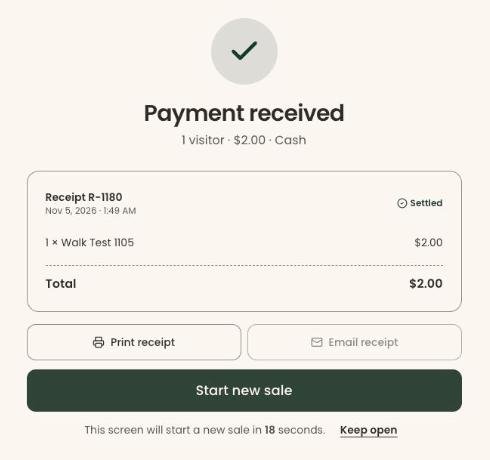
- The screen says "Payment received", with the number of visitors, the total and how they paid, and a receipt number.
- To print, tap "Print receipt".
- Tap "Start new sale" for the next visitor. If you don't, the screen starts a new sale by itself: it says, for example, "This screen will start a new sale in 18 seconds." Tap "Keep open" next to it to stop that. Tapping anywhere outside the receipt also starts a new sale, so print first if you need to.
If something went wrong, a red message appears at the top of the screen and the sale goes back to the visitor list. Nothing is charged for a sale that didn't finish.
See visitor numbers
Page: /dashboard/admission
- In the left-hand menu, under "Programs & Sales", click "Admission". Then click "Visitor Dashboard" in the list that opens below it.
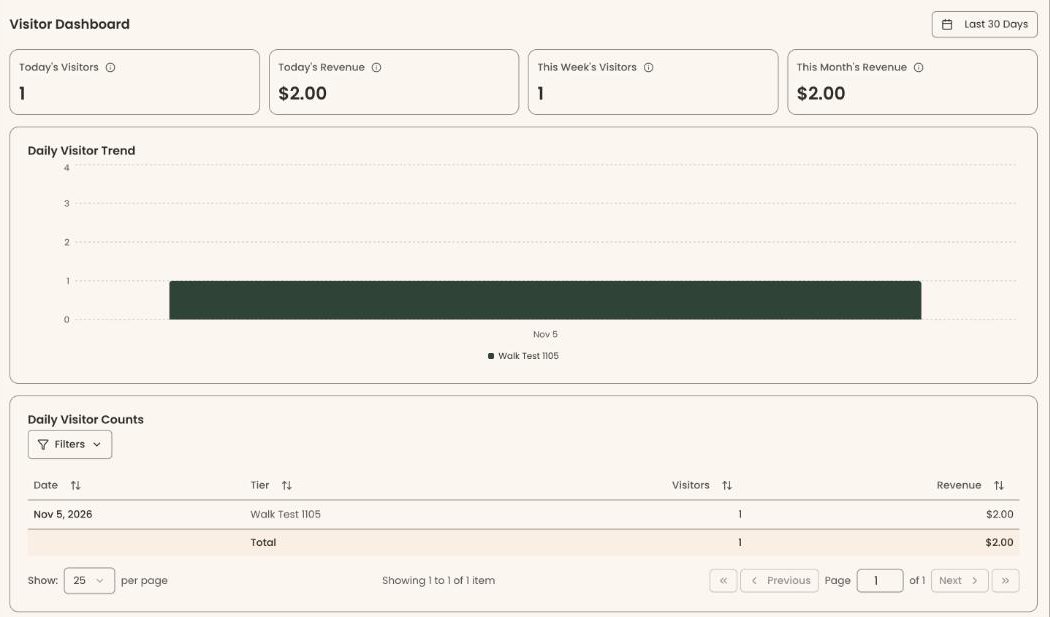
- At the top are four boxes: "Today's Visitors", "Today's Revenue", "This Week's Visitors" and "This Month's Revenue".
- To change the dates, click the date range box at the top right (it starts on "Last 30 Days") and pick the dates.
- "Daily Visitor Trend" shows visitors per day, colored by visitor type.
- "Daily Visitor Counts" lists each day and visitor type with "Visitors" and "Revenue", and a "Total" row.
If there were no sales in the dates you picked, you'll see "No visitors in this period."
What the labels mean
- "Verify ID": staff should check eligibility before selling this visitor type.
- "FREE": this visitor pays nothing, usually because of a member benefit.
- "Member discount": the price was lowered by the member benefit you applied.
- "Card reader ready" / "No reader connected" (top of the screen): whether a card reader is linked.
- "This Week's Visitors": Sunday to today.
Special cases
- "Member lookup" appears only after you add at least one visitor.
- "Email receipt" is grayed out. Email receipts aren't available on this screen yet.
- If your organization requires the kiosk PIN, the screen asks "Enter kiosk PIN" the first time on each device. See Set up the kiosk and its PIN.
- "No card reader is connected. Type the card, or connect a reader in Settings to tap, insert or swipe." means only "Type card", "Cash" and "Check" are offered. See Register a card reader and its location.
If you make a mistake
- Before payment: tap the minus (−) on a visitor type, or "Cancel" on the payment screen.
- After payment: a finished sale can't be changed or refunded on the admission screen. Ask someone with refund access to refund the payment in Clerestory: see Refund a payment.