


Who can do this: Owner, Administrator, Programs and Front desk. Finance, Fundraiser and Viewer users can see the page, but its buttons are grayed out for them.
Quick steps: Settings › "Card Readers" › "Add Location" › fill in the address › "Save Location" › "Add Reader" › type the registration code, a label and the location › "Register Reader".
Before you start
- You need the Owner, Administrator, Programs or Front desk role.
- Your organization must have its Stripe payment account connected. See Connect Stripe and payouts.
- You need a compatible reader: WisePOS E, Stripe Reader S700 or S710. The page says where to order one.
- Have the reader switched on and connected to the internet, with its registration code showing. The reader's own instructions say how to show the code.
- Have the street address, city, state and postal code where the reader will be used.
- A card reader is the small Stripe device a customer taps, inserts or swipes their card on. A location is the street address where your readers are used.
Add a location
Page: /dashboard/settings/card-readers
- In the left-hand menu, under "Tools", click "Settings". Then click "Card Readers" in the list that opens below it. You may need to scroll the left-hand menu to see the list.
- In the "Locations" box, at the top right, click "Add Location". A short form opens. The gray text in some boxes (such as "123 Main St" and "CA") is only an example, so type your own in every box.
- In "Display Name", type a name staff will recognize, for example Front Desk.
- In "Street Address", type the street address, for example 123 Main St.
- In "City", type the city.
- In "State", type the two-letter state, for example CA.
- In "Postal Code", type the ZIP code.
- Click "Save Location". It can't be clicked until "Display Name", "Street Address", "City" and "Postal Code" are filled in.
- You'll see "Location added", and the location appears in the list with "0 readers". That means it worked.
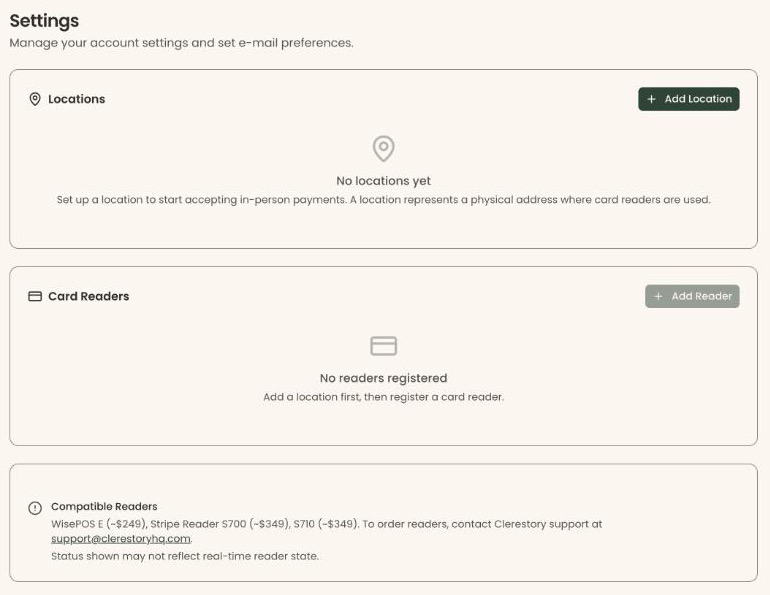
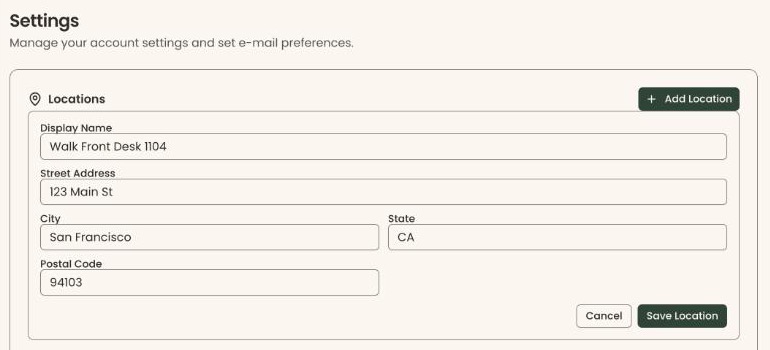
If you see "Failed to create location. Check the address and try again.", check each part of the address and try again.
Register a card reader
- In the "Card Readers" box, at the top right, click "Add Reader". (It can't be clicked until you have a location.)
- In "Registration Code", type the code shown on the reader.
- In "Label", type a name for the reader, for example Front Desk Reader.
- Under "Location", click "Select a location" and choose where the reader is used.
- Click "Register Reader". It can't be clicked until "Registration Code", "Label" and "Location" are all filled in.
- You'll see "Reader registered", and the reader appears in the list with its label, a status and its location. That means it worked.
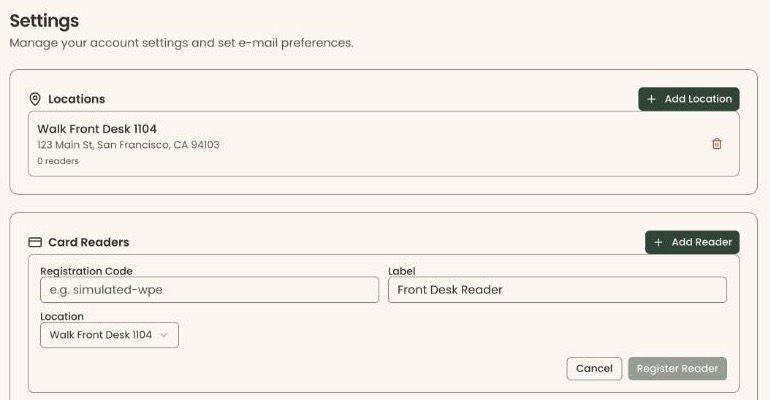
If you see "Failed to register reader. Check the registration code and try again.", make a new code on the reader and type it again.
The status ("online", "offline") may not show the reader's real-time state.
Remove a reader
- In the "Card Readers" box, find the reader.
- At the far right of its row, click the red trash can icon. Your browser asks "Remove this card reader?".
Important: Clicking "OK" stops the reader taking payments for your organization right away. To use it again you must register it again with a new code.
- Click "OK", or "Cancel" to keep it.
- You'll see "Reader removed". That means it worked.
Changes in the next release: instead of the browser's question, a box called "Remove Front Desk Reader?" (with the reader's label) opens. Click "Remove reader" in it to confirm.
Remove a location
Remove every reader at the location first.
- In the "Locations" box, find the location.
- At the far right of its row, click the red trash can icon. Your browser asks "Remove this location? All readers must be removed first."
Important: Clicking "OK" deletes the location. It can't be brought back; you would add it again.
- Click "OK", or "Cancel" to keep it.
- You'll see "Location removed". That means it worked.
If you see "Cannot delete — please remove all card readers at this location first.", remove its readers, then try again.
Changes in the next release: instead of the browser's question, a box called "Remove Front Desk?" (with the location's name) opens. Click "Remove location" in it to confirm. If readers are still at the location, the box says so.
Buttons to avoid
- The red trash can icons remove a reader or a location. "Add Reader" and "Add Location" only open the forms.
- "Cancel" under a form closes it without saving.
If you make a mistake
- A wrong label or location: remove the reader and register it again with a new code.
- A removed reader or location can't be brought back in the screens. Add it again.