


Who can do this: Owner, Administrator, Programs and Front desk. Finance, Fundraiser and Viewer see only "Visitor Dashboard" under "Admission" in the menu.
Quick steps: Programs & Sales › Admission › "Admission Settings" › "Enable Admission" › "Create Tier" › fill in › "Create Tier" › "Add Benefit" › fill in › "Create Benefit".
Changes in the next release: only an Owner or Administrator can change admission prices, member benefits and settings. Programs and Front desk see these controls grayed out, with "Only an Owner or Administrator can change admission prices and settings."
Before you start
- You need an Owner, Administrator, Programs or Front desk login.
- The Admission feature must be on. If "Admission" isn't in the left-hand menu, ask an Owner or Administrator to turn it on: see Turn features on or off.
- To take card payments, your organization must be connected to Stripe. See Add a payment account, connect Stripe and set your payout schedule.
- Decide your prices. A price tier is one kind of ticket with its own price, for example "Adult $15" or "Child $8".
- To give members a benefit, your membership levels must already exist. See Set up membership levels: add, edit, duplicate, stop offering and delete.
Turn on admission
Page: /dashboard/admission/settings
- In the left-hand menu, under "Programs & Sales", click "Admission". Then click "Admission Settings" in the list that opens below it.
- The page says "Admission Not Configured".
- Click "Enable Admission" in the middle of the page.
- You'll see "Admission enabled successfully". The page now shows "Launch Kiosk", "Admission Configuration", "Price Tiers" and "Membership Benefits". That means it worked.
Turning admission on also creates a campaign called "Admission", where admission sales are recorded.
If it didn't work, you'll see "Failed to enable admission". Try again.
Add a price
Page: /dashboard/admission/settings
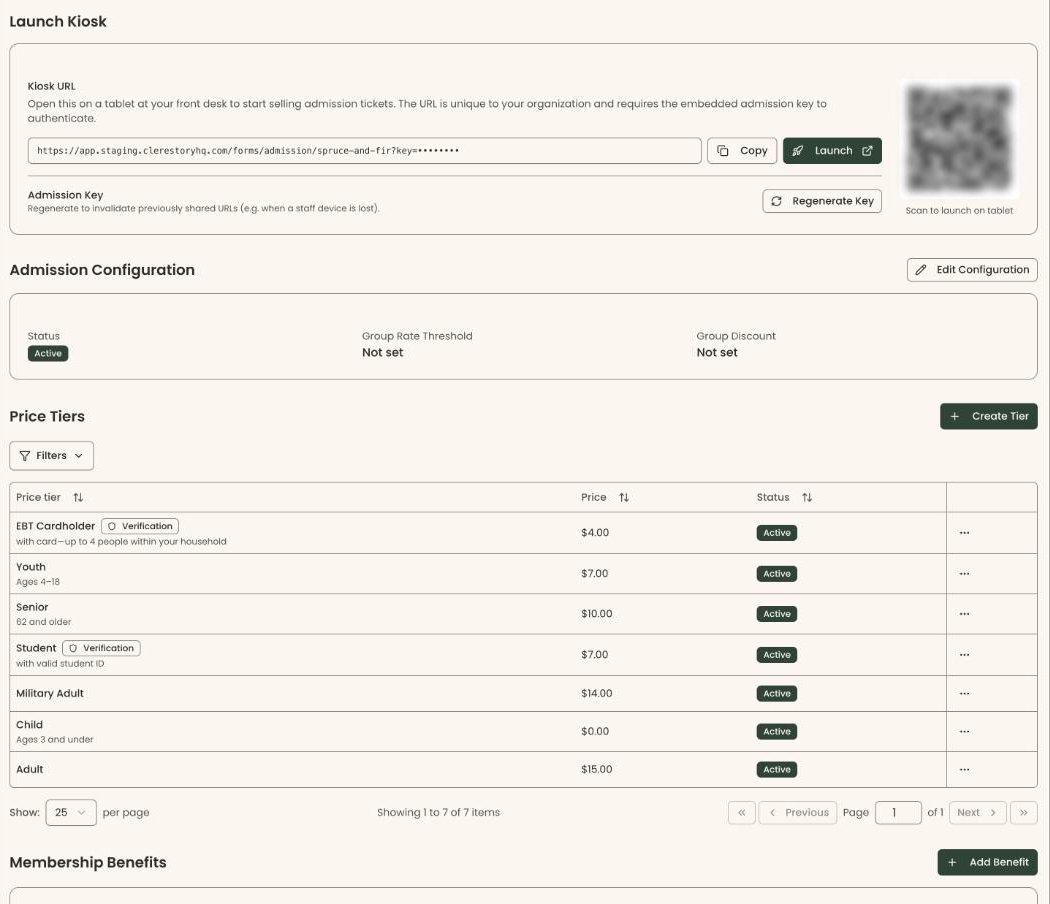
- Under "Price Tiers", click "Create Tier" on the right. (If there are none yet, click "Create Your First Tier".) A box opens called "Create Price Tier".
- In "Name", type the visitor type, for example "Adult". This is the button staff tap at the desk.
- In "Price ($)", type the price, for example 15. Type 0 for a free tier.
- In "Eligibility Description", you can say who qualifies, for example "Ages 5-12".
- In "Receipt note", you can type a short note for the buyer's email receipt. Leave out tax wording: the receipt already includes it.
- Check "Requires Verification" if staff must check something first, such as ID for a senior price.
- In "Sort Order", type a number. Lower numbers appear first at the desk, for example 1 for Adult, 2 for Child.
- Click "Create Tier" at the bottom of the box.
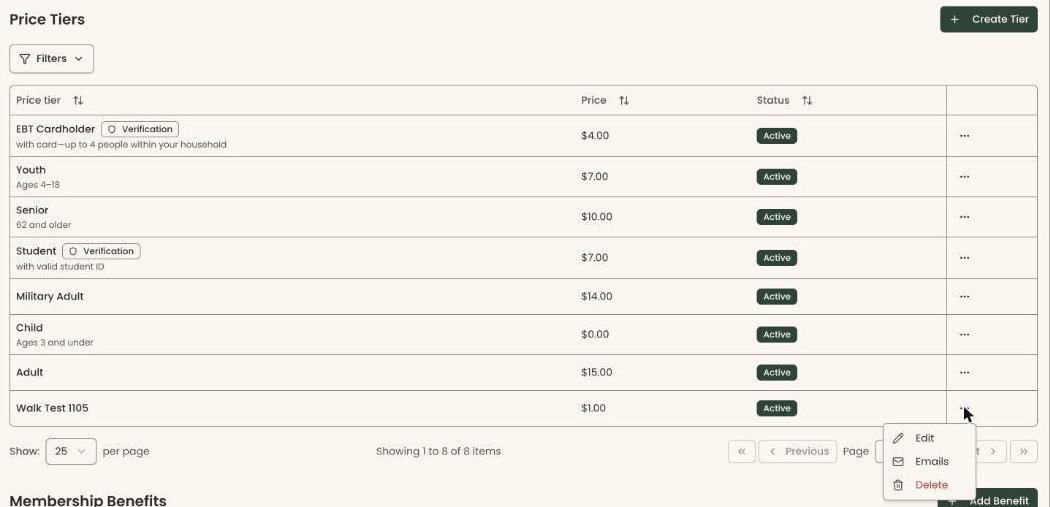
- You'll see "Price tier created successfully". The tier appears in the "Price Tiers" table. That means it worked.
- Repeat for each price.
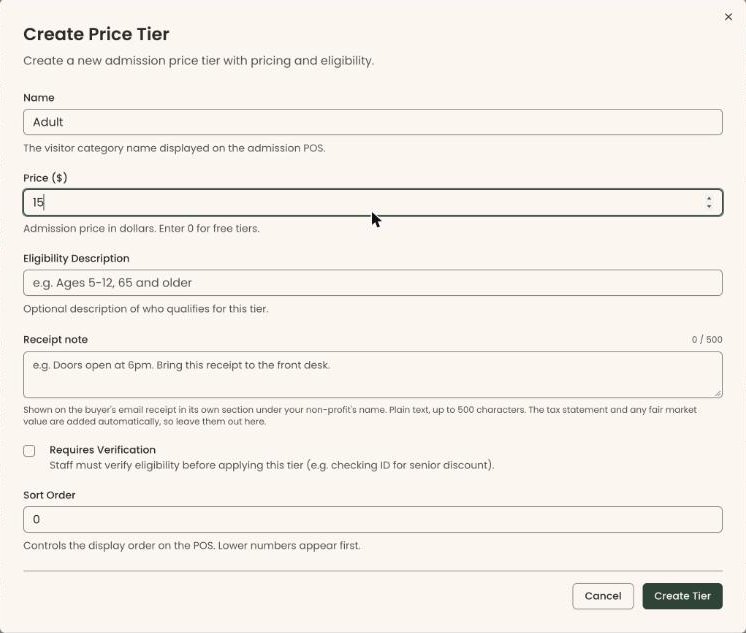
If something is missing, the box says what, for example "Name is required" or "Price cannot be negative".
Change or remove a price
- In the "Price Tiers" table, find the tier. At the far right of its row, click the three dots (⋯). The menu shows "Edit", "Emails" and "Delete".
- To change it, click "Edit". The box "Edit Price Tier" opens. Make your changes.
Important: Saving a new price changes what the admission screen charges from then on.
- Click "Update Tier". You'll see "Price tier updated successfully". That means it worked.
- To remove it, click "Delete" in the ⋯ menu instead. A box called "Delete Price Tier" asks "Are you sure you want to delete this price tier? This action cannot be undone."
Important: Deleting a price tier can't be undone.
- Click "Delete". You'll see "Price tier deleted".
Give members free or discounted admission
A membership benefit gives members of one membership level free entry or a discount, for themselves and a number of guests.
Page: /dashboard/admission/settings
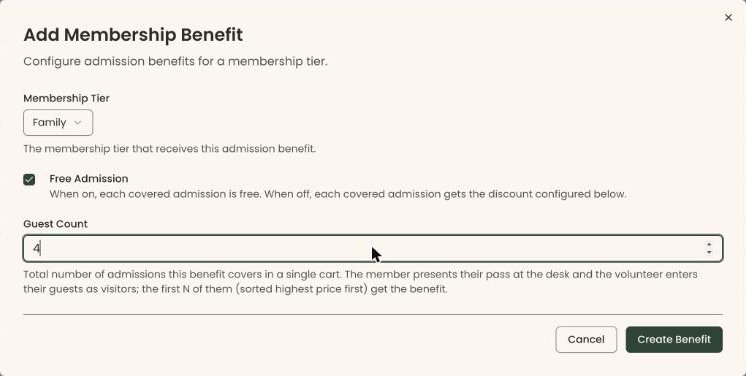
- Under "Membership Benefits", click "Add Benefit" on the right. (If there are none yet, click "Add Your First Benefit".) A box opens called "Add Membership Benefit".
- In "Membership Tier", choose the membership level, for example "Family".
- "Free Admission" starts checked, which makes entry free. Leave it checked for free entry.
- For a discount instead, uncheck "Free Admission". "Discount Type" and "Discount Value" appear below "Guest Count". Choose "Percentage" or "Fixed Amount" and type the value, for example 50 for 50% off.
- In "Guest Count", type how many admissions the benefit covers in one sale, for example 4 for a family of four. The highest-priced visitors in the sale get it first.
- Click "Create Benefit" at the bottom of the box.
- You'll see "Membership benefit created successfully". The level appears under "Membership Benefits" with "Free Admission" or the discount. That means it worked.
If you see "Discount type and value are required when free admission is off", either check "Free Admission" or fill in both discount fields.
Change or remove a member benefit
- Under "Membership Benefits", find the level. To change it, click the pencil to the right of it and make your changes.
Important: Saving a changed benefit changes what those members pay at the admission screen from then on.
- Click "Update Benefit". You'll see "Membership benefit updated successfully". That means it worked.
- To remove a benefit instead, click the red trash can to the right of it. A box called "Delete Membership Benefit" asks "Are you sure you want to delete this membership benefit? This action cannot be undone."
Important: Deleting a membership benefit can't be undone.
- Click "Delete". You'll see "Membership benefit deleted".
Set opening hours, or pause admission
Page: /dashboard/admission/settings
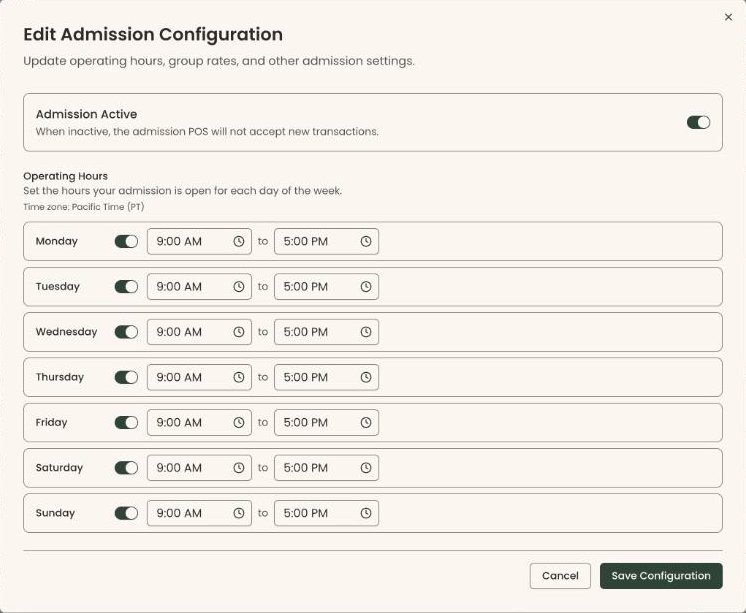
- Next to "Admission Configuration", click "Edit Configuration" on the right. A box opens called "Edit Admission Configuration".
- Under "Operating Hours", turn on the switch for each day you're open, then set the opening and closing times. Days left off show "Closed". The times are in the time zone shown under the heading, for example "Time zone: Pacific Time (PT)".
- At the top of the box, the switch "Admission Active" controls whether sales can be taken.
Important: Turning off "Admission Active" stops the admission screen taking new sales right away.
- Click "Save Configuration" at the bottom of the box.
- You'll see "Admission configuration updated". "Status" on the page shows "Active" or "Inactive". That means it worked.
If you see "Close time must be after open time", fix that day's times.
What the labels mean
- "Status": "Active" means the admission screen can take sales. "Inactive" means it can't.
- "Group Rate Threshold" and "Group Discount": show "Not set" unless they were set before. They can't be changed on this page.
- "Free Admission" or "… off" next to a membership level: the benefit those members get.
- "… guests": how many admissions the benefit covers per sale.
Buttons to avoid
- "Regenerate Key", under "Launch Kiosk", stops every existing link to the admission screen working. See Launch the admission screen on a tablet.
If you make a mistake
- Edit the price tier or benefit again and save.
- A deleted price tier or benefit can't be brought back. Create it again.