


Who can do this: Owner, Administrator, Programs and Front desk. Finance, Fundraiser and Viewer don't see "Admission Settings" in the menu.
Quick steps: Programs & Sales › Admission › "Admission Settings" › "Launch Kiosk" › scan the QR code with the tablet, or "Copy" the link, or "Launch" on this computer.
Before you start
- You need an Owner, Administrator, Programs or Front desk login.
- Admission must be turned on, with at least one price. See Turn on admission, set prices and member benefits.
- Have the tablet charged and connected to the internet, with its camera ready to scan a QR code.
- If your organization requires a PIN on the admission screen, have the kiosk PIN. See Set up the kiosk and its PIN.
- To take card payments on a card reader, register the reader first. See Register a card reader and its location.
Open the admission screen on a tablet
Page: /dashboard/admission/settings
- On your computer, in the left-hand menu, under "Programs & Sales", click "Admission". Then click "Admission Settings" in the list that opens below it.
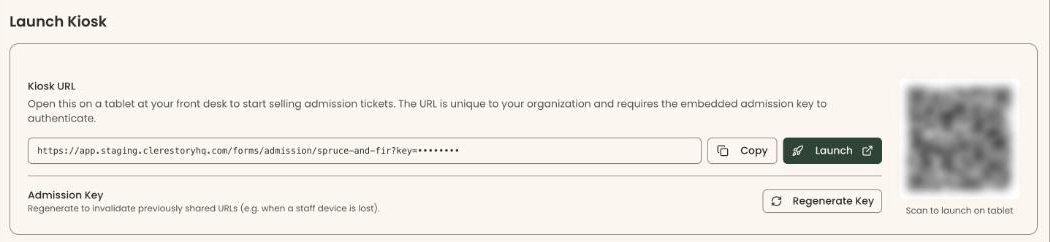
- At the top of the page, under "Launch Kiosk", you'll see the "Kiosk URL" box and, on the right, a QR code labeled "Scan to launch on tablet".
- On the tablet, open the camera and point it at the QR code. Tap the link that appears.
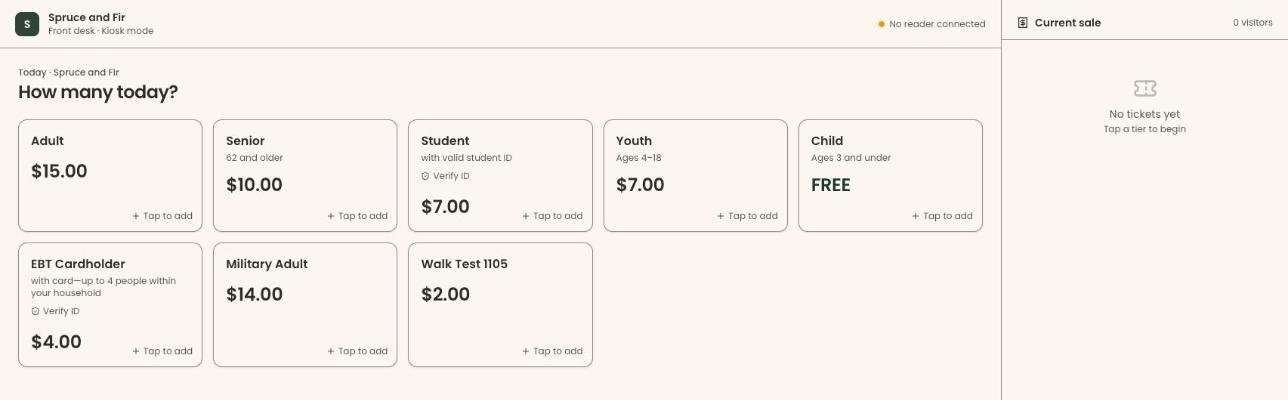
- The admission screen opens on the tablet. It shows "Today ·" and your organization's name, and "How many today?" above your prices. That means it worked.
- Bookmark the page on the tablet, or add it to the home screen, so staff can open it again.
If the tablet shows "Enter kiosk PIN", type the PIN and tap "Unlock". The tablet then stays unlocked until an administrator removes it.
Other ways to open it
- Copy the link: next to the "Kiosk URL" box, click "Copy". You'll see "Kiosk URL copied to clipboard". Send it to the tablet, for example by email to yourself, and open it there.
- Open it on this computer: click "Launch". The admission screen opens in a new tab.
Check the card reader
At the top of the admission screen, a label says "Card reader ready" or "No reader connected". If it says "No reader connected", staff can still take cash, checks and typed card numbers. Tap-and-insert card payments ("Credit/Debit Card", "Apple / Google Pay") only appear when a reader is connected. To take card-reader payments, register the reader: see Register a card reader and its location.
Replace the link if a device is lost
The link has a built-in key (the admission key). Anyone with the link can open the admission screen, so make a new key if a tablet is lost or the link was shared by mistake.
Page: /dashboard/admission/settings
- Under "Launch Kiosk", find "Admission Key".
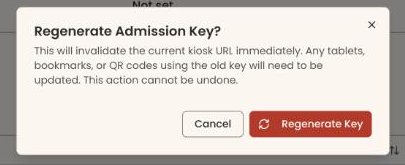
- Click "Regenerate Key" on the right. A box opens: "Regenerate Admission Key?".
Important: Regenerating stops the current link working right away, on every tablet, bookmark and printed QR code. This can't be undone.
- Click "Regenerate Key" in the box.
- You'll see "Admission key regenerated. Previous kiosk URLs no longer work." The "Kiosk URL" and QR code change. That means it worked.
- Open the new link on each tablet you still use, as in "Open the admission screen on a tablet".
If it didn't work, you'll see "Failed to regenerate admission key". Try again.
Changes in the next release: only an Owner or Administrator can click "Regenerate Key". For Programs and Front desk it is grayed out. "Copy", "Launch" and the QR code still work for them.
Special cases
- "A kiosk URL will appear here once your organization slug is set." means your organization has no web address name yet. Ask an Owner or Administrator.
- If the tablet shows "This admission link is missing its access key. Open the kiosk from Admission settings using Launch kiosk.", the link is old or incomplete. Open the current link again.
- "No admission pricing configured. Set up price tiers in Admission Settings." means there are no prices yet. See Turn on admission, set prices and member benefits.
- "Not accepting payments yet. This organization is still setting up online payments." means Stripe isn't connected yet. See Add a payment account, connect Stripe and set your payout schedule.
- "No kiosk PIN has been set" on the tablet means the PIN is required but nobody has set it. An Owner or Administrator sets it in Settings. See Set up the kiosk and its PIN.
Buttons to avoid
- "Regenerate Key" replaces the link for every device. Use it only when a link must stop working. Click "Cancel" in the box if you clicked it by mistake.
If you make a mistake
A regenerated key can't be put back. Open the new link on each tablet.