


Who can do this: Owner, Administrator, Finance. Other roles don't see the "Payment Accounts" box.
Quick steps: Settings › Organizations › "Payment Accounts" › "Add Payment Account" › name, classification, EIN › "Create & Connect Stripe" › finish on Stripe › later, "Payout schedule" › "Frequency" › "Save schedule".
Before you start
- Your role must be Owner, Administrator or Finance.
- A payment account is one legal entity in Clerestory, with its own bank account and tax classification. Most organizations need only one.
- Stripe is the card payment service Clerestory uses. A payout is Stripe sending your collected money to your bank account.
- Have to hand: your EIN (Employer Identification Number, 9 digits), your tax-exempt classification (for example 501(c)(3)), your bank account details, and the legal and contact details Stripe asks for.
Add a payment account and connect Stripe
Page: /dashboard/settings/organizations
- In the left-hand menu, under "Tools", click Settings to open its list.
- Click Organizations.
- Scroll down to the box headed "Payment Accounts". It's below your organization's details and directly above "Team Management". (For Finance users it's the first box on the page.)
- Click "Add Payment Account", at the top right of that box.
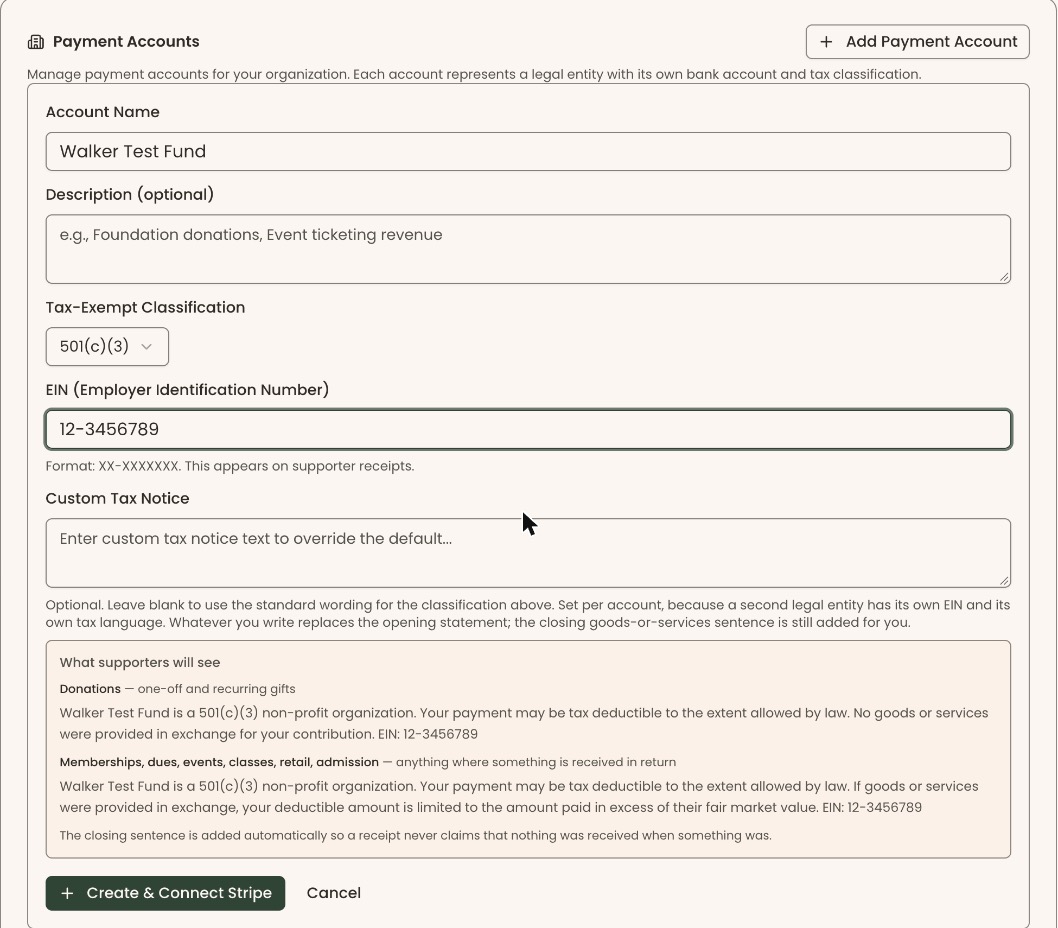
- A form opens inside the box. In "Account Name", type a name your team will recognize, for example "Main Fund".
- In "Description (optional)", add a note if you like.
- Click "Tax-Exempt Classification" and choose your organization's type. It starts on "501(c)(3)".
- In "EIN (Employer Identification Number)", type your EIN. The dash is added for you, for example 12-3456789. It appears on supporter receipts.
- Leave "Custom Tax Notice" blank to use the standard wording, or type your own. The preview underneath shows how receipts will read.
- Click "Create & Connect Stripe", below the form.
- Stripe's own pages open in the same window. Fill in your organization's and bank details there, following Stripe's steps.
- When you finish, Stripe sends you back to this page. You'll see "Thanks — Stripe has your details. Payments turn on as soon as Stripe finishes its review." That means your details reached Stripe.
- Your account now shows a "Pending" tag next to its name while Stripe reviews it.
- When Stripe approves it, the tag changes to "Connected". That means you can take card payments.
Finish Stripe's setup
If Stripe needs more information, the account shows "Stripe needs …", saying what and by when. The Overview page also lists it under "Needs attention" with a "Finish in Stripe" button.
- In the left-hand menu, click Settings, then Organizations.
- Scroll down to "Payment Accounts" and find the account.
- Click "Continue Onboarding", under the account's details.
- Complete the steps on Stripe's pages.
- You'll come back to this page and see "Thanks — Stripe has your details. Payments turn on as soon as Stripe finishes its review."
Set the payout schedule
The "Payout schedule" box appears under an account once its tag says "Connected".
- In the left-hand menu, click Settings, then Organizations.
- Scroll down to "Payment Accounts". Find the box headed "Payout schedule" under the account.
- Click "Frequency" and choose "Daily", "Weekly" or "Monthly".
- If you chose "Weekly", click "Day of the week" and choose a day from Monday to Friday.
- If you chose "Monthly", click "Day of the month" and choose a day from 1 to 31.
- Click "Save schedule".
- You'll see "Payout schedule updated". That means it worked.
- If you see "Authentication required" instead, nothing was saved. Contact Clerestory support; the schedule can also be changed with "Manage in Stripe".

Change an account's details
- In "Payment Accounts", find the account. At the right of its row, click the small pencil icon.
- Change any of "Account Name", "Description (optional)", "Tax-Exempt Classification", "Custom Tax Notice", "EIN" or "Reply-To Email". "Reply-To Email" is where replies go when a supporter answers an email from this account.
- Click "Save".
- You'll see "Payment account updated". That means it worked.
What the labels mean
- Pending: the account exists, and Stripe is still collecting or reviewing your details.
- Connected: Stripe has approved the account, so payments can go through.
- Restricted: Stripe has limited the account until it gets more information. Use "Continue Onboarding".
- No Stripe Account: the payment account isn't linked to Stripe yet.
- Default: the account payments go to unless something says otherwise.
- "No EIN set — tax receipts for this account will not show one. Edit this account to add it." Add the EIN, as in "Change an account's details".
Special cases
- "Your Stripe setup link expired." Stripe's link only lasts a short time. Click "Continue Onboarding" to get a fresh one.
- "Payouts are currently manual." Someone set manual payouts in Stripe directly. Choose "Daily", "Weekly" or "Monthly" and click "Save schedule" to send payouts automatically. You can't choose manual here.
- Non-profit rate. Some new accounts show a note about Stripe's discounted non-profit rate. Until Stripe approves your application, card payments are charged at Stripe's standard rate. Once Stripe approves it, let Clerestory know.
- "EIN is required and must be in the format XX-XXXXXXX". Check the EIN has 9 digits.
- "Account name is required". Type a name in "Account Name".
- "Failed to create payment account". The account may have been saved anyway, without Stripe. Don't click "Create & Connect Stripe" again yet, or you may get a second copy. Refresh the page and look in "Payment Accounts". If your new account is there marked "No Stripe Account", delete it (see "Delete a payment account"), then start again. If it happens twice, contact Clerestory support.
- More than one account. Click "Set as Default" on the one payments should use. You'll see "Default account updated".
- Manage in Stripe. On a "Connected" or "Restricted" account, "Manage in Stripe" opens your Stripe dashboard.
Delete a payment account
- In "Payment Accounts", find the account. At the right of its row, click the red trash can icon. Your default account doesn't have one.
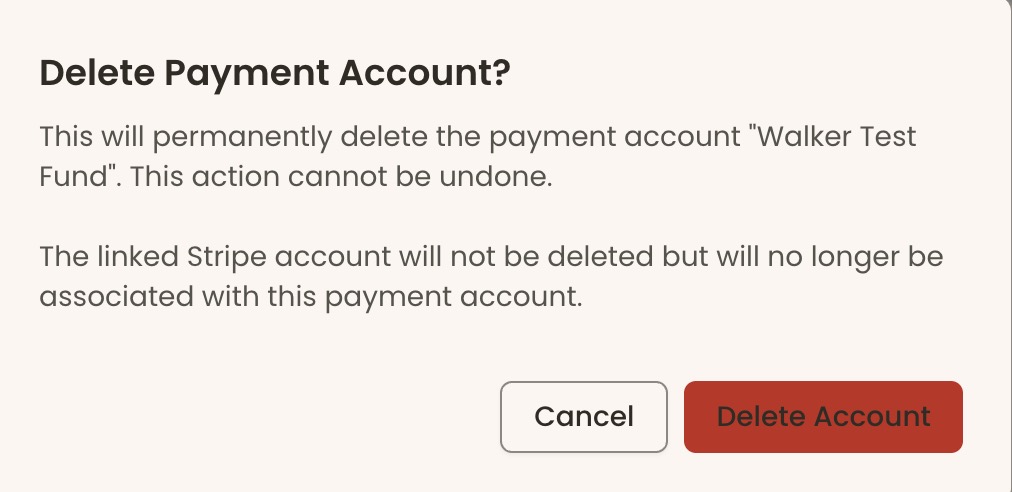
- A box opens headed "Delete Payment Account?".
Important: Clicking "Delete Account" permanently deletes this payment account. It can't be undone. The Stripe account isn't deleted, but it's no longer linked to Clerestory.
- Click "Delete Account" to delete it, or "Cancel" to keep it.
- You'll see "Payment account deleted". That means it worked.
If you make a mistake
- Wrong name, EIN or tax wording: change it as in "Change an account's details".
- Wrong payout schedule: choose the right one and click "Save schedule" again.
- Wrong bank or legal details in Stripe: click "Manage in Stripe", or "Continue Onboarding" while it's still pending, and correct them there.
- Deleted an account by mistake: this can't be undone in the screens. Add a new payment account.