


Who can do this: Anyone with the event's link. Buyers don't need an account. Staff can open the same page from "Preview Form" on the event.
Quick steps: Open the event link › "+" beside a ticket › your email › "Continue" › "Continue to Checkout — Total: …" › "Continue — Total: …" › "Contact Information" › "Continue" › "Attendee Details" › "Continue with Attendee Details" › "Continue to Payment — …" › card details › "Pay $… now" › "You're registered!". Sold out: "Join the waitlist".
Before you start
- The event must be published. See Share the event link, QR code or website embed.
- To test as a buyer, open the link from "Event Form Links" › "Preview Form" on the event's page.
- A waitlist only appears if it is turned on in the event's "Settings" tab, under "Waitlist". See Run the waitlist.
- To buy, have ready: an email address, a phone number, a street address, and a card.
Buy tickets
Page: /forms/event/<eventSlug>
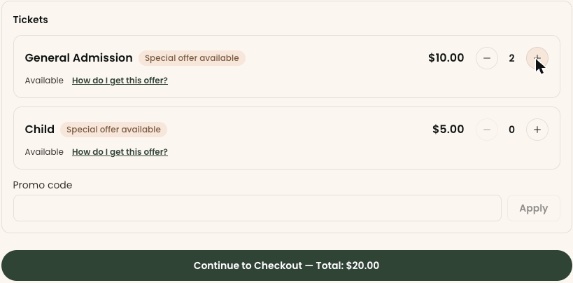
- Open the event's link. The page shows the event's details and its tickets.
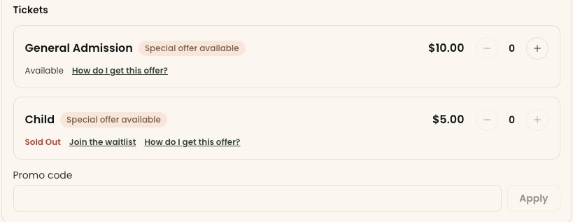
- Beside the ticket you want, click the plus (+) button once for each ticket. The minus (−) button takes one away.
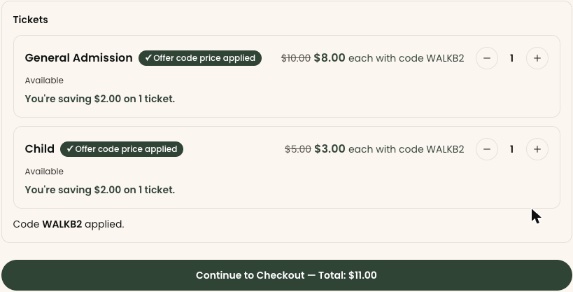
- If you have a code, type it in the "Promo code" box under the tickets and click "Apply". You'll see "Code … applied.", and each ticket it covers shows "Offer code price applied" and the new price.
- Under "Enter your email to get started", type your email address in "Email Address". Then click "Continue" just below it.
- If the page asks "How would you like to continue?", that email is already in the organization's records. Click "Continue as anonymous" to buy without signing in. The page doesn't change when you click it; carry on with the next step. ("Continue with login" emails you a code to sign in instead.)
- At the bottom, click "Continue to Checkout — Total: …".
- Under "Review Your Selections", check the tickets and any code. Click "Continue — Total: …".
- Under "Contact Information", fill in "First Name", "Last Name", "Phone Number", "Street Address", "City", "State" and "ZIP/Postal Code". All are required. Then click "Continue".
- Under "Attendee Details", the first guest is filled in with your name and email. For each other guest, type their "First Name" and "Last Name" ("Email" is optional), or check "Guest name not known yet". Then click "Continue with Attendee Details". Or click "Skip attendee details" if you don't know them yet.
- If the event has a waiver, a "Waivers" step asks each guest to agree to it. Then click "Continue".
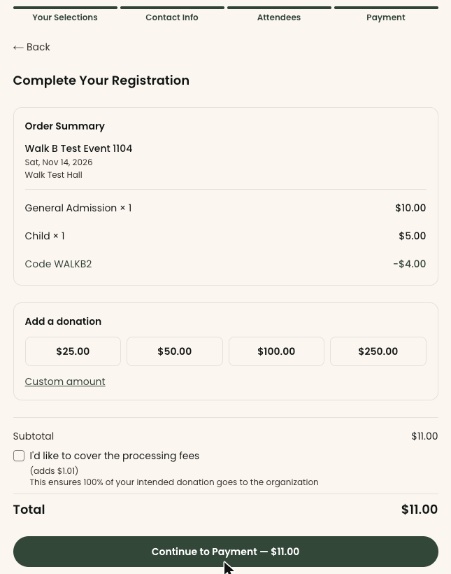
- Under "Complete Your Registration", check the "Order Summary".
- Under "Add a donation", you can pick an amount or click "Custom amount". To give nothing extra, don't pick one.
- To pay the card fees for the organization, check "I'd like to cover the processing fees". It shows how much it adds.
- Click "Continue to Payment — …". The amount is your total.
- Under "Complete Your Purchase", "Card" is chosen. Enter the "Card number", "Expiration date" and "Security code". Check the "ZIP code".
- "Save my information for faster checkout" is checked to start. It saves your details with Stripe's Link service. Uncheck it if you don't want that.
Important: the next click charges the card.
- Click "Pay $… now" at the bottom.
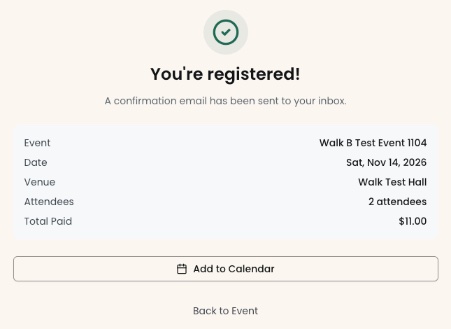
- You'll see "You're registered!" and "A confirmation email has been sent to your inbox.", with the event, date, number of attendees and "Total Paid". That means it worked.
If a required field is empty, the field turns red with a line such as "Phone number is required". Fill it in and click "Continue" again.
The steps along the top read "Your Selections", "Contact Info", "Attendees" and "Payment". A "Waivers" step is added when the event has one.
Use a presale code before tickets go on sale
- Open the event's link. Instead of tickets, it says "Tickets go on sale …" or "Tickets are not on sale yet".
- If it says "Have a presale code? Enter it below to book now.", type the code in "Presale code".
- Click "Apply". You'll see "Your code unlocked early access to the tickets below."
- Choose tickets and follow "Buy tickets" from step 2.
Join the waitlist
When a ticket is sold out, it shows "Sold Out" in red. If the event has a waitlist, a "Join the waitlist" link appears next to it, on the same line.
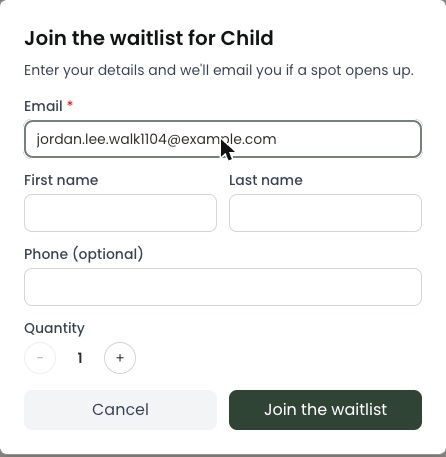
- Next to "Sold Out", click "Join the waitlist". A box called "Join the waitlist for …" opens, with the ticket's name.
- In "Email", type your email address.
- Type your "First name" and "Last name". "Phone (optional)" can be left blank.
- Next to "Quantity", use the minus (−) and plus (+) buttons to choose how many tickets you want.
- Click "Join the waitlist" at the bottom of the box.
- You'll see "You're on the waitlist!" and "We'll email you if a spot opens up.". Click "Done". That means it worked.
If something is missing, the box says so, for example "Please enter your email address.". If it says "Something went wrong. Please try again.", click "Join the waitlist" again.
When a waitlist spot opens
- The buyer gets an email titled "A spot has opened for …". It says when the offer expires.
- They click "Complete my registration" in the email.
- The event page opens with "You've been offered a spot…". They finish checkout as in "Buy tickets".
- If they don't finish by the deadline in the email, the spot goes to the next person on the waitlist.
Special cases
- "Registration has not opened yet" or "Registration opens …": nothing can be booked until then.
- "Registration is closed" or "Registration for this event has closed.": the event no longer takes bookings.
- A ticket marked "Available" has no limit on how many can be sold.
- The "Promo code" box appears only while the event has a working code.
If you make a mistake
- Wrong number of tickets before paying: click "Back" at the top left of the step and change them.
- After paying: the buyer can't change or cancel the order themselves on this page. Your staff can, from the event's "Orders" tab. See Edit a guest or change a ticket type and Cancel or refund an event order.