


Who can do this: Owner, Administrator and Programs. Finance, Fundraiser, Front desk and Viewer users can open the "Waitlist" tab and see who is on it, but they don't see the buttons.
Quick steps: Events › Events › the event › "Settings" › "Edit" › turn on "Waitlist" › "Save Changes". Then "Waitlist" tab › "Promote next-in-queue", or the three dots (⋯) on a row › "Promote this entry" or "Remove from waitlist".
Before you start
- You need an Owner, Administrator or Programs login.
- The event needs at least one ticket type with a limit on how many can be sold. To set one up, see Create an event and tickets.
- To promote someone means to offer them a spot. Clerestory emails them a link to buy their tickets before the offer runs out.
- A waitlist is the line of people who asked to be told when a sold-out ticket type or sponsorship opens up.
Turn the waitlist on
Page: /dashboard/campaigns/<campaignId>?tab=settings
- In the left-hand menu, under "Fundraising", click "Events". Then click "Events" in the list that opens below it.
- In the list of events, click the event's name.
- Click the "Settings" tab in the row of tabs near the top. It is the last tab, on the second line.
- At the top right, next to "Event Settings", click "Edit".
- Scroll down to "Waitlist", inside the "Venue & Details" box. Click the switch at the left of "Let people join a waitlist when tickets or sponsorships sell out".
- Optional: in "Waitlist Cap (Optional)", type the most people who can wait at once, for example 20. Leave it blank for no limit.
- Scroll down to the end of the settings, just above "Embed code", and click "Save Changes" at the right.
- You'll see "Event settings saved successfully". Under "Waitlist" it now reads "Enabled — no cap" or "Enabled — capped at 20". That means it worked.

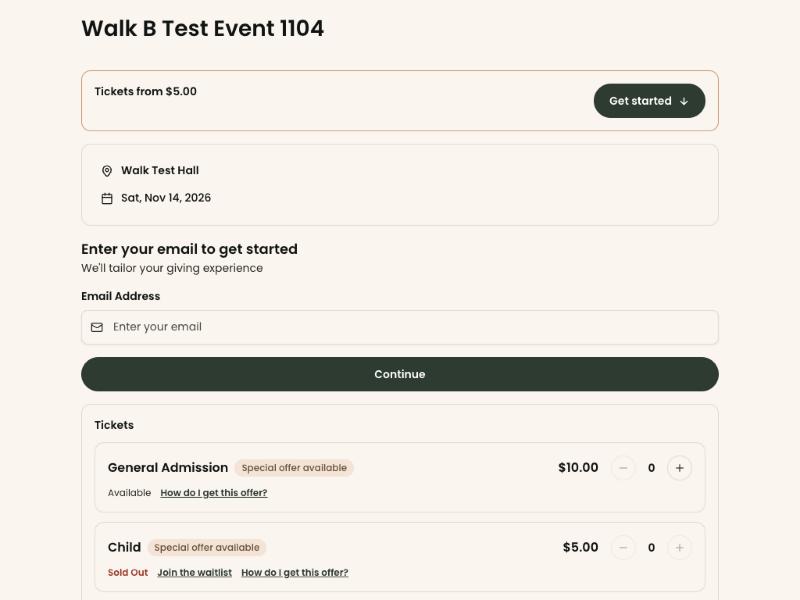
From now on, when a ticket type sells out, your event page shows "Sold Out" with a "Join the waitlist" link beside it. People who join see "You're on the waitlist!".
See who is waiting
Page: /dashboard/campaigns/<campaignId>?tab=waitlist
- Open the event, as in steps 1 and 2 above.
- Click the "Waitlist" tab in the row of tabs near the top.
- Above the table you'll see how many entries there are, for example "4 waitlist entries".
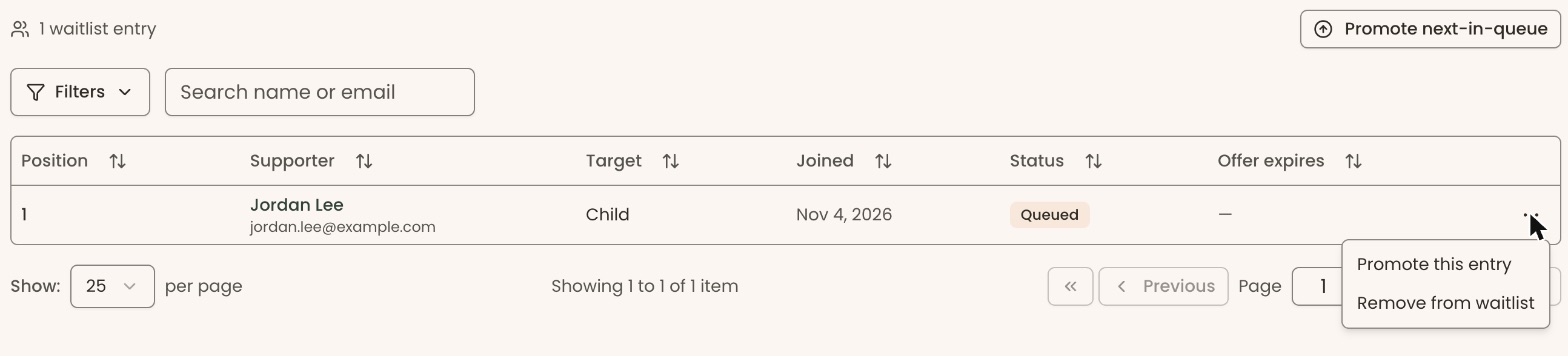
- Each row shows the person's "Position" in line, their name ("Supporter"), what they are waiting for ("Target"), when they "Joined", their "Status" and when the offer expires ("Offer expires").
- To find someone, type a name or email in "Search name or email".

If no one has joined, you'll see "No one is on the waitlist."
Offer a spot to the next person in line
Use this when a spot has opened up, for example after a cancellation.
Important: "Promote next-in-queue" emails the person at the front of the line right away, with a link to buy their tickets. The offer runs out after a set time, shown in "Offer expires".
- On the "Waitlist" tab, at the top right, click "Promote next-in-queue". You only see it when someone is waiting.
- You'll see "Promoted the next entry in the queue." Their "Status" changes to "Offered". That means it worked.
- If you see "No queued entry fits available capacity right now.", there aren't enough free spots for the next person yet. Nobody was emailed.
Offer a spot to a particular person
Use this to skip someone ahead of the line.
- On the "Waitlist" tab, find the person's row.
- At the far right of the row, click the three dots (⋯).
Important: "Promote this entry" emails this person right away, with a link to buy their tickets.
- Click "Promote this entry". You only see it while their "Status" is "Queued".
- You'll see "Promoted Jordan Lee." and their "Status" changes to "Offered". That means it worked.
- If you see "Failed to promote entry.", there may not be enough free spots for the number of tickets they asked for. Check the ticket type's limit on the "Tickets" tab.
Remove someone from the waitlist
- On the "Waitlist" tab, find the person's row.
- At the far right of the row, click the three dots (⋯).
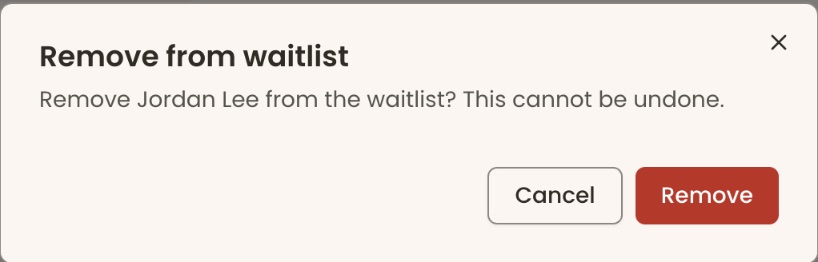
- Click "Remove from waitlist". A box opens called "Remove from waitlist".
Important: Removing someone can't be undone. If their status was "Offered", their spot is offered to the next person in line, who is emailed right away.
- Click "Remove".
- You'll see "Removed from waitlist" and their "Status" changes to "Canceled". That means it worked.
If you see "Failed to remove from waitlist", try again.
What the labels mean
- Queued: waiting in line. Not offered a spot yet.
- Offered: emailed an offer and has until "Offer expires" to buy.
- Accepted: bought their tickets through the offer.
- Expired: didn't buy in time. They are emailed that the offer has ended.
- Canceled: removed from the waitlist.
- Offer expires: while an offer is open, shows the time left, for example "in 5h 20m". It turns amber under a day and red under an hour.
Special cases
- Spots offered without you. When an order is canceled (see Cancel or refund an event order) or an offer runs out, Clerestory offers the freed spot to the next person in line by itself.
- What the person sees. The email link opens your event page with "You've been offered a spot… complete checkout by…". If the offer has run out, they see "Waitlist Offer Unavailable".
- Rows with no three dots. People who are "Accepted", "Expired" or "Canceled" show a dash instead. Nothing more can be done for them.
- Turning the waitlist off stops new people joining. People already on it stay on the "Waitlist" tab.
If you make a mistake
An offer can't be taken back in the screens. To stop an offer, use "Remove from waitlist", but the next person in line is then offered the spot. A removal can't be undone; the person would need to join the waitlist again from your event page.