


Who can do this: Owner, Administrator and Programs. Finance, Fundraiser, Front desk and Viewer users can open a space and see these settings, but can't change them.
Quick steps: Rentals › "Spaces" › the space › "Settings" box › "Agreement": "Choose an agreement" › "Add". Then check "Insurance required", choose "Cancellation terms" › "Save space".
Before you start
- You need the Owner, Administrator or Programs role.
- The space must already exist. See Add a building and a space.
- Write the agreement first, in your waiver library. See Create a waiver and attach it to an event or class. Stop after the waiver is saved: you attach it to the space here.
- Decide your refund rules, for example a full refund 30 days or more ahead, half 7 to 29 days ahead, nothing after that.
- A rental agreement is the document a renter signs for their booking, such as your hall rental terms. A renter signs it once per booking.
- A renter is the person or group who rents one of your spaces.
Open the space
Page: /dashboard/rentals/spaces/<spaceId>
- In the left-hand menu, under "Programs & Sales", click "Rentals".
- In the row of tabs under the "Rentals" heading, click "Spaces".
- Click the space's name. The space's page opens.
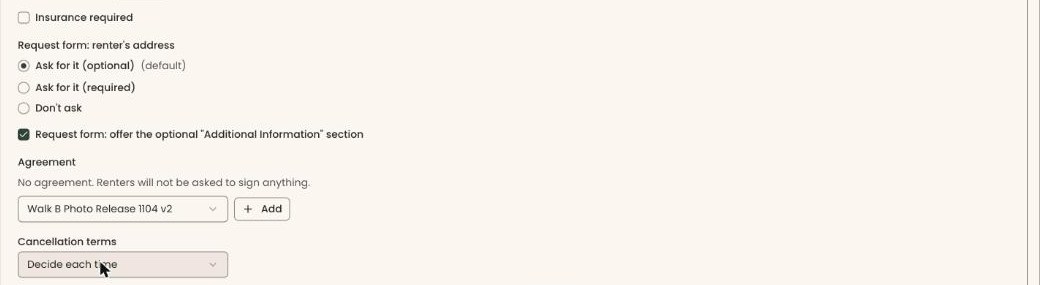
- Find the box headed "Settings". Scroll down in it: "Insurance required" is a checkbox just above "Request form: renter's address". "Agreement" and "Cancellation terms" are below "Request form: offer the optional "Additional Information" section".
Add a rental agreement
The agreement saves as soon as you click. You don't need "Save space" for it.
- Under "Agreement", it says "No agreement. Renters will not be asked to sign anything." if none is attached yet.
- Click the box that says "Choose an agreement", under "Agreement". Click your agreement. Each one shows its name and version, for example "Hall rental terms v1".
- Click "Add", to the right of the box.
- The agreement now shows in a row under "Agreement", with a "Required" switch turned on. That means it worked.

If you see "Write the agreement in Waivers first, then choose it here.", you have no waivers yet. Write one first. See Create a waiver and attach it to an event or class.
Renters now sign the agreement on their booking link. While "Required" is on, they can't confirm until they sign. They see "Please read and sign the rental agreement before you confirm." if they try.
Make an agreement optional
- In the agreement's row, click the "Required" switch to turn it off.
- It saves right away. Renters are offered the agreement but can confirm without signing. A booking's page then shows "Optional, not signed" until they do.
Remove an agreement
Important: The X removes the agreement from the space right away. Nothing asks you to confirm.
- At the right of the agreement's row, click the X.
- It is removed. If no agreement is left, you'll see "No agreement. Renters will not be asked to sign anything."
Require an insurance certificate
- In the "Settings" box, check "Insurance required".
- Scroll down. At the bottom right of the "Settings" box, below "Status", click "Save space".
- You'll see "Space saved". That means it worked.

Renters are now asked to upload an insurance certificate on their booking link. To see what they do, see What a renter does. To stop asking, uncheck it and click "Save space".
Set cancellation terms
Your cancellation terms are shown to renters under "Payment and cancellation" when they review their rental request, before they send it. When you cancel a booking, Clerestory suggests a refund from them. You can change the suggested amount each time.
- In the "Settings" box, click the box under "Cancellation terms". Choose one:
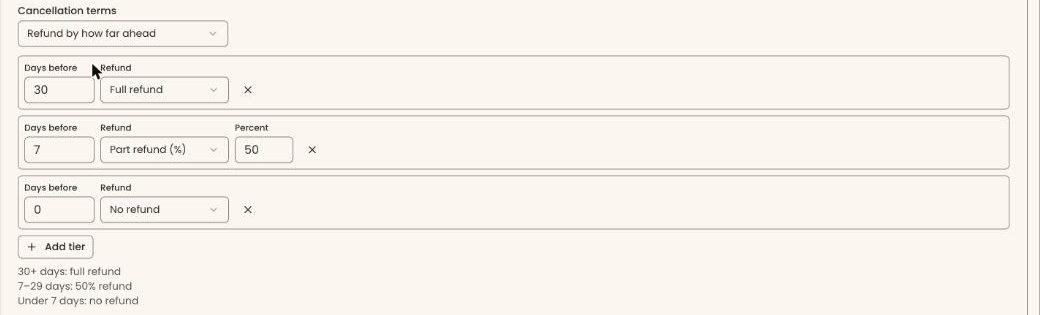
- "Refund by how far ahead": the refund depends on how many days before the booking it is canceled.
- "No refunds": nothing is refunded.
- "Decide each time": no terms. You choose the refund for each cancellation.
- If you chose "Refund by how far ahead", three rows appear. They start as: 30 days, "Full refund"; 7 days, "Part refund (%)" at 50; 0 days, "No refund".
- Change each row to suit you. In "Days before", type the days, for example 14. Under "Refund", choose "Full refund", "Part refund (%)", "Refund less a fee" or "No refund".
- For "Part refund (%)", type the percent in "Percent", for example 50. For "Refund less a fee", type the amount you keep in "Fee kept ($)", for example 25.
- To add a row, click "Add tier". It starts at 0 days and "No refund". Change its "Days before" if you already have a 0-day row.
- To remove a row, click the X at its right. For "Refund less a fee", "Fee kept ($)" starts at 0.
- Check the summary under the rows, for example "30+ days: full refund", "7–29 days: 50% refund", "Under 7 days: no refund". Make sure it reads the way you want.
Important: "Save space" saves everything in the "Settings" box at once, including "Status". If the space is published, renters see the new terms right away.
- At the bottom right of the "Settings" box, click "Save space".
- You'll see "Space saved". That means it worked.
If you see one of these in red above "Save space", fix it and click "Save space" again:
- "Cancellation terms need a last tier at 0 days, for a cancellation on the day." Add a row at 0 days.
- "Two tiers both start at 7 days. Each tier needs its own number of days." Change one row's days.
- "A percentage tier needs a whole percentage from 0 to 100."
- "A fee tier needs the amount kept, $0 or more."
- "Cancellation terms can have at most 10 tiers." Remove a row.
Special cases
- Deposits. A refundable security deposit is always returned in full if the renter cancels. The public page says so.
- Weekly bookings. Each date is counted back on its own.
- Accepting a certificate. When a renter uploads one, review it on the booking's page. See Accept or reject an insurance certificate.
Buttons to avoid
- The X next to an agreement removes it at once.
- The X next to a refund row removes that row. It isn't saved until you click "Save space".
If you make a mistake
- An agreement removed by mistake: choose it again and click "Add".
- Cancellation rows changed by mistake: reload the page before you click "Save space". Your unsaved changes are dropped.
- Terms saved by mistake: change them back and click "Save space" again.