


Who can do this: Owner, Administrator and Programs. Front desk users can also click "Email everyone missing" on a class's or event's "Waivers" tab, but can't create, change or attach waivers. Other roles can open the waiver library but can't create, change or attach waivers.
Quick steps: Operations › Waivers › "New waiver template" › name it › "Create template" › write it › "Save changes". Then the class or event › "Waivers" tab › "Attach from library" › "Attach"
Before you start
- You need an Owner, Administrator or Programs login.
- Have the waiver text ready to paste, or a web link to a PDF of it.
- Decide how people agree: by checking an "I agree" box, or by typing their full name.
Create the waiver
Page: /dashboard/waivers
- In the left-hand menu, under "Operations", click "Waivers". The "Waivers & Disclosures" page opens.
- At the top right, next to "Export all acks (CSV)", click "New waiver template". A box opens called "New Waiver Template".
- In "Template name", type a name, for example "Photo Release Waiver".
- Under "Display mode", "Inline text" (the text shows on the registration form) is chosen to start. Click "PDF link" instead to show a link to a PDF.
- Click "Create template". The waiver's own page opens.
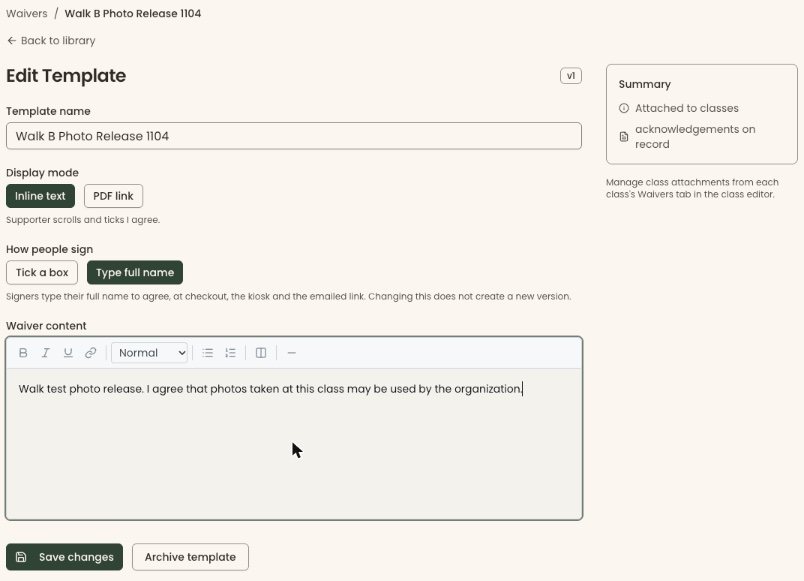
- Under "How people sign", "Tick a box" is chosen to start. Click "Type full name" if people should type their name instead.
- In "Waiver content", paste the waiver text. For "PDF link", paste the web address of the PDF in "PDF URL" instead.
- Below the text, click "Save changes".
- You'll see "Changes saved." or "Saved · new version v2". That means it worked.

If it didn't work:
- "Template name is required." means the name is blank.
- "PDF URL is required for PDF link mode." means the PDF address is blank.
- "Failed to create waiver template. Please try again." or "Failed to save changes. Please try again." means it didn't save. Try again.
Attach it to a class
Page: /dashboard/classes/<classId>?tab=waivers
- In the left-hand menu, under "Programs & Sales", click "Classes & Camps". Then click "Classes" in the list that opens below it.
- Click the class's name, then the "Waivers" tab in the row of tabs near the top.
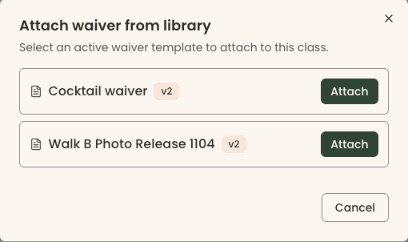
- In the "Attached waivers" box, at the top right, click "Attach from library". A box opens called "Attach waiver from library".
Important: an attached waiver is required right away. Anyone registering must agree to it before they can pay.
- Next to the waiver's name, click "Attach".
- You'll see "Waiver attached to class", and the waiver shows in the list with "Required". That means it worked.
If it didn't work, you'll see "Failed to attach waiver". Try again.
Attach it to an event
Page: /dashboard/campaigns/<campaignId>?tab=waivers
- In the left-hand menu, under "Fundraising", click "Events". Then click "Events" in the list that opens below it.
- Click the event's name, then the "Waivers" tab in the row of tabs near the top.
- Follow steps 3 to 5 of "Attach it to a class". You'll see "Waiver attached to event".
Make a waiver optional, or once per order
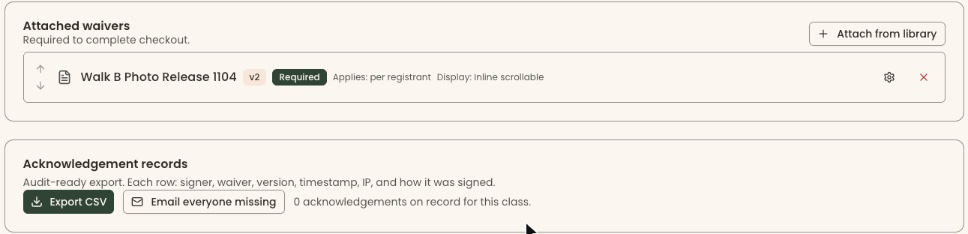
- On the "Waivers" tab, in the waiver's row, click the gear button at the right. A box opens called "Configure: …".
- Switch "Required" off to make it optional.
- Under "Applies scope", choose "Per registrant" (for an event, "Each attendee") or "Once per order".
- Change "Display mode override" only if this class or event needs a different display from the library.
- Click "Save".
- You'll see "Attachment configuration saved". That means it worked.
Ask people who haven't signed
You can do this with an Owner, Administrator, Programs or Front desk login. To record a paper waiver, or email one family, see Record a paper waiver, or email a link to sign online.
Important: clicking "Email everyone missing" emails your supporters right away. Everyone registered who is missing a required waiver gets an email with a signing link. An email can't be unsent.
- On the "Waivers" tab, in the "Acknowledgement records" box, click "Email everyone missing".
- You'll see "Signing links sent to … people." or "Nobody is missing a required waiver.". That means it worked.
"Email everyone missing" is grayed out while nobody is registered.
Special cases
- Editing a waiver's text makes a new version (shown as "v2", "v3"). People who already signed keep the version they signed.
- Changing "How people sign" does not make a new version.
- "All available templates are already attached to this …" means every waiver in your library is already on it.
- "No waiver templates exist yet. Create one in the waiver library." means you need to create one first.
- To download every signature for your records, click "Export all acks (CSV)" on the "Waivers & Disclosures" page. This needs the export permission (Owner, Administrator, Finance or Fundraiser).
Buttons to avoid
- "Archive template" on a waiver's page retires the whole waiver from your library. It can't then be attached to anything new.
- The red X at the far right of an attached waiver's row (to the right of the gear) removes it from that class or event at once, with no box to confirm.
If you make a mistake
- Attached the wrong waiver: click the red X at the far right of its row, to the right of the gear. You'll see "Waiver removed from class" (or "event").
- Wrong text: fix it on the waiver's page and click "Save changes". New registrations see the new version.