


Who can do this: Owner, Administrator, Finance, Programs and Front desk. Fundraiser and Viewer users can see the "Insurance" line and click "View", but don't see "Accept", "Reject" or "Upload for the renter".
Quick steps: Rentals › "Bookings" › the booking › "Insurance" › "View" › "Accept". Or "Reject" › "Reason" › "Reject".
Before you start
- You need the Owner, Administrator, Finance, Programs or Front desk role.
- An insurance certificate is a document from the renter's insurer showing they are covered for the event. Renters upload it on their booking link.
- A booking asks for one only when its space has "Insurance required" checked in the space's settings. Otherwise the booking shows "Not required". See Require an agreement, insurance and cancellation terms for a space.
- The "Insurance" line appears on a booking only once it has been approved. See Approve or decline a rental request.
- Have the event's dates ready, so you can check the certificate covers them.
Find the certificate
Page: /dashboard/rentals/bookings/<bookingId>
- In the left-hand menu, under "Programs & Sales", click "Rentals".
- In the row of tabs under the "Rentals" heading, click "Bookings".
- In the search box ("Search references and renters"), type the renter's name or the booking reference, for example B-1042.
- Click the booking's reference. The booking's page opens.
- Scroll down past "Payments" to the "Agreement" line. The "Insurance" line is right under it.
- You'll see one of these:
- "Not uploaded yet": the space needs a certificate and the renter hasn't sent one.
- "Not required": the space doesn't ask for one.
- A label and the file's name. "Uploaded" means it is waiting for you to review it. "Accepted" or "Rejected" means someone already reviewed it.

Check the certificate
- On the "Insurance" line, click "View", next to the label. The file downloads to your computer. It doesn't open inside Clerestory.
- Open the downloaded file. It is a PDF, JPEG or PNG.
- Check the renter's name, the policy dates and anything your organization requires.
- If the renter gave the dates the policy covers, they show after the file name, for example "covers Nov 1, 2026 to Nov 30, 2026".
Accept a certificate
Accepting sends nothing to the renter. Their booking link then shows "Accepted" next to the insurance step.
Important: Accepting can't be undone in the screens. Once a certificate is accepted, no new one can be uploaded.
- Under the file name, click "Accept".
- The label changes to "Accepted". "Accept" and "Reject" disappear. That means it worked.

Reject a certificate
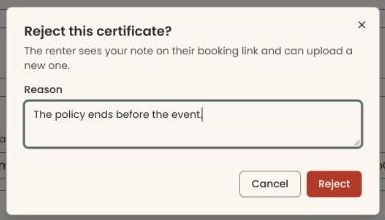
- Under the file name, click "Reject". A box opens called "Reject this certificate?". It says the renter sees your note on their booking link and can upload a new one.
- In "Reason", type what is wrong, for example "The policy ends before the event." The renter will read this.
Important: Rejecting can't be undone in the screens. The renter has to upload a new certificate.
- At the bottom right of the box, click "Reject". It stays grayed out until you type a reason.
- The box closes. The label changes to "Rejected", with your reason under it. That means it worked.

Rejecting doesn't email the renter. They see your reason the next time they open their booking link. To make sure they know, contact them yourself.
To change your mind before step 3, click "Cancel".
Upload a certificate for the renter
Use this when the renter sends you the certificate by email or on paper.
- Save the certificate on your computer as a PDF, JPEG or PNG, no larger than 10 MB.
- On the "Insurance" line, click "Upload for the renter". It shows only while the space needs a certificate and none has been accepted.
- In the window that opens, choose the file and click "Open". It uploads right away.
- The file appears on the "Insurance" line labeled "Uploaded".
- Check it and click "Accept", as above. A certificate you upload still needs accepting.
If you see "That file is too large. The limit is 10 MB.", make the file smaller and try again. If you see "Please upload a PDF, JPEG or PNG file.", save it in one of those formats.
Special cases
- More than one file. Each upload shows on its own row with its own label. Review each one.
- Reminders. About a week before a confirmed booking starts, if its space needs insurance and none has been accepted, Clerestory emails the renter a reminder. The "Rental insurance reminders" email can be turned off. See See which emails go out automatically, and turn one off.
- Knowing when a renter uploads. Your team is emailed "Insurance uploaded for rental …" when a renter uploads a certificate. This is the "Rental insurance alerts" staff email.
- Getting a task. In Settings › "Task Automation", the "Rental Insurance Missing" rule creates a task when a confirmed rental is about to start without an accepted certificate. It is off until you turn it on.
- The booking confirms without it. An accepted certificate isn't needed for the booking to be confirmed. Clerestory doesn't stop the event if one is missing.
- No "Accept" or "Reject" buttons. Your role can't review certificates, or the file has already been reviewed.
Buttons to avoid
- "Reject" on the "Insurance" line only opens the box. "Reject" inside the box is the one that rejects.
- "Cancel" in the box closes it without rejecting.
If you make a mistake
Accepting and rejecting can't be undone in the screens.
- Rejected by mistake: ask the renter to upload the certificate again on their booking link, or click "Upload for the renter" and upload it yourself. Then accept the new file.
- Accepted by mistake: the screens have no way to set it back. Once a certificate is accepted, no new one can be uploaded.