


Who can do this: Owner, Administrator, Finance and Fundraiser. Programs, Front desk and Viewer can open the Grants page and see the list, but don't see "Add a grant" or the three-dots (⋯) menu on each row.
Quick steps: Supporters › "Grants" › "Add a grant" › funder, name, dates › "Add grant" · when awarded: ⋯ › "Record the award" › amount › "Record the award"
Before you start
- You need the Owner, Administrator, Finance or Fundraiser role.
- The funder must already be in your records, as a supporter or a business. To add one, see Add a supporter or a contact.
- Have ready: the grant's name, the amount you're asking for, the application deadline and the date a report is due.
- The deadline and report date become tasks for the funder's relationship owner (the team member who looks after them). To set one, see Set up supporter levels and stages, assign owners, and work your portfolio.
- A grant is money you ask a foundation or other funder for. The funder is the foundation or person you ask. A supporter is anyone in your records who has given, joined, bought or registered.
Add a grant
Page: /dashboard/supporters/grants
- In the left-hand menu, under People, click "Supporters". A short list opens under it.
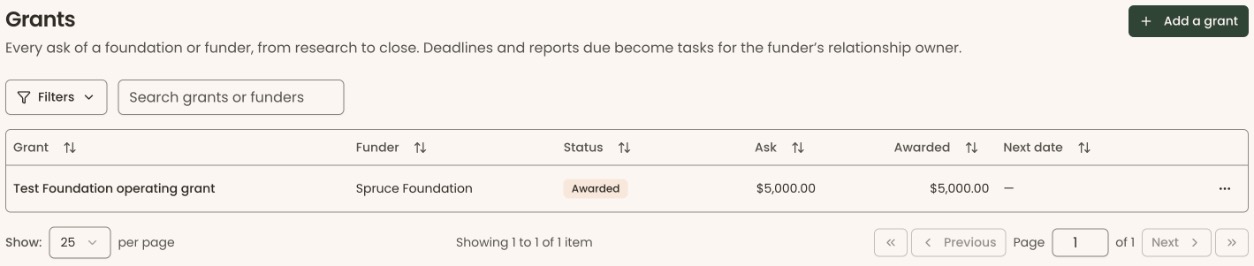
- Click "Grants". The page "Grants" opens.
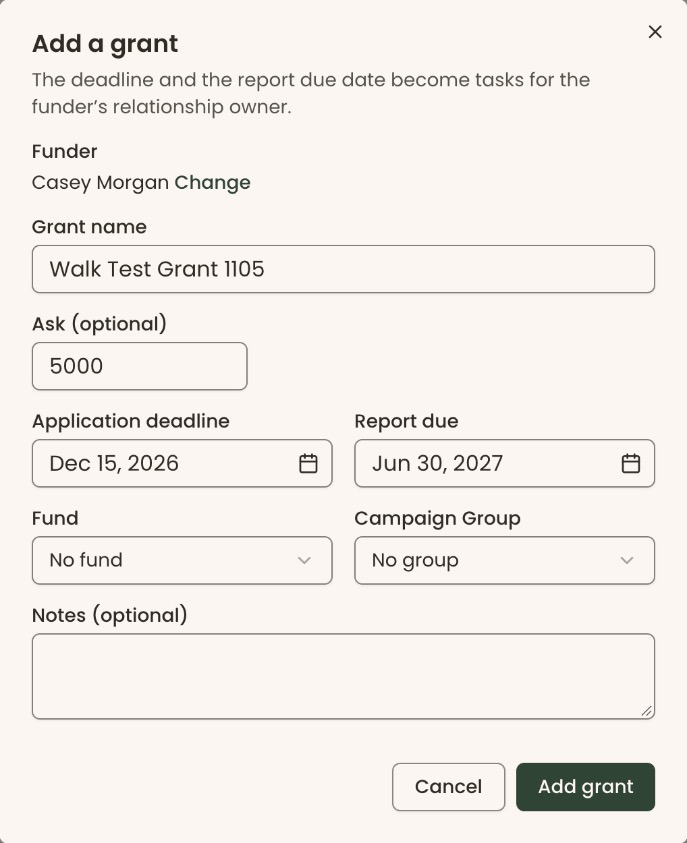
- At the top right of the page, click "Add a grant" (it has a plus sign). A box opens called "Add a grant".
- In "Funder", type at least two letters of the funder's name, for example "Spruce Foundation". Click the right one in the list. Its name then shows under "Funder", with "Change" beside it.
- In "Grant name", type a name, for example "2027 Education Grant".
- In "Ask (optional)", type the amount you are asking for, for example 5000.
- In "Application deadline", choose the date your application is due.
- In "Report due", choose the date your report to the funder is due, if you know it.
- In "Fund", choose the fund the money is for, or leave "No fund".
- If you see "Campaign Group", to the right of "Fund", choose one, or leave "No group".
- In "Notes (optional)", add anything useful.
- At the bottom right of the box, click "Add grant".
- You'll see "Grant added.". That means it worked. The grant is listed with the status "Researching".
- If you see "Choose the funder.", "Give the grant a name." or "The ask must be an amount in dollars.", fix that field and click "Add grant" again.
What happens to the dates
- While the grant is "Researching", Clerestory makes a task "Grant application due: …" on the deadline.
- Once it is "Awarded" or "Reporting", it makes a task "Grant report due: …" on the report date.
- The task goes to the funder's relationship owner. If they have none, it goes to your organization's Owner.
- If you change a date, the task's due date moves with it. When a date no longer applies, its task is closed.
- The tasks show under Operations › "Tasks". See Create, update and complete tasks.
Move a grant along
A grant moves forward only: "Researching" › "Applied" › "Awarded" or "Declined" › "Reporting" › "Closed".
- On the Grants page, find the grant's row.
- At the far right of the row, click the three dots (⋯).
Important: A status change can't be undone. A grant can't be moved back to an earlier status, and "Close" ends it for good.
- Click the next step. You only see the steps that fit the grant's status:
- "Researching": "Mark applied" or "Close" (if you decided not to apply).
- "Applied": "Record the award" (see below) or "Mark declined".
- "Awarded": "Mark reporting", or "Close" if no report is needed.
- "Declined" or "Reporting": "Close".
- You'll see, for example, "2027 Education Grant: Applied.". That means it worked.
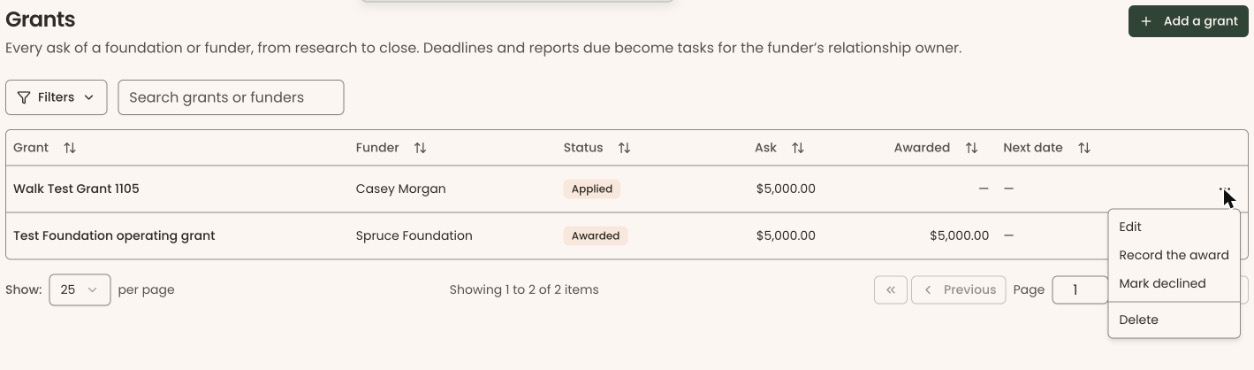
The "Next date" column shows the date that matters now: "Application due" or "Report due".
Record the award
Use this when the funder says yes. It marks the grant "Awarded" and records the money as a payment from the funder, like any gift you record. It then counts in your reports.
Page: /dashboard/supporters/grants
- Find the grant's row. Its status must be "Applied".
- At the far right of the row, click the three dots (⋯).
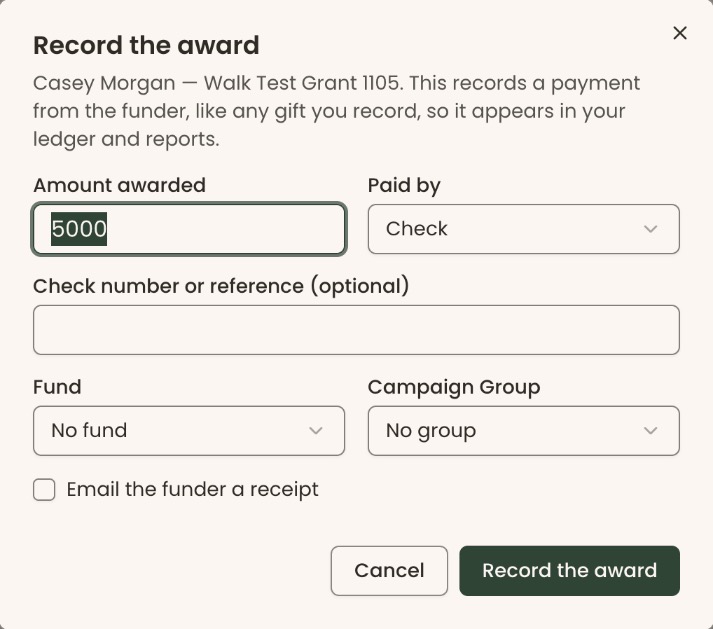
- Click "Record the award". A box opens called "Record the award".
- "Amount awarded" is filled in with the ask. Change it to the amount you were given, for example 4500.
- In "Paid by", choose "Check", "Bank transfer" or "Other". "Check" is chosen to start with.
- In "Check number or reference (optional)", type the check number or transfer reference.
- Check "Fund" and, if shown, "Campaign Group". They start with the grant's own choices.
- "Email the funder a receipt" is unchecked. Check it only if you want the funder emailed a receipt.
Important: Clicking "Record the award" adds the payment to your records right away. If "Email the funder a receipt" is checked, it also emails the funder a receipt. The award can't be removed from the grant afterwards.
- At the bottom right of the box, click "Record the award".
- You'll see "2027 Education Grant is awarded and the payment is recorded.". That means it worked. The "Awarded" column shows the amount. Click it to open the payment.
- If you see "Enter the amount awarded, in dollars.", type an amount above zero.
Change a grant's details
- Click the three dots (⋯) on the grant's row, then "Edit". A box opens called "Edit grant".
- Change any field. To pick a different funder, click "Change" next to the funder's name. Once an award is recorded, the funder can't be changed.
- Click "Save grant".
- You'll see "Grant saved.". That means it worked.
Special cases
- No "Record the award" in the menu. The grant isn't "Applied" yet. Use "Mark applied" first.
- No "Delete" in the menu. An awarded grant has a payment, so it can't be deleted. Use "Close" instead.
- Search and sort. Type in "Search grants or funders" to find a grant. Click a column heading to sort by it.
- The funder isn't in the list. The "Funder" box only finds people and businesses already in your records. Add the funder first.
Buttons to avoid
Important: "Delete" in the ⋯ menu deletes the grant at once. There is no "Are you sure?" box, and it can't be undone. Its open tasks are closed.
- "Delete": at the bottom of the ⋯ menu, under a line.
- "Close": closes the grant for good. A closed grant can't be moved again.
If you make a mistake
- Wrong details: use "Edit" and "Save grant".
- Moved to the wrong status: a grant can't be moved back in the screens. If no award has been recorded on it, you can delete it and add it again. "Delete" in the ⋯ menu deletes the grant at once, with no "Are you sure?" box.
- Recorded the wrong award amount: this can't be fixed from the Grants page. Click the amount in the "Awarded" column to open the payment.
- Deleted by mistake: add the grant again.