


Who can do this: Owner, Administrator, Finance, Fundraiser, Programs and Front desk can create, edit and complete tasks. Only Owner, Administrator and Fundraiser can delete them. Viewer can see tasks but doesn't see "+ New Task", and task details are read-only.
Quick steps: Tasks › "+ New Task" › "Title", "Assign to" › "Create Task" · to finish: ⋯ on the row › "Mark Complete"
Before you start
- You need one of the roles above.
- The person you assign it to must be on your team in Clerestory.
- Know the supporter's name if the task is about someone.
Create a task
Page: /dashboard/tasks
- In the left-hand menu, under Operations, click "Tasks".
- At the top right of the page, click "+ New Task".
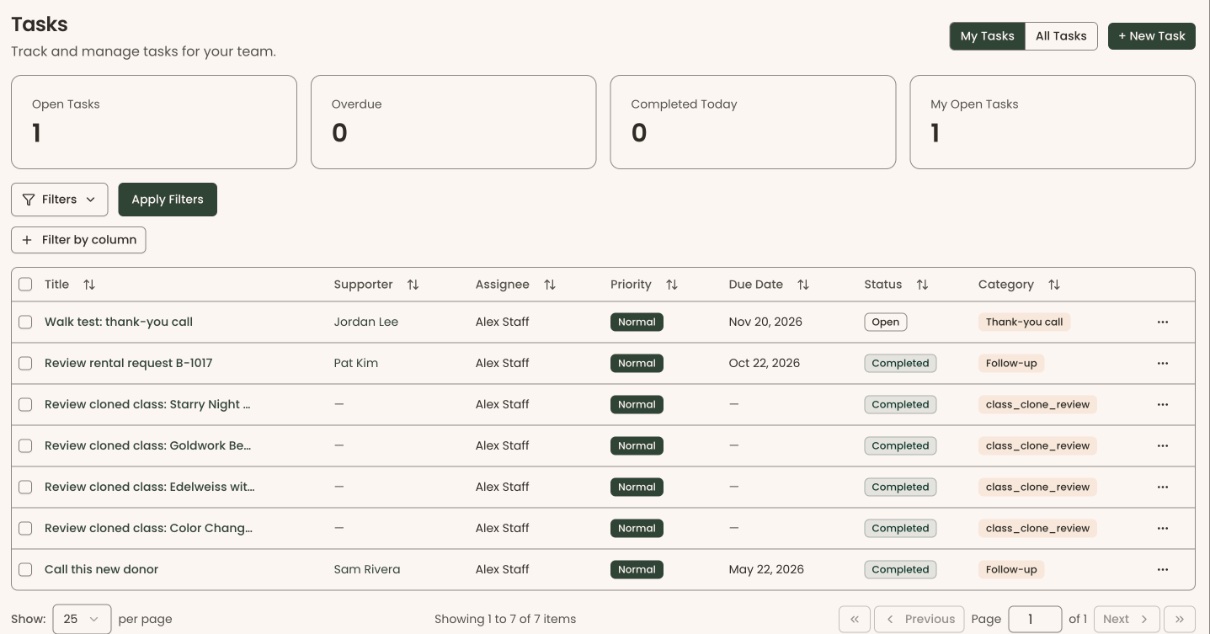
- A panel opens on the right called "Create Task".
- In "Title *", type what needs doing, for example "Thank-you call to Jordan Lee".
- In "Description", add any detail. It's optional.
- "Assign to *" starts with your own name. To give the task to someone else, click it and choose a team member.
- In "Supporter (optional)", type a name and click the right person in the list.
- In "Priority", choose "Low", "Normal", "High" or "Urgent". "Normal" is chosen to start with.
- In "Category", choose one, such as "Thank-you call" or "Follow-up". "General" is chosen to start with.
- In "Due Date", type the day it's due, for example Sep 24, 2026, or click the calendar icon at the right of the box.
Important: Clicking "Create Task" emails the person in "Assign to *" to tell them about the task. This happens even if you assign it to yourself.
- Click "Create Task" at the bottom of the panel.
- You'll see "Task created". That means it worked.
- If you see "Title is required" or "Assignee is required", fill in that box and click "Create Task" again.
Find your tasks
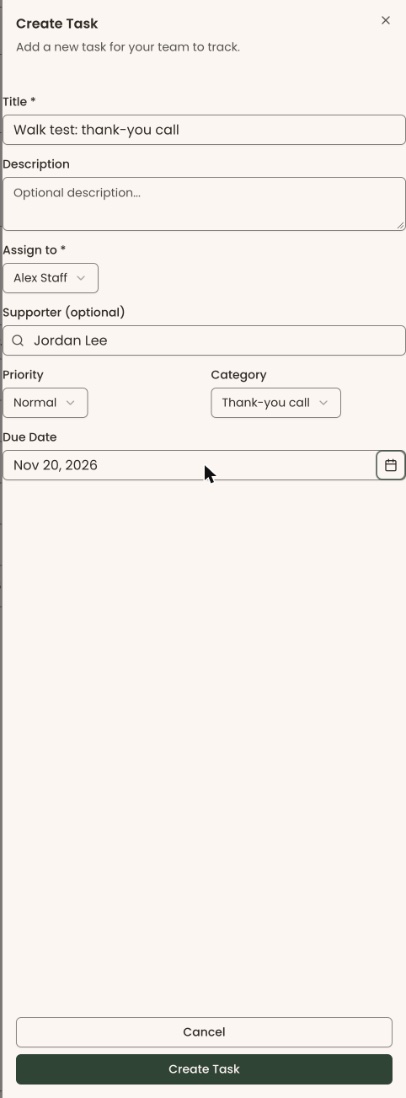
- At the top right of the Tasks page, left of "+ New Task", click "My Tasks" to see tasks assigned to you, or "All Tasks" to see everyone's.
- The boxes across the top show "Open Tasks", "Overdue", "Completed Today" and "My Open Tasks". These count all tasks, not only the ones in the filtered list.
- Click a column heading, such as "Due Date", to sort by it.
Mark a task complete
- Find the task's row.
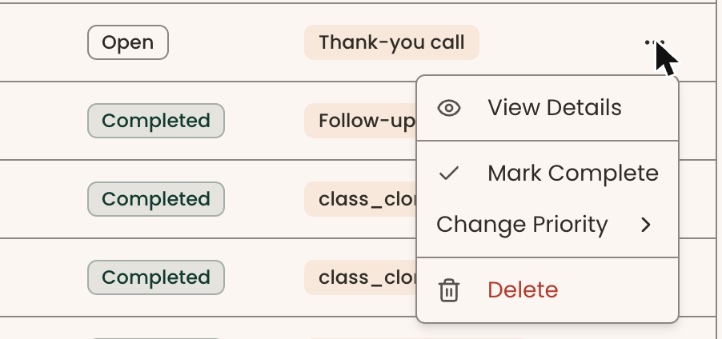
- At the far right of the row, click the three dots (⋯).
- Click "Mark Complete".
- You'll see "Task marked as complete". That means it worked.
To complete several at once, check the box at the left of each row. A bar appears above the list showing, for example, "3 selected". Click "Mark Complete" in that bar. You'll see, for example, "3 task(s) marked as complete".
Change a task
- Click the task's title, or click the three dots (⋯) and then "View Details".
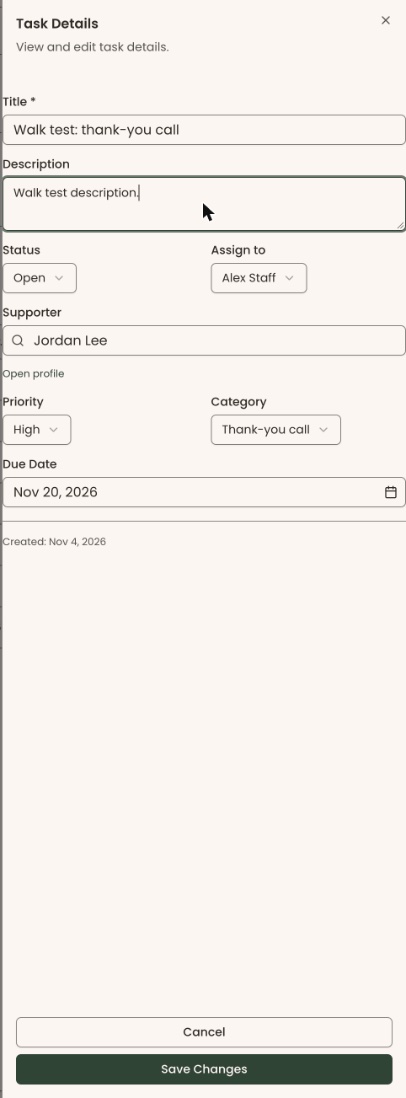
- A panel opens called "Task Details".
- Change "Title *", "Description", "Status", "Assign to", "Supporter", "Priority", "Category" or "Due Date".
Important: If you changed "Assign to", clicking "Save Changes" emails the new person to tell them about the task.
- Click "Save Changes".
- You'll see "Task updated". That means it worked.
To change only the priority: click the three dots (⋯), point to "Change Priority", and click the new one in the list that opens to its left. You'll see, for example, "Priority changed to High".
Tasks on a supporter's record
- Open the supporter's record: People › "Supporters" › "All Supporters", then click the eye button at the far right of their row, under "Actions".
- Below the giving totals, click the "Notes & activity" tab.
Important: Saving a new task emails the person it's assigned to.
- In the "Tasks" card, click "Create Task" to add one for this person.
- To finish one, click the check mark (✓) at the far right of the task. You'll see "Task completed".

Special cases
- Tasks made automatically. Some tasks are created by your organization's task automation. In "Task Details" they say "Auto-generated task" and what made them.
- Status choices are "Open", "In progress", "Completed" and "Canceled".
Buttons to avoid
Important: "Delete" removes the task at once. There is no "Are you sure?" box, and it can't be undone. To close a task without deleting it, set its "Status" to "Canceled".
- "Delete": in the ⋯ menu, and in the bar when rows are checked.
If you make a mistake
- Marked complete by mistake: open "Task Details", set "Status" back to "Open", and click "Save Changes".
- Wrong details: open "Task Details", fix them, and click "Save Changes".
- Deleted by mistake: this can't be undone in the screens. Create the task again.