


Who can do this: Owner, Administrator and Programs. Only these roles see the "Questions" tab. Finance, Fundraiser, Front desk and Viewer users can see a building's or space's "Booking limits" but don't see "Save limits".
Quick steps: Rentals › "Questions" › "Add question" › "Label", "Field type" › "Add field". Booking limits: Rentals › "Buildings" or "Spaces" › the building or space › "Booking limits" › "Per day", "Per week" › "Save limits".
Before you start
- You need the Owner, Administrator or Programs role.
- Rentals must be switched on. See Turn Rentals on and choose your rental settings.
- For a pick-list question, have the choices ready, for example "Wedding, Party, Meeting".
- A renter question is one question on your rental request form, such as "Will alcohol be served?". The same questions are asked for every space. Only your staff see the answers.
- A booking limit is the most bookings a building or space takes in one day or one week.
Add a renter question
Page: /dashboard/rentals/questions
- In the left-hand menu, under "Programs & Sales", click "Rentals".
- In the row of tabs under the "Rentals" heading, click "Questions". The "Rental request questions" page opens. (From the "Settings" tab, "Edit inquiry questions" opens the same page.)
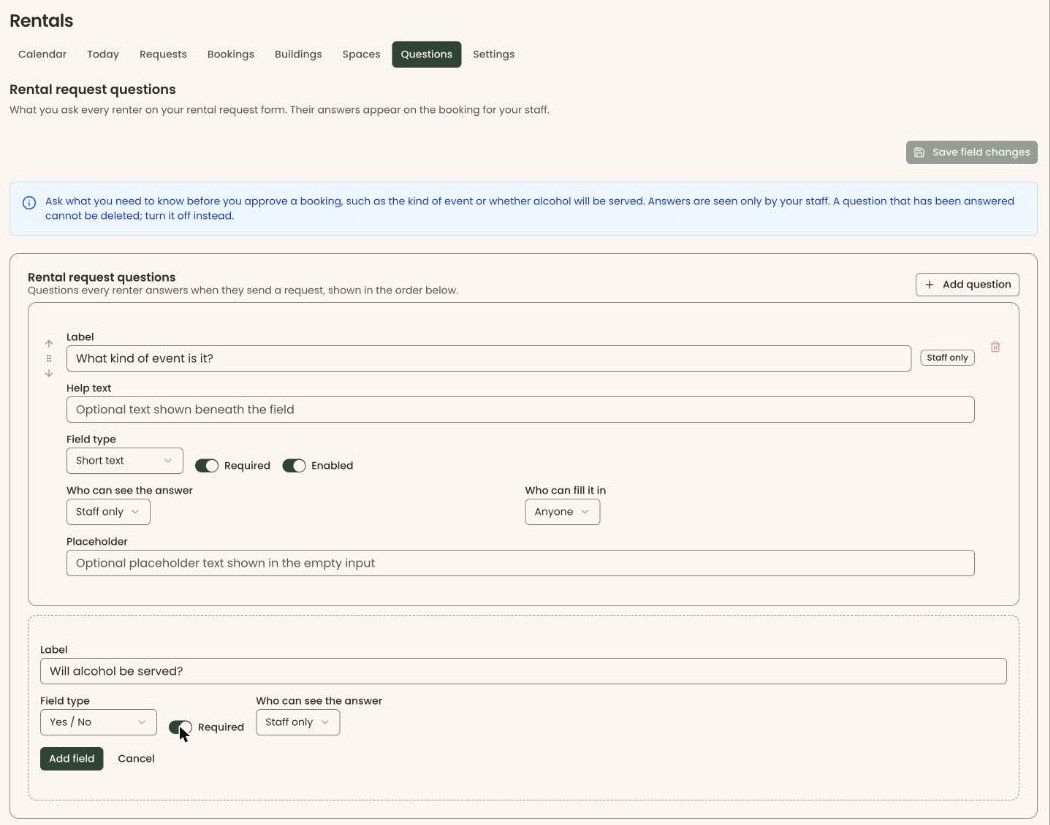
- In the box headed "Rental request questions", at the top right, click "Add question". A form opens at the bottom of the box, below the questions you already have.
- In "Label", type the question, for example "Will alcohol be served?".
- Click the box under "Field type" and choose one: "Short text", "Long text", "Single select", "Multi select", "Yes / No", "Number", "Date" or "Web link".
- If you chose "Single select" or "Multi select", type the choices in "Options (comma-separated)", for example "Wedding, Party, Meeting".
- To make renters answer before they can send a request, click the switch next to "Required".
- Leave "Who can see the answer" on "Staff only". It's the only choice.
- Click "Add field". It stays grayed out until "Label" is filled in.
- You'll see "Field added", and the question appears in the list. That means it worked.
From now on, renters see the question on your rental request form. Their answers appear on the booking's page under "Answers".
Change the order of the questions
Questions are asked in the order of the list.
- On the "Rental request questions" page, find the question.
- Click the small up arrow ("Move up") or down arrow ("Move down") at the left of it.
- It moves and saves right away.
Edit or turn off a question
- On the "Rental request questions" page, find the question in the list.
- Change what you need, for example its "Label", "Help text", "Placeholder" or "Required".
- To stop asking it, click the switch next to "Enabled" to turn it off. The question grays out and shows "Hidden" at the right of its label.
- At the top right of the page, a label shows how many changes you haven't saved, for example "1 unsaved change". Click "Save field changes" next to it.
- You'll see "Fields saved". That means it worked.
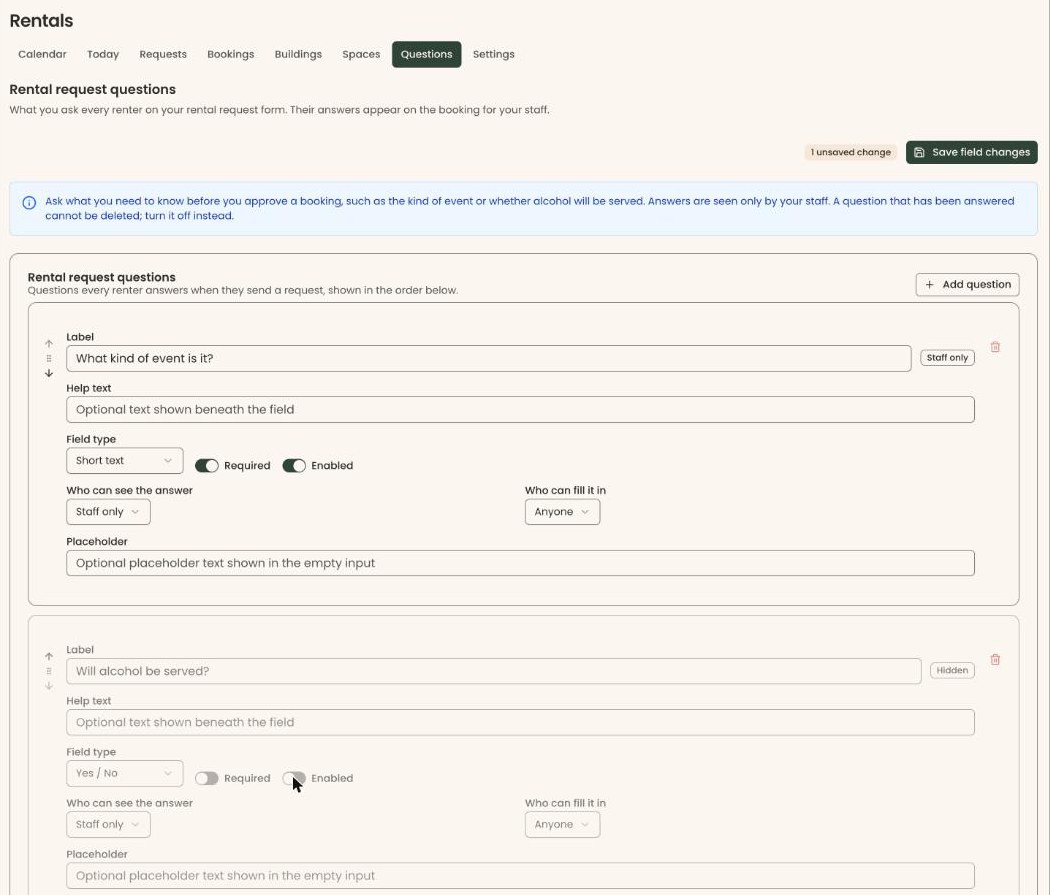
If you leave the page before clicking "Save field changes", your edits are lost.
Delete a question
You can only delete a question no renter has answered yet. Once it has answers, turn it off with "Enabled" instead.
- On the "Rental request questions" page, find the question.
- At the top right of its box, click the red trash can. If you can't click it, hold your pointer over it: it says how many stored answers use the question.
Important: A deleted question can't be brought back.
- A box called "Delete custom field" opens. It names the question and says "This question will no longer appear on your rental request form." Click "Delete".
- You'll see "Field "Will alcohol be served?" deleted". That means it worked.
Set booking limits for a building
A building's limits count bookings across all its spaces.
Page: /dashboard/rentals/venues/<venueId>
- In the row of tabs under the "Rentals" heading, click "Buildings".
- Click the building's name. The building's page opens.
- Scroll to the box headed "Booking limits", below the "Details" box and its "Save building" button.
- In "Per day", type the most bookings the building takes in one day, for example 3. Leave it blank for no limit.
- In "Per week", type the most in one week, for example 10. Leave it blank for no limit.
- Click "Save limits". It stays grayed out until you change a number.
- You'll see "Booking limits saved". That means it worked.

If you see "Enter a whole number of 1 or more, or leave it blank." in red under the boxes, fix the number. "Save limits" can't be clicked until you do. The week starts on the day set on the Rentals "Settings" tab.
Set booking limits for one space
Page: /dashboard/rentals/spaces/<spaceId>
- In the row of tabs under the "Rentals" heading, click "Spaces".
- Click the space's name. The space's page opens.
- Scroll to the box headed "Booking limits", below the "Settings" box.
- Fill in "Per day" and "Per week" as for a building, and click "Save limits".
- You'll see "Booking limits saved". That means it worked.
These limits are saved on their own. You don't need "Save space".
What happens at the limit
- Renters see a full day as unavailable on your rental pages.
- Your staff are warned with "Over the booking limit" when making or moving a booking. They can click "Book anyway" or "Go back". See Make a booking for someone.
Special cases
- To remove a limit, delete the number so the box is empty, and click "Save limits".
- Questions apply to every space. You can't ask different questions for different spaces. Each space can choose whether to ask for the renter's address and the "Additional Information" section. See Add a building and a space.
If you make a mistake
- A question turned off by mistake: turn "Enabled" back on and click "Save field changes".
- A question deleted by mistake can't be restored. Add it again with "Add question".
- A wrong limit: change it and click "Save limits" again.