


Who can do this: Owner, Administrator and Programs can add emails and turn automatic emails off. Saving a copy to your library needs an Owner or Administrator. Finance, Fundraiser and Viewer users can look but not change anything. Front desk users have no access to emails.
Quick steps: Events › Events › the event › "Emails" tab › "Add email" › "Start blank" › write it › "Next: when and who" › choose when and who › "Save", "Schedule" or "Send now"
Before you start
- You need an Owner, Administrator or Programs login.
- For an email timed from the start ("A number of days before or after it starts"), the event needs a date.
- Have the subject line and message ready.
- A buyer is the person who paid. An attendee is a person named on a ticket.
Open the Emails tab
Page: /dashboard/campaigns/<campaignId>?tab=emails
- In the left-hand menu, under "Fundraising", click "Events". Then click "Events" in the list that opens below it.
- In the list of events, click the event's name.
- Click the "Emails" tab in the row of tabs near the top.
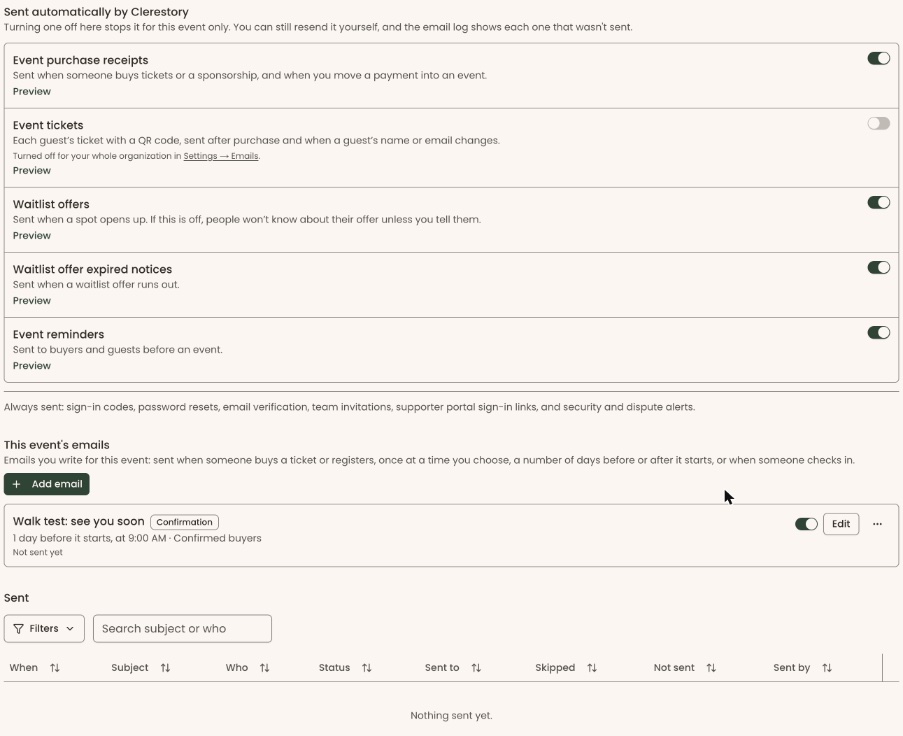
- The tab has three parts: "Sent automatically by Clerestory", "This event's emails" and "Sent".
Add an email
- Under "This event's emails", below its description, click "Add email" (on the left).
- In the menu that opens, click "Start blank". A box opens called "New email for …". It says "Step 1 of 2 · Write it".
- Fill in "Subject line" and "Message". A preview of the email shows on the right. To give it a "Name" for your team, or change its "Type" or "Letterhead", click "More options" below the message. Left blank, the name is the subject line.

Important: "Send me a test" emails a test copy of this email to you. It goes to no one else and doesn't save the email.
- To see it in your own inbox first, click "Send me a test". You'll see "Test email sent to …".
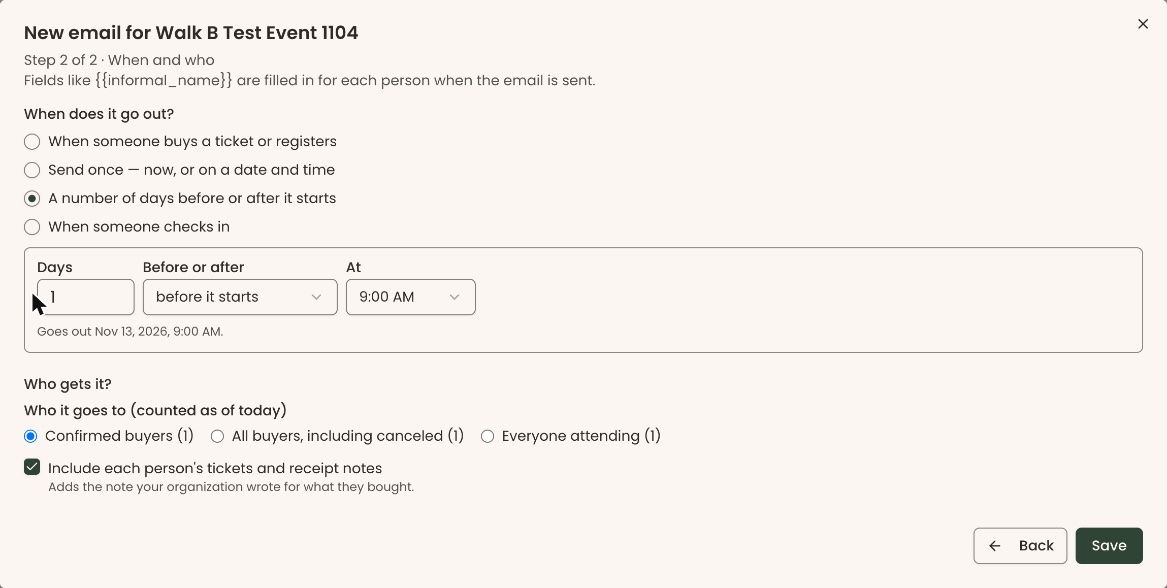
- Click "Next: when and who". The box now says "Step 2 of 2 · When and who".
- Under "When does it go out?", choose one of the options offered, such as:
- "When someone buys a ticket or registers"
- "Send once — now, or on a date and time"
- "A number of days before or after it starts" (then fill in "Days", "Before or after" and "At")
- "When someone checks in"
- Under "Who gets it?", choose who, for example "Confirmed buyers", "All buyers, including canceled" or "Everyone attending".
- Check the count in brackets beside each choice under "Who it goes to (counted as of today)". For a timed email, the line "Goes out …" under the days shows the date and time it will send.
Important: the next click turns the email on. A "when" email goes to everyone it applies to from now on. "Send now" emails everyone counted, and can't be called back.
- Click the button at the bottom right:
- "Save" for an email that goes out when something happens or on a schedule.
- "Schedule" for "Send once" on a date and time.
- "Send now" for "Send once" now. It then changes to "Send to … people?". Click it again to send.
- You'll see one of these messages, and the email appears under "This event's emails". That means it worked:
- "Saved." after "Save".
- "Scheduled for …" and the date and time, after "Schedule".
- "Sending to … people." after "Send to … people?".
To keep a send-once email without sending it, click "Save for later". You'll see "Saved. Send it from the list whenever you're ready.".
If it didn't work:
- "An email needs a subject line." means the subject is blank.
- "Set this event's date before adding an email timed from its start." means the event has no date. Add it on the "Settings" tab. See Edit, clone, archive or delete an event.
Add a letter or a series
- A letter is a printable letter rather than an email. Click "Add email", then "Start a letter". It works like an email, with a "Letterhead" choice in step 1. "Start a letter" appears only where "When someone buys a ticket or registers" is offered.
- Copy from your library starts from an email your organization has already written. Click "Add email", then "Copy from your library". Pick it in "Library email" and click "Copy and edit". Changing the copy never changes the library email. To manage your library, see Templates: start from an example, duplicate, archive; add emails to a donation form.
A series is several emails sent in steps, one after another.
- Click "Add email", then "Start a series". A box opens called "New series".
- Give it a "Name (optional)" and choose under "Starts when:": "Someone buys or registers" or "Someone checks in".
- Under "Then", "Step 1" starts on "Send an email". Click "Choose a template" under "Email template" and pick the email to send. Click "Add a step" for the next one.
- To stop the series for anyone who gives or renews, check "Stop when they, or anyone in their household, give or renew".
- Leave "Turned on" switched on.
Important: with "Turned on" switched on, the next click starts the series. Clerestory then emails each step automatically to everyone it applies to, from now on.
- Click "Save series". You'll see "Series saved.", and the series appears under "This event's emails" with a "Series" label.
To delete a series, click "Delete" at the right of its row, then "Delete" in the box. You'll see "Series deleted.".
Change, pause or delete one of your emails
- Under "This event's emails", find the email.
- To change it, click "Edit" (or "Edit or send" for a send-once email) and follow "Add an email" from step 3.
- To pause an email that goes out when something happens, switch it off with the switch on its row.
- To delete it, click the three dots (⋯) at the right of its row, then "Delete".
Important: deleting stops the email, and anything scheduled is canceled. What was already sent stays in the "Sent" list and the email log.
- In the box "Delete "…"?", click "Delete". You'll see ""…" deleted.".
The automatic emails
Under "Sent automatically by Clerestory" is each email Clerestory sends for this event, such as confirmations and reminders, with a line saying what it does.
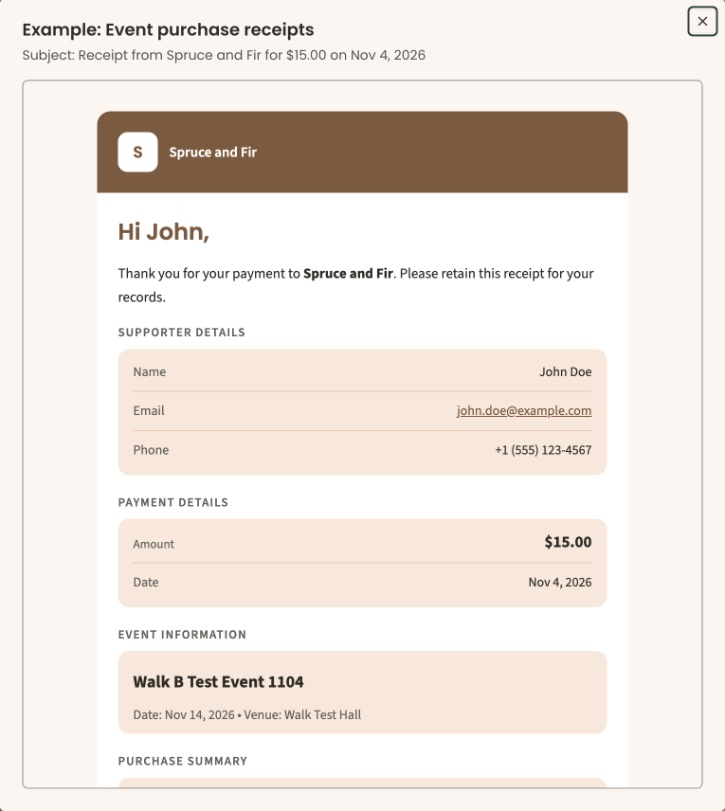
- To see what one looks like, click "Preview" under its name. A box opens called "Example: …", showing it sent to a made-up buyer.
- To stop one for this event only, switch it off with the switch at the right of its row.
- You'll see "… turned off for this event.". That means it worked. Switch it back on the same way.
This tab has no way to change the wording of an automatic email. Turning one off here doesn't stop you resending it yourself.
See who got an email
- Under "This event's emails", click the three dots (⋯) at the right of the email's row.
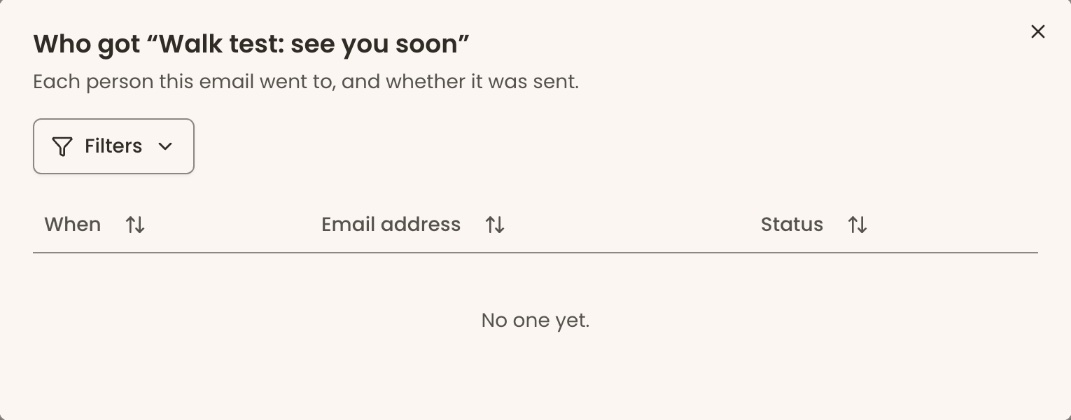
- Click "Who got it". A box opens called "Who got "…"", listing "When", "Email address" and "Status" for each person.
The "Sent" list at the bottom shows every email sent for this event, with "Subject", "Status", "Sent to", "Skipped", "Not sent" and "Sent by" ("Automatic" for ones Clerestory sent). Click "People" on a row to see who it went to.
Special cases
- "Turned off for your whole organization in Settings → Emails." means the automatic email is off everywhere. Its switch is grayed out here. See See which emails go out automatically, and turn one off.
- "Also sent for this event by your organization's rules" lists emails set up for all events. Change these in Communications.
- An email under "Sent" with the status "Scheduled" can be stopped: click "Cancel" on its row. You'll see ""…" won't be sent.".
Buttons to avoid
- "Save a copy to your library" (in the ⋯ menu) copies the email to your organization's library. It doesn't send anything.
- "Keep it" closes a delete box without deleting.
If you make a mistake
An email that has been sent can't be called back. A scheduled one can be canceled from the "Sent" list. A deleted email can't be restored; add it again.