


Who can do this: Owner, Administrator and Programs. Front desk, Finance, Fundraiser and Viewer can open these screens but can't change anything.
Quick steps: Events › Events › the event › "Auctions" tab › "Before" › "Guests & bidder numbers" › "Give them bidder numbers" › "Send phone bidding links". Then "Tables" › "Add table" › "Seat at…".
Before you start
- You need the Owner, Administrator or Programs role.
- Auctions must be on for the event. See Add auction items, sections and close times.
- Guests appear once tickets are bought or added. To add one yourself, see Register someone by hand.
- A bidder number is the number a guest bids with, for example #112. Several guests can share one number, and one card pays for everything bid on it.
- A phone bidding link is a personal link, sent by email, that lets a guest bid from their phone.
Give every guest a bidder number
Guests who buy tickets online usually get a number when they buy. This gives one to everyone still without one.
Page: /dashboard/campaigns/<campaignId>?tab=gala&area=before&screen=guests
- In the left-hand menu, under "Fundraising", click "Events". Then click "Events" in the list that opens below it.
- In the list of events, click the event's name.
- Click the "Auctions" tab in the row of tabs near the top.
- Click "Before", then click "Guests & bidder numbers" in the row of buttons below it.
- If some guests have no number, a box says "… guests have no bidder number yet." Click "Give them bidder numbers" in that box.
- You'll see "… guests given bidder numbers." The "#" column now shows each number. That means it worked.
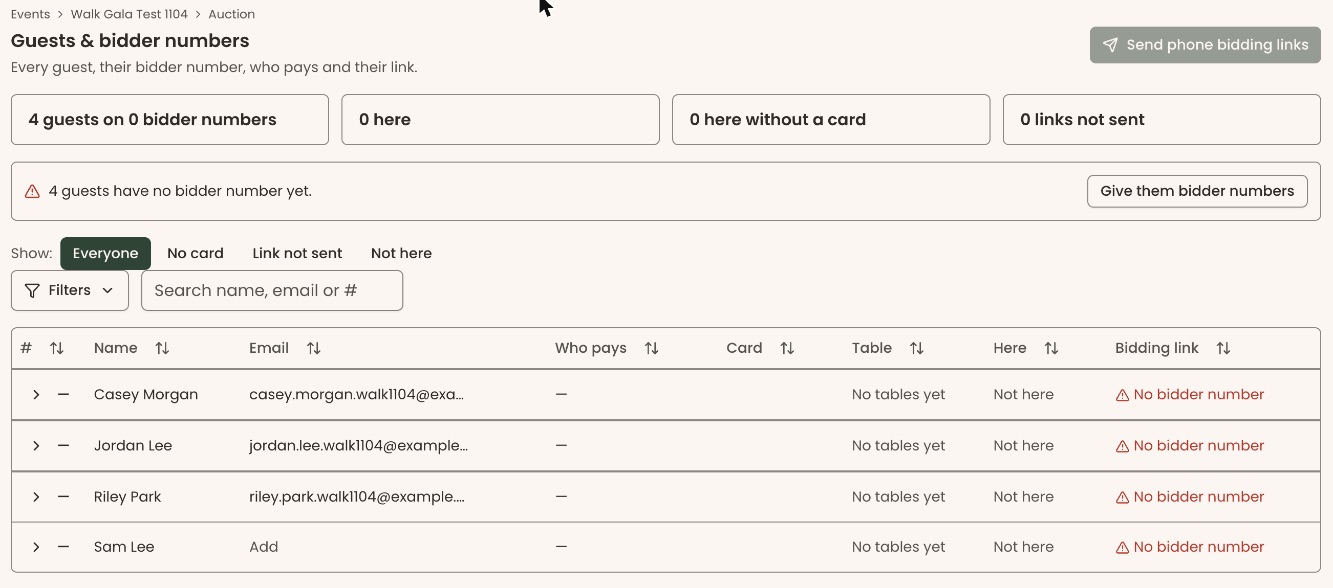
Each guest without a number gets their own number and is shown as paying for it, even guests who came on someone else's order. To put a party on one number, move them (see below).
Change who is on a number and who pays
Page: /dashboard/campaigns/<campaignId>?tab=gala&area=before&screen=guests
- In the guest list, click an empty part of the guest's row (not their name, email or table). A panel called "Bidder number #…" opens on the right.
- The panel shows "Card" first, then "People on this number". The person who pays shows "Pays".
- For anyone else, click the "On this card" box under their name and choose one. A guest just moved onto a number starts on "Covered up to an amount".
- "Shares …'s card": they bid on the payer's card with no limit. This saves as soon as you choose it.
- "Covered up to an amount": type the most they can bid in "Covered up to", for example 500, and click "Save".
- "Pays for this number": makes them the payer. You can't choose this once a card is on file.
- To move someone to a different number, click "Move to another number" under their name, type the number in the box that appears, for example 112, and click "Save". You'll see "… is now on #112.".
Important: "Give them their own number" gives the guest a new number that needs its own card. Anything already bid stays on the old number.
- To split someone off, click "Give them their own number", then "Give them their own number" again in the box that opens. You'll see "… now has bidder number #…".
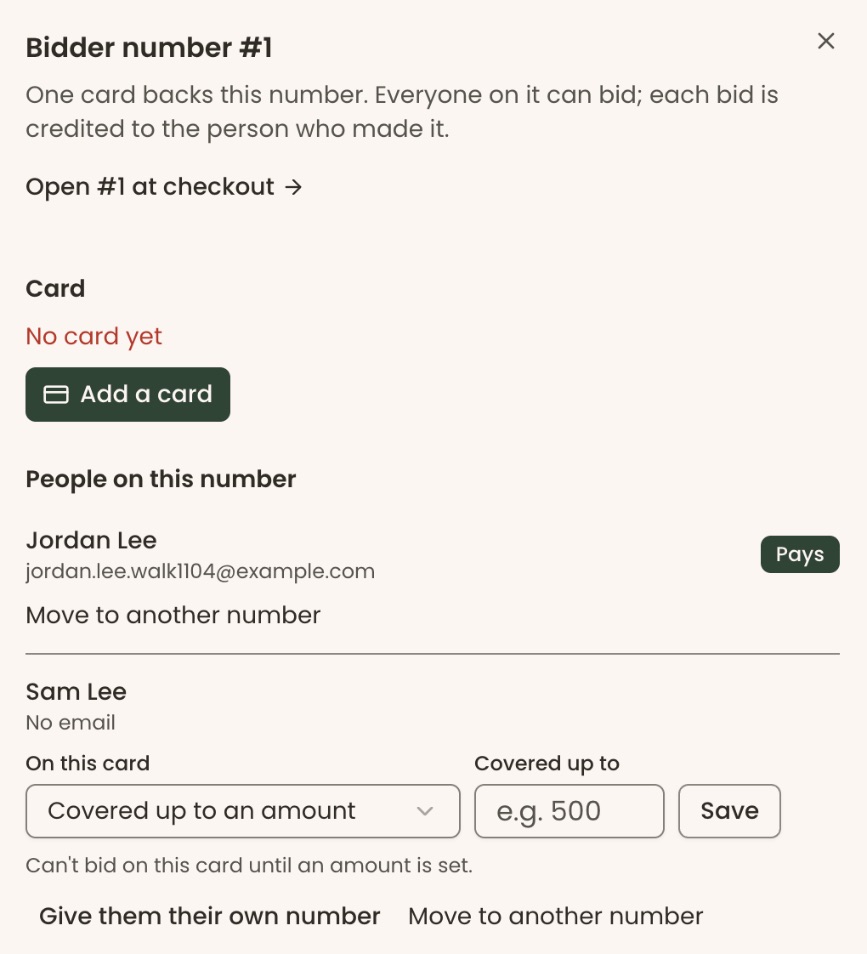
A guest set to "Covered up to an amount" with no amount shows "Can't bid yet" in the "Who pays" column.
Add a card to a number
- Open the number's panel as in step 1 above.
- Under "Card", click "Add a card" (or "Change the card"). A box called "Add a card for #…" opens. Nothing is charged now.
- If it asks "Who pays for #…?", click the person who pays.
Important: "Email a link to their phone" emails the payer their bidding link as soon as you click it.
- Choose "Use the card reader", "Type the card number" or "Email a link to their phone". The steps are the same as at check-in: see Check in gala guests.
Fix a guest's name or email
A guest needs a name and their own email before their bidding link can be sent.
- In the guest list, click the guest's name (or "Add" in the "Email" column).
- Type the change in the boxes that appear.
- Click "Save" next to the boxes. The row shows the new name or email. That means it worked.
If you see "That doesn't look like an email address.", check the address and try again.
Send phone bidding links
Page: /dashboard/campaigns/<campaignId>?tab=gala&area=before&screen=guests
- On the "Guests & bidder numbers" screen, look at the "Bidding link" column. "Not sent" means the guest is ready for a link.
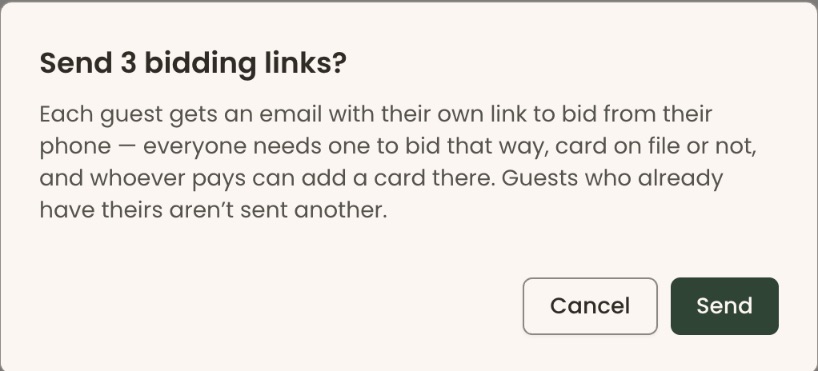
- At the top right, click "Send phone bidding links (…)". The number is how many guests will get one. A box opens asking "Send … bidding links?".
Important: clicking "Send" emails each of those guests their own bidding link right away. Guests who already have theirs aren't sent another.
- Click "Send".
- You'll see "… links sent." and the "Bidding link" column changes to "Sent" with the time, followed by "Resend". That means it worked.
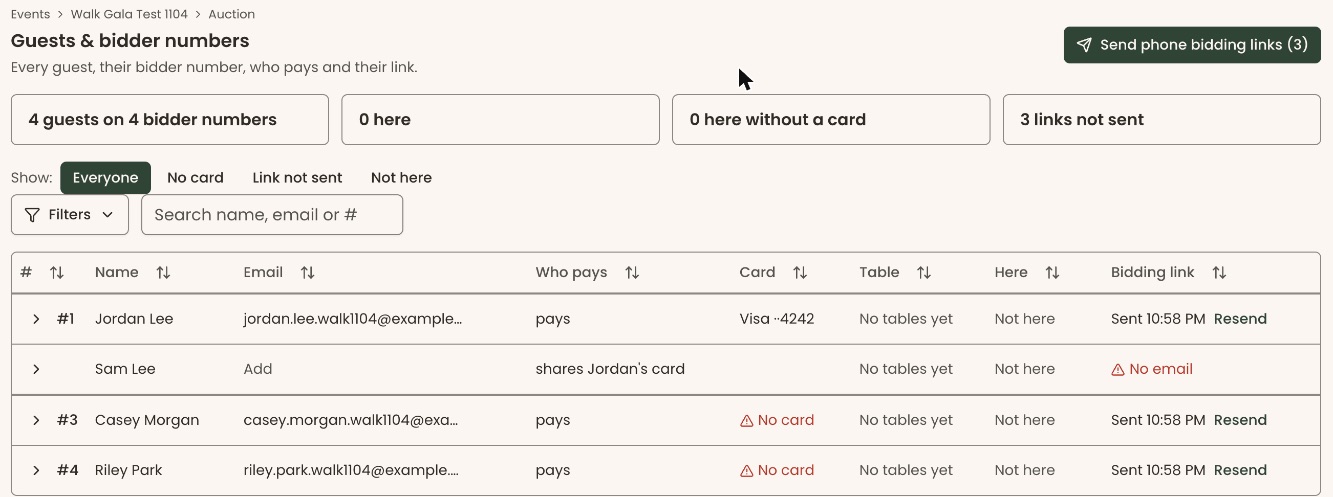
The "Sent" shows as soon as you click, before the email has actually gone. Reload the page a minute later: if a guest's row says "Not sent" again, their email did not go out. Check their email address, then click "Send" in their row.
Important: "Send" and "Resend" in a guest's row email that guest their bidding link as soon as you click.
To send one guest's link, click "Send" in their row. To send another copy, click "Resend". You'll see "Sent to …" or "Sent again to …".
If the "Bidding link" column shows a reason in red instead, fix it first:
- "No bidder number": give them a number (see above).
- "Unnamed" or "Unnamed (ask …)": add their name.
- "No email": add their email.
- "Same email as …": give this guest their own email.
- "Asked not to be emailed": this guest has opted out of email.
Add tables and seat guests
Page: /dashboard/campaigns/<campaignId>?tab=gala&area=before&screen=tables
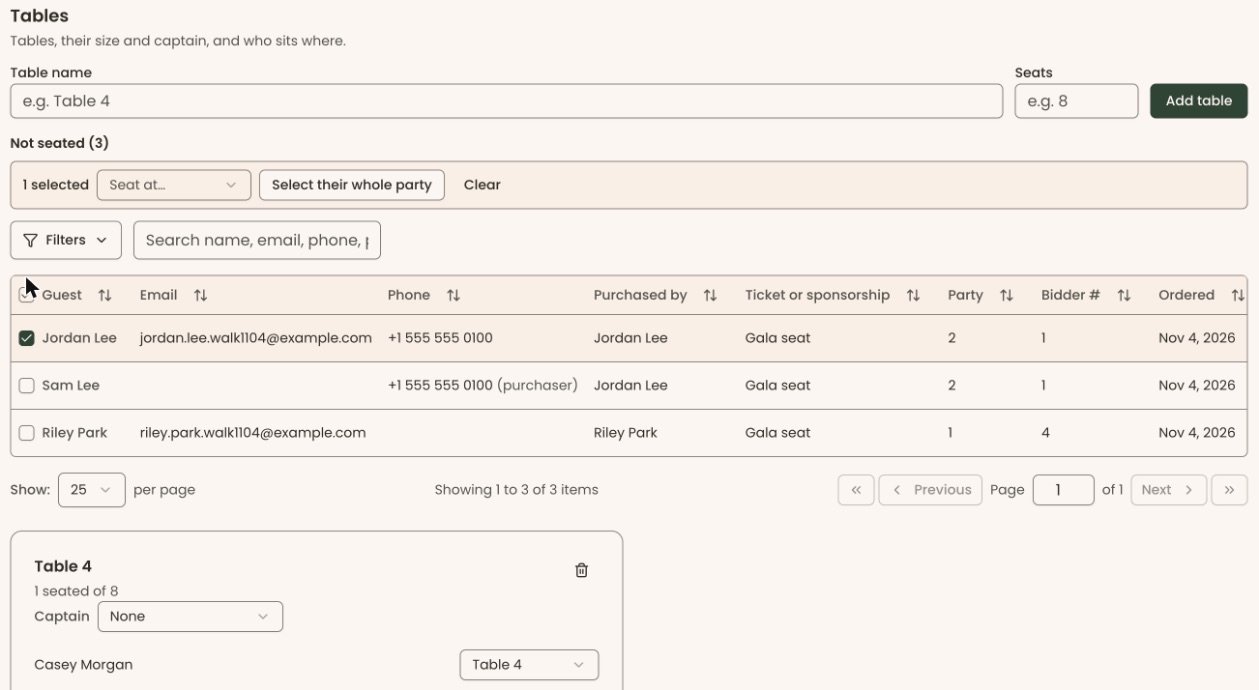
- On the "Auctions" tab, click "Before", then "Tables".
- In "Table name", type a name, for example "Table 4".
- In "Seats", type how many it seats, for example 8. You can leave it blank.
- Click "Add table". The table appears as a card below. That means it worked.
- Under "Not seated", find a guest. At the far right of their row, click "Seat at…" and choose the table. If you don't see "Seat at…", scroll the list sideways.
- To seat several at once, check the box at the left of each guest. A bar appears above the list, starting "… selected". Click "Seat at…" in that bar and choose the table. "Select their whole party" adds everyone on the same orders. "Clear" unchecks them all.
- The guest moves onto the table's card. When everyone has a table, "Not seated" says "Everyone has a table.".
- On a table's card, click the "Captain" box (it starts on "None") and pick one of its guests as table captain.
You can also seat a guest from the "Table" column on "Guests & bidder numbers".
If you see "There's already a table with that name.", choose another name.
Buttons to avoid
- The trash can icon at the top right of a table's card deletes the table. Its guests move to "Not seated"; nobody is removed from the event.
- "Open #… at checkout" in a number's panel opens the checkout desk for that number. It is for the night itself.
If you make a mistake
- A number, payer, table or seat can be changed again at any time on these screens.
- A bidding link that was sent can't be unsent. Click "Resend" if a guest lost theirs.