


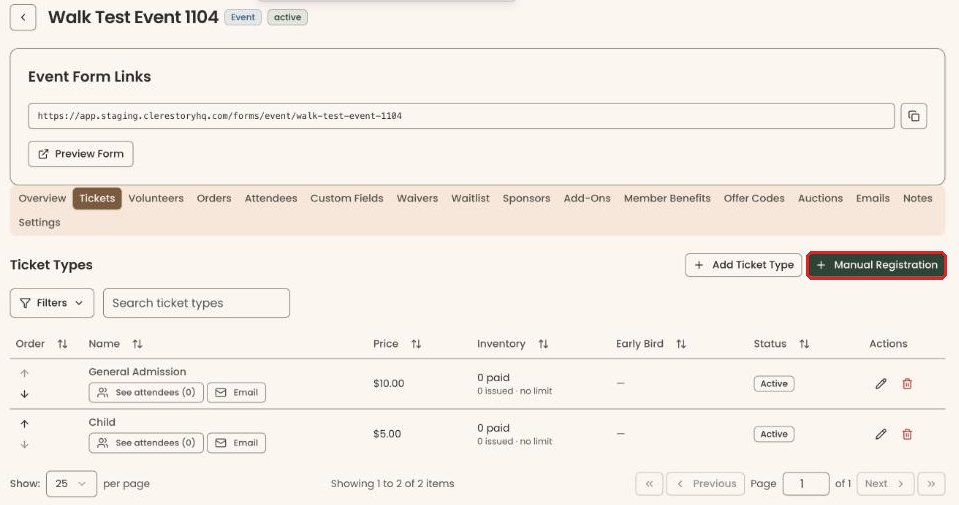
Who can do this: Owner, Administrator, Programs and Front desk. Other roles don't see the "Manual Registration" button.
Quick steps: Events › Events › the event › "Tickets" tab › "Manual Registration" › name, email, ticket, payment › "Register"
Before you start
- You need an Owner, Administrator, Programs or Front desk login.
- The event must already have the ticket type you need. See Create an event and add ticket types.
- Have to hand: the person's name and email address. An email is required.
- Have to hand: how they paid, the amount, and the check number if they paid by check.
- A comp is a free ticket you give away. It records $0.
Add the registration
Page: /dashboard/campaigns/<campaignId>?tab=tickets
- In the left-hand menu, under "Fundraising", click "Events". Then click "Events" in the list that opens below it.
- In the list of events, click the event's name.
- Click the "Tickets" tab in the row of tabs near the top.
- At the top right of the "Ticket Types" section, click "Manual Registration" (the dark button). A box opens called "Manual Registration".
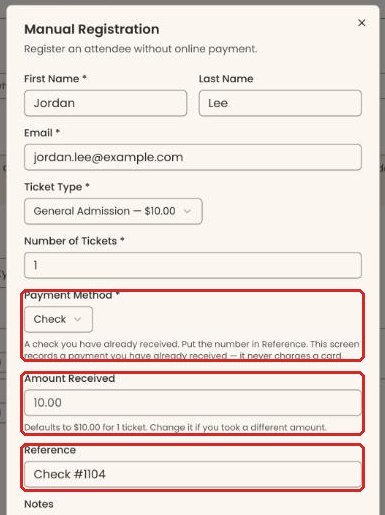
- Type "First Name *". Type "Last Name" if you have it, for example Jordan and Lee.
- Type "Email *".
- In "Ticket Type *", choose the ticket. A full ticket type shows "(Sold Out)" and can't be picked.
- In "Number of Tickets *", type how many. For a ticket that admits several people, a line underneath shows the total attendees.
- If the event asks questions, answer them under "Registration Questions" and "Questions for" the registrant.
- Optional: under "Other Guests", type the other people's names. Blank seats appear on the attendee list as "Guest".
- "Payment Method *" starts on "Comp (no charge)". If they paid, click it and choose "Cash", "Check" or "Other".
- For anything except a comp, look at "Amount Received". It is filled in with the ticket price. Change it only if they paid a different amount.
- For a check, type the check number in "Reference", for example "Check #1234". "Reference" appears once you choose a method other than a comp.
- Optional: add "Notes", or any "Add-Ons" they bought.
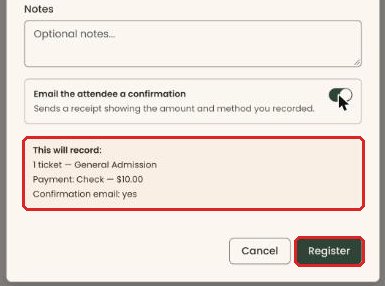
- "Email the attendee a confirmation" is switched off. Switch it on to email them a receipt (for a comp, a complimentary-admission confirmation).
- Read the shaded "This will record:" box above the buttons. It lists the tickets, the payment, and "Confirmation email: yes" or "no".
Important: if "Confirmation email:" says "yes", clicking "Register" emails the person straight away.
- At the bottom of the box, click "Register".
- The box closes and you'll see "Registration created successfully" at the top of the screen. That means it worked. The ticket type's "Inventory" now counts the sale, for example "1 paid". The order appears on the "Orders" tab, and each person on the "Attendees" tab.
If it didn't work:
- "Register" stays grayed out until "First Name *", "Email *" and "Ticket Type *" are filled in.
- "Answer the required questions:" followed by names means a required question is blank. Answer it.
- Any other message, such as "Failed to create registration", says why. Fix that field and click "Register" again.
Special cases
- No email address: there is no way to register someone without one on this screen.
- Paid more than the ticket price: record only the ticket amount here. Record the rest as a gift on their supporter record.
- Holding a spot for someone who will pay online later: remove your placeholder once they pay, or they'll have two orders. See Cancel or refund an event order.
- Changes in the next release: a ticket type filled only by places held for waitlist offers stays selectable here.
If you make a mistake
- Wrong name or email on a guest: on the "Orders" tab, click "Show the guest" on the order. Then click the pencil to the right of the person ("Edit Attendee").
- Wrong ticket type: on the "Orders" tab, click the two-arrows icon ("Change ticket type") to the right of the guest. No money is charged or refunded. Only Owner, Administrator and Programs see this; Front desk users must ask one of them.
- Registered by mistake, or twice: cancel the extra order. See Cancel or refund an event order.