


Who can do this: Owner, Administrator and Programs. Front desk, Finance, Fundraiser and Viewer users can open an event but don't see the "New Event" or "Add Ticket Type" buttons.
Quick steps: Events › Events › "New Event" › fill in name and dates › "Create Event" › "Tickets" tab › "Add Ticket Type" › name and price › "Create"
Before you start
- You need an Owner, Administrator or Programs login.
- Have to hand: the event's name, start and end dates, and venue.
- Have to hand: each ticket type's name, price, and how many you can sell.
- A ticket type is one kind of ticket with its own price, for example "Adult $50" or "Child $20".
Create the event
Page: /dashboard/events
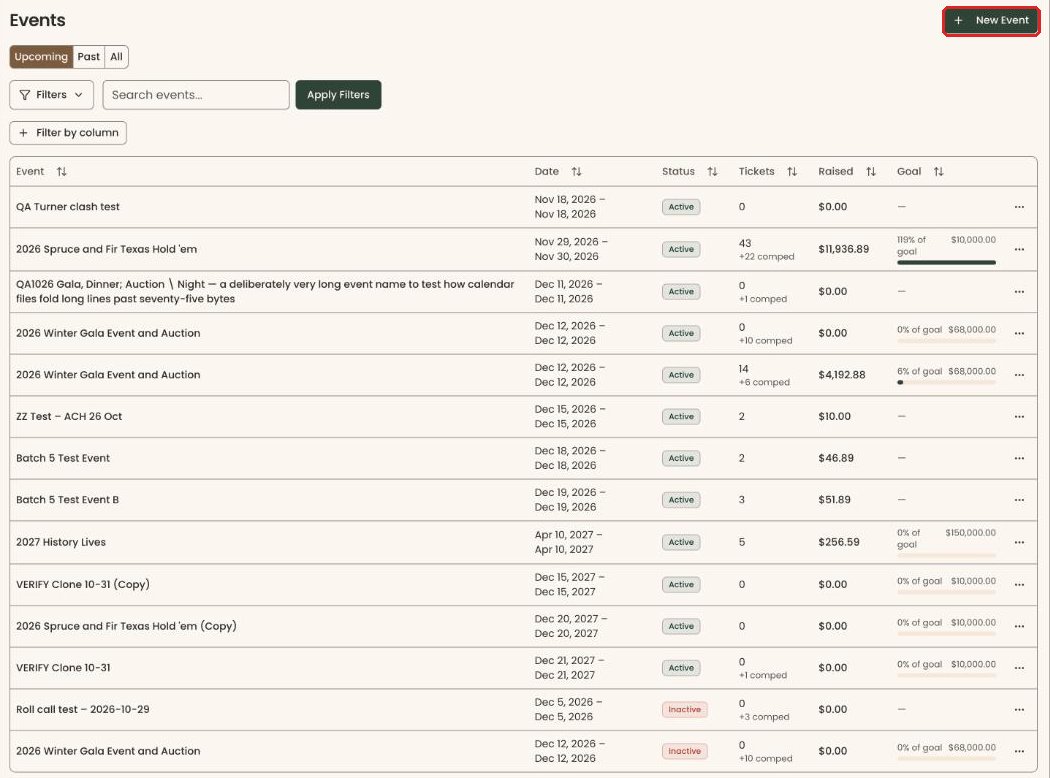
- In the left-hand menu, under "Fundraising", click "Events". Then click "Events" in the list that opens below it. The page is called "Events".
- At the top right of the page, click "New Event".
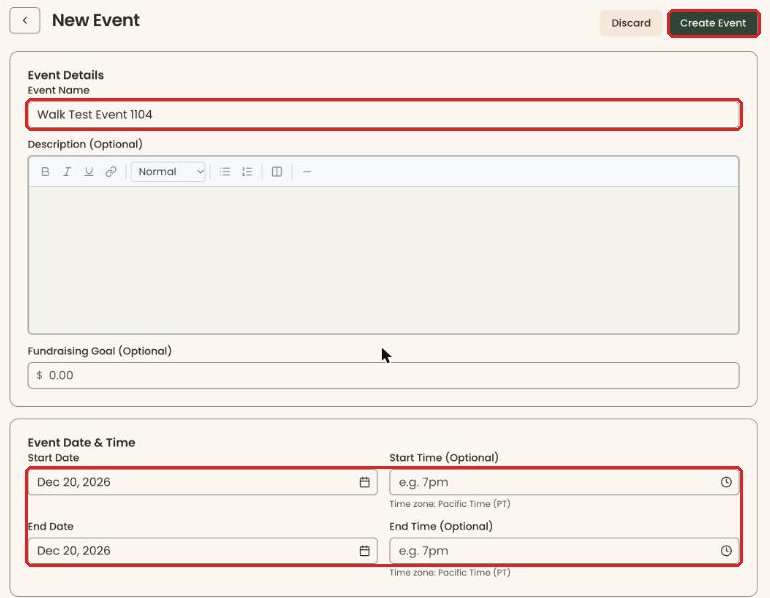
- Under "Event Details", in "Event Name", type the name, for example "Spring Gala". You can also add a "Description (Optional)" and a "Fundraising Goal (Optional)".
- Under "Event Date & Time", click "Start Date" and type or pick the first day, for example "Dec 20, 2026". Do the same in "End Date" for the last day (the same day for a one-day event).
- Optional: fill in "Start Time (Optional)" and "End Time (Optional)". Leave them blank for an all-day event.
- Optional: under "Venue", fill in "Venue Name (Optional)" and "Venue Address (Optional)".
- Optional: under "Registration & Ticket Sales (Optional)", set "Tickets On Sale Date". Blank means "On sale immediately".
- Optional: under "Registration Window", set when registration opens and closes. Blank means "Open now" and "Never closes".
- Scroll down to "Capacity & Status". Optional: in "Total Capacity", type the most people the event can hold, for example 200. Blank means no event-wide limit.
- "Event Status" starts on "Published". To keep the event private while you set it up, click it and choose "Draft".
Important: if "Event Status" is left on "Published", the event's public links work as soon as you create it.
- Scroll back to the top of the page and click "Create Event" at the top right.
- You'll see "Event created successfully", and the event's own page opens with its "Event Form Links" box and a row of tabs. That means it worked.
If it didn't work:
- "Name must be at least 2 characters." means the name is too short. Make it longer and click "Create Event" again.
- "Start date is required." or "End date is required." means a date is missing. Pick it and try again.
Add ticket types
Page: /dashboard/campaigns/<campaignId>?tab=tickets
- On the event's page, click the "Tickets" tab in the row of tabs near the top.
- At the top right of the "Ticket Types" section, click "Add Ticket Type" (to the left of "Manual Registration"). A box opens called "Add Ticket Type".
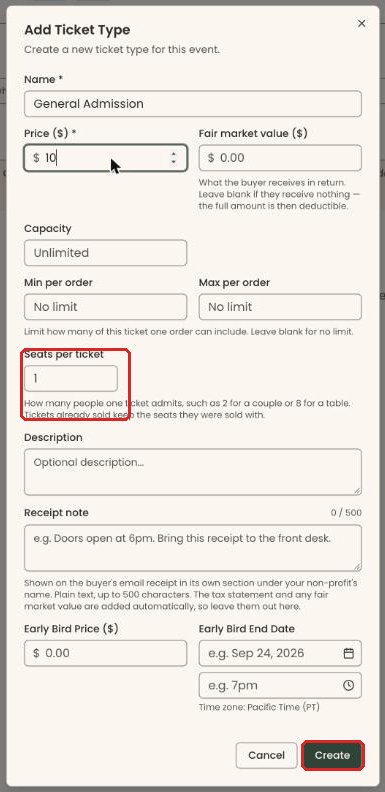
- In "Name *", type the ticket's name, for example "General Admission".
- In "Price ($) *", type the price, for example 50. Type 0 for a free ticket.
- Optional: in "Fair market value ($)", type what the buyer gets in return, such as the value of dinner. Leave it blank if they get nothing.
- Optional: in "Capacity", type how many of this ticket can be sold. Blank means "Unlimited".
- Optional: "Min per order" and "Max per order" limit how many one order can include. Blank means "No limit".
- In "Seats per ticket", leave 1 for one person. Type 2 for a couple ticket, or 8 for a table.
- Optional: add a "Description", a "Receipt note" (printed on the buyer's email receipt), an "Early Bird Price ($)" and an "Early Bird End Date".
- At the bottom of the box, click "Create".
- You'll see "Ticket type created" at the top of the screen, and the ticket appears in the "Ticket Types" list with the status "Active". That means it worked.
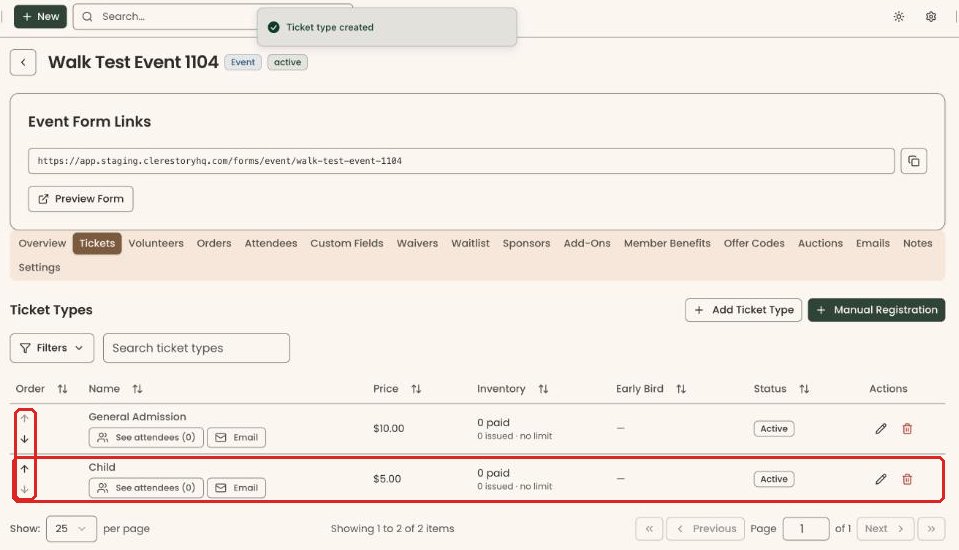
Repeat for each ticket type. To change the order people see them in, use the up and down arrows in the "Order" column, at the left of each row.
If it didn't work, the message at the bottom of the screen says why, for example "Failed to save ticket type". Check the fields and click "Create" again.
Special cases
- If the ticket types' capacities add up to more than the event's "Total Capacity", a yellow note appears. The event stops taking registrations at its total.
- Changing "Seats per ticket" later applies to new sales only. Tickets already sold keep their seats.
- Changes in the next release: a ticket type will show "Sold Out" once tickets sold plus places held for waitlist offers reach its capacity.
If you make a mistake
- Wrong ticket details: on the "Tickets" tab, at the far right of that ticket's row, click the pencil. Correct it in "Edit Ticket Type", then click "Save Changes".
- A ticket type nobody has bought: at the far right of its row, click the delete icon next to the pencil.
Important: deleting a ticket type can't be undone.
- Then click "Delete" in the "Delete Ticket Type?" box. Once tickets have been sold, it can't be deleted ("Cannot delete: tickets have been sold").
- Wrong event details: change them on the event's "Settings" tab.