


Who can do this: Owner, Administrator and Fundraiser can do every part. Programs can send an email from a report using a template someone else wrote, but can't write templates, letterheads or rules. Changing "Reply-To Email" needs Owner, Administrator or Finance. Front desk doesn't see Communications.
Quick steps: Communications › "Templates" › "New email" › write it › "Save". Then Reporting › Templates › "Membership Renewals Due" › "Run Report →" › "Email these people" › "Template" › "Send email".
Before you start
- You need one of the roles above for each part.
- Have ready: your organization's mailing address and sign-off, the wording of your email, and the web address of your membership sign-up page if you want a renewal button.
- A template is an email you write once and reuse. Clerestory fills in each person's own details when it sends.
- A letterhead is the header and footer that wrap your emails, for example your logo and mailing address.
- An automation (shown as a "rule") is an email Clerestory sends by itself when something happens, such as a membership lapsing.
1. Where replies go
When a member replies to an email from Clerestory, the reply goes to your Payment Account's "Reply-To Email". If that is blank, it goes to the email address of your Clerestory account owner.
To send replies to a different address, for example your organization's shared inbox:
Page: /dashboard/settings/organizations
- In the left-hand menu, under "Tools", click "Settings" to open it.
- Click "Organizations".
- Find the box called "Payment Accounts". At the right of your account's row, next to "Manage in Stripe", click the small pencil icon. The account's details open in place. If you have more than one payment account, each has its own "Reply-To Email".
- In "Reply-To Email", type the address replies should go to, for example "info@yourorg.org".
- Below the box, click "Save".
- You'll see "Payment account updated". That means it worked.
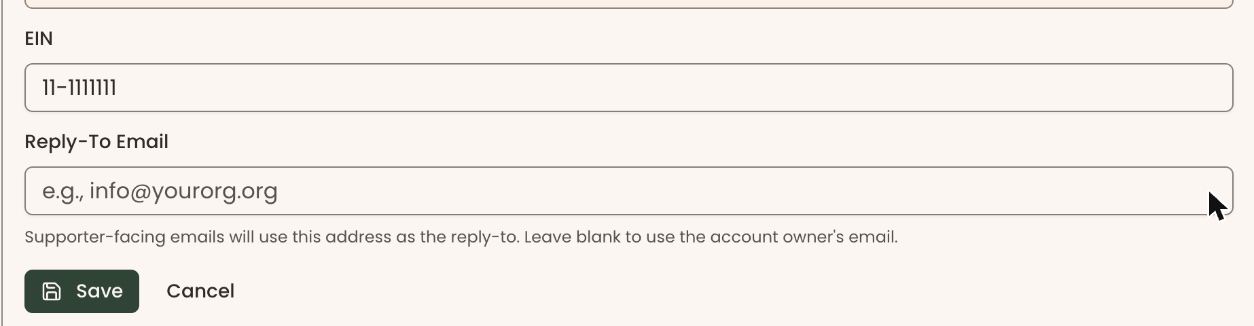
You only see the "Payment Accounts" box if you are an Owner, Administrator or Finance user.
2. Automatic renewal reminders
Clerestory already emails your members for you:
- 30 days before an annual membership expires, and again 7 days before.
- On the day a membership ends, a notice that it has ended.
To check these are on:
Page: /dashboard/settings/emails
- In the left-hand menu, under "Tools", click "Settings", then "Emails".
- Find "Membership renewal reminders" and "Membership expired notices". Each switch should be on (filled in and pushed to the right).
- These also need "Automated reminder emails" turned on, in the "Reminder Settings" box at the top of Settings › "Emails". Owner, Administrator and Fundraiser can change that switch.
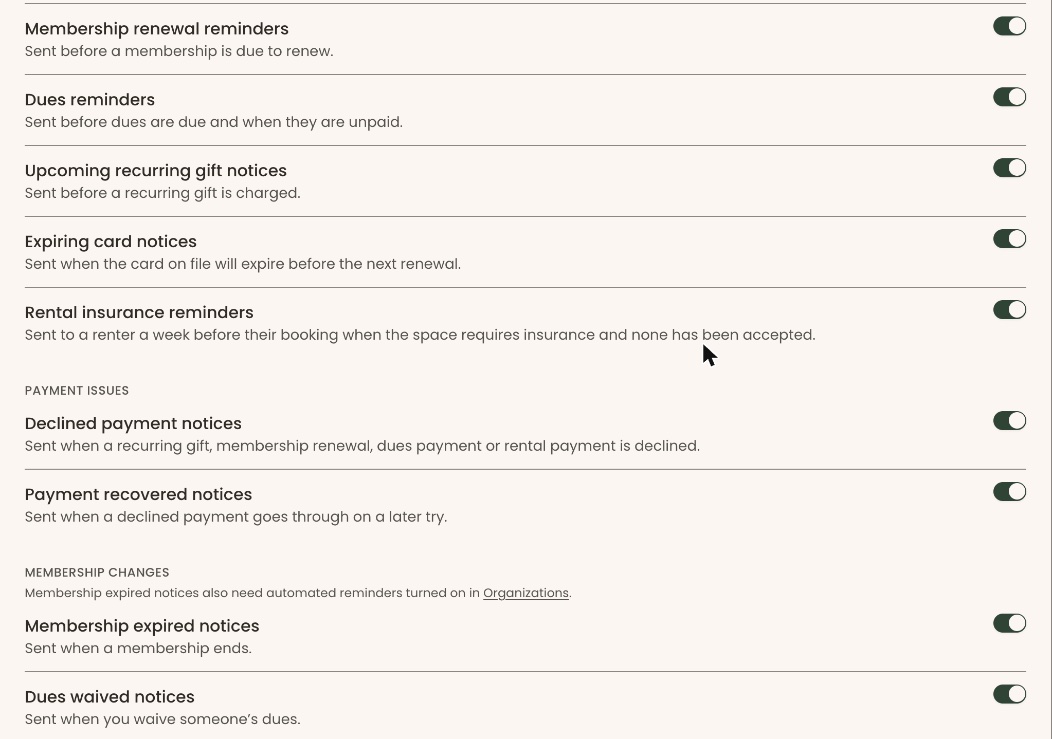
For the full list of automatic emails, see See which emails go out automatically, and turn one off.
The rest of this guide is for when you want to send your own personal email as well.
3. One-time setup: add your mailing address to your emails
Emails you write don't include your mailing address unless you add it to a letterhead once.
Page: /dashboard/communications?tab=letterheads
- In the left-hand menu, find the group called "Operations" and click "Communications".
- Near the top of the page, click the "Letterheads" tab.
- Click "New letterhead".
- In "Name", type a name only your team sees, for example "Main letterhead".
- In "Footer text", type your sign-off and your organization's mailing address.
- Click "Save letterhead".
- You'll see "Letterhead saved." That means it worked.
- If you see "Give the letterhead a name.", fill in "Name" and click "Save letterhead" again.
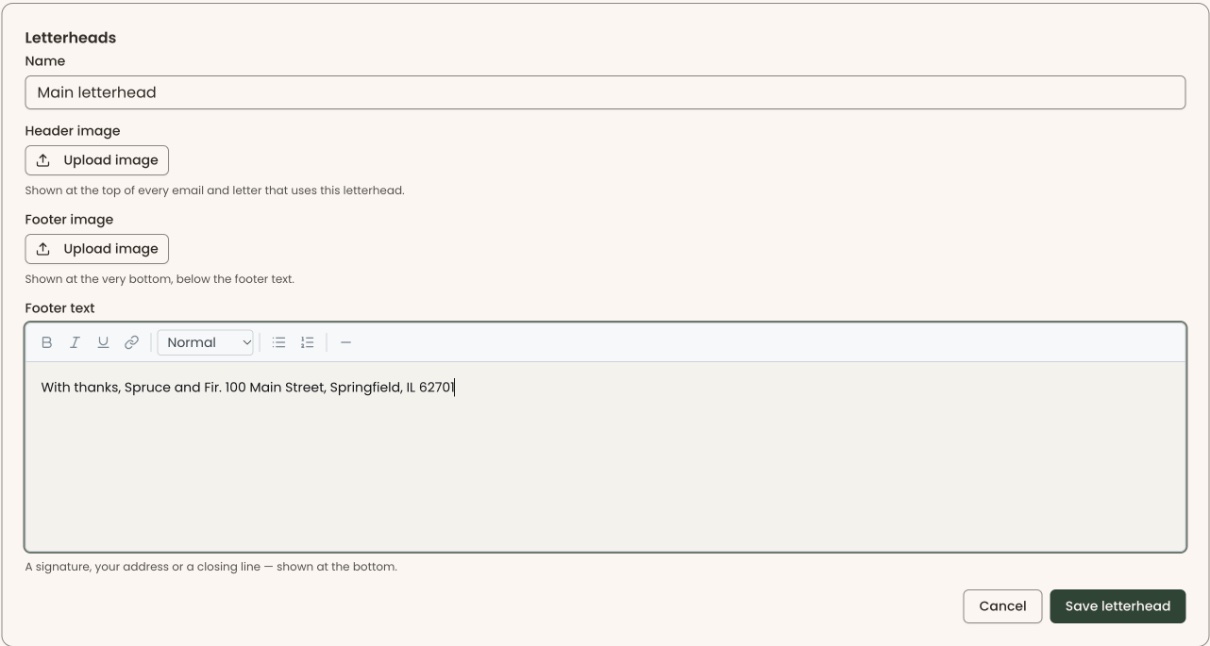
4. Write your email once, as a template
Page: /dashboard/communications
- In the left-hand menu, under "Operations", click "Communications". The "Templates" tab opens.
- At the top right of the list, click "New email". A box opens called "New email template".
- "Subject line" starts with a sample subject, already selected. Type over it, for example "Your membership is up for renewal".
- In "Message", type your email.
- To add each member's own details, click in the message where you want them. Then open "Insert field" and choose one, for example "First name", "Membership level" or "Membership renewal date".
- To add a renewal button, click "Add block", then "Button". Under the message, fill in "Button label" (for example "Renew my membership") and "Button link" (the web address of your membership sign-up page).
- Click "More options". In "Name", type a name only your team sees, for example "Renewal reminder – personal". If you leave it blank, the subject line is used.
- In "Type", choose "Appeal". Its note reads "Asks for support. Has an unsubscribe link and skips anyone who opted out."
- In "Letterhead", choose the letterhead you made in Part 3.
- Check the preview beside the message. (On a phone, tap "Preview" at the top.)
Important: "Send me a test" emails a test copy of this email to you. It goes to no one else and doesn't save the template.
- Click "Send me a test". You'll see "Test email sent to" and your address. Check it in your own inbox.
- Click "Save".
- You'll see "Template saved." That means it worked.
- If you see "An email needs a subject line.", fill in "Subject line" and click "Save" again.
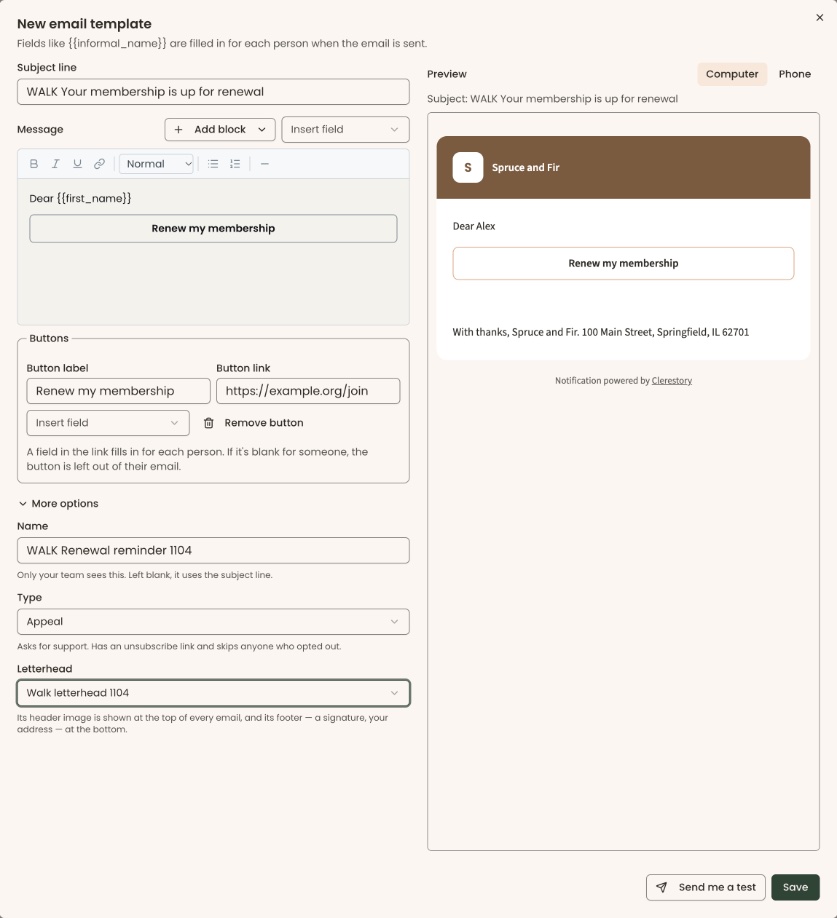
5. Email members whose membership expires in the next 30 days
Page: /dashboard/reporting/templates
- In the left-hand menu, under "Tools", click "Reporting" to open it, then click "Templates".
- The page is headed "Report Templates". Under "Membership", find "Membership Renewals Due". It lists active members whose membership expires within the next 30 days.
- Click "Run Report →" at the bottom of its card. The report opens.
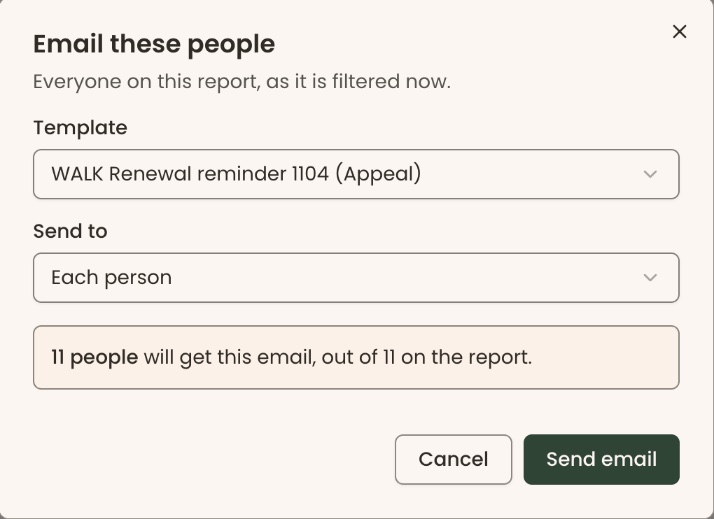
- Above the results, click "Email these people". A box opens with the same name.
- In "Template", choose the email you saved in Part 4.
- In "Send to", leave "Each person". (Choose "One per household or business" to send one email per household.)
- Read the line that says how many people "will get this email", out of the number on the report. Under it, Clerestory lists anyone it's leaving out, with the number and the reason.
Important: clicking "Send email" sends to everyone counted, right away. There's no second "Are you sure?" step, and an email can't be unsent. Send yourself a test from the template first (Part 4, step 11).
- Click "Send email".
- You'll see a message such as "12 emails on the way." That means it worked. If anyone was left out, the message says how many.
6. Email members whose membership has already expired
- Follow Part 5, steps 1 to 3, but choose "Lapsed Members" instead. It lists members whose membership has expired with no renewal in the last 90 days.
- Click "Email these people" and follow Part 5, steps 5 to 9.
7. Optional: send a follow-up automatically
Page: /dashboard/communications?tab=automations
- In the left-hand menu, under "Operations", click "Communications".
- Near the top of the page, click the "Automations" tab.
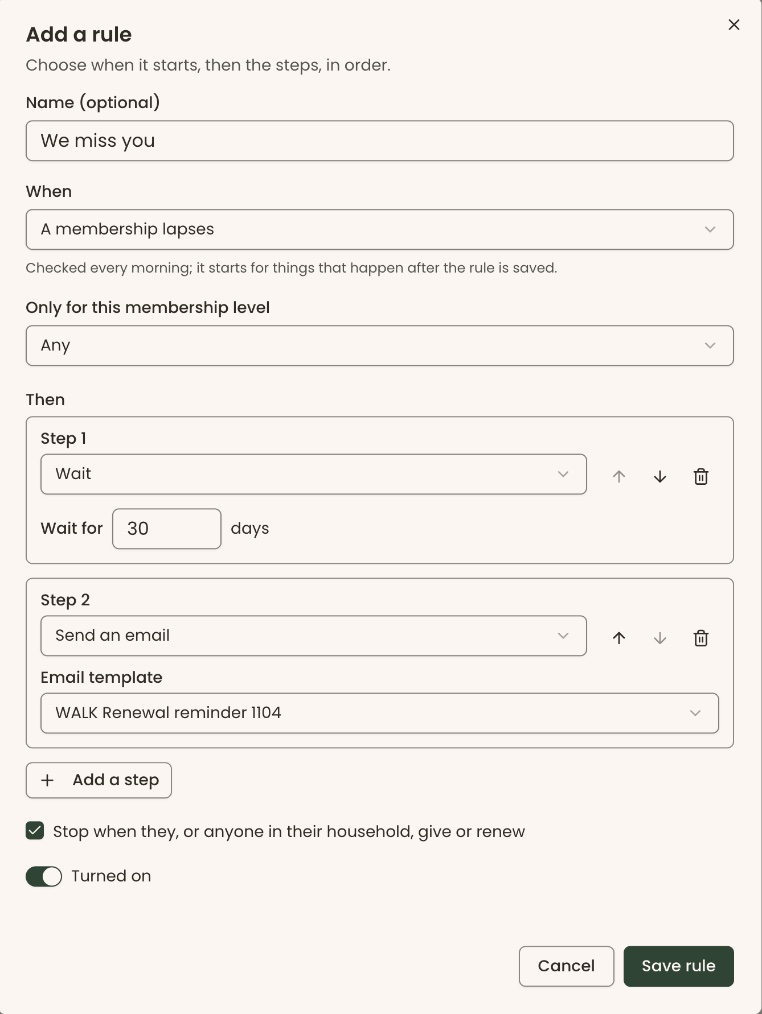
- Click "Add a rule". A box opens with the same name.
- In "Name (optional)", type a name, for example "We miss you".
- In "When", choose "A membership lapses".
- "Step 1" starts as "Send an email". Change it to "Wait". In "Wait for", type the number of days, for example 30.
- Click "Add a step". "Step 2" appears.
- In "Step 2", choose "Send an email". In "Email template", choose your "We miss you" template.
- Check "Stop when they, or anyone in their household, give or renew".
- Check that the "Turned on" switch is on. It starts on.
Important: once you save a rule that is turned on, Clerestory starts sending this email by itself to every member whose membership lapses from now on.
- Click "Save rule".
- You'll see "Rule saved." That means it worked.
8. See what was sent
- Everything: in the left-hand menu, under "Tools", click "Settings", then "Email Log".
- One person: open their record from People › Supporters, then click the "Communication" tab. To find someone, see Find, search and filter supporters.
If you make a mistake
- Sent the wrong email: an email can't be unsent. Send a short correction the same way.
- A rule is sending when it shouldn't: on the "Automations" tab, open the rule, turn off "Turned on" and click "Save rule".
- Wrong wording in a template: open it from the "Templates" tab, change it and click "Save". Emails already sent don't change.