


Who can do this: Owner, Administrator, Programs and Front desk. Finance, Fundraiser and Viewer can see the product list but don't see "Add Product" or the row menu.
Quick steps: Programs & Sales › Retail › "Retail Products" › "Add Product" › fill in "Product Details" and "Pricing" › "Submit". To change one: the three dots (⋯) on its row › "Edit" › "Update Product".
Before you start
- You need the Owner, Administrator, Programs or Front desk role.
- The Shop feature must be on. See Turn features on or off.
- Have ready: the product's name, its price, its fair market value, how many you have, and a photo (PNG or JPG, up to 5MB).
- A product is something you sell, such as a T-shirt or a mug. Fair market value (FMV) is what the item is worth. The amount paid above it may be tax-deductible. A SKU is a short code that identifies the product.
Add a product
Page: /dashboard/retail/products/create
- In the left-hand menu, under "Programs & Sales", click "Retail". A short list opens under it.
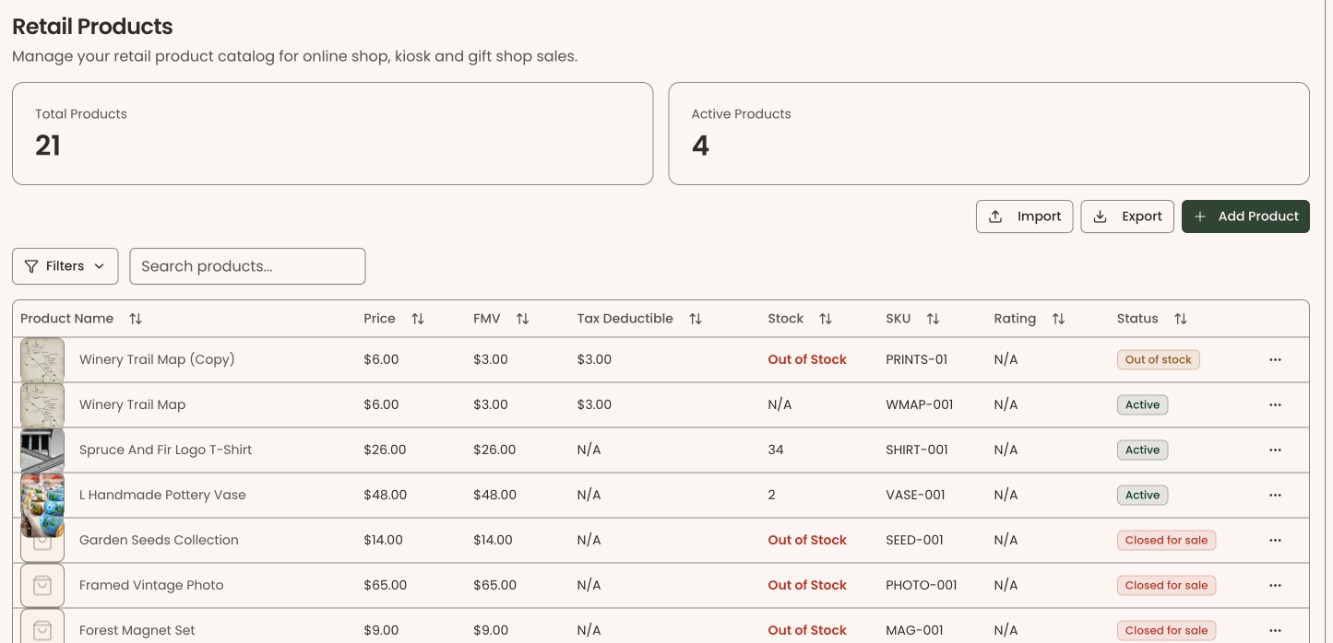
- Click "Retail Products". The "Retail Products" page opens.
- At the top right, above the list (next to "Import" and "Export"), click "Add Product". The "Add Product" page opens.
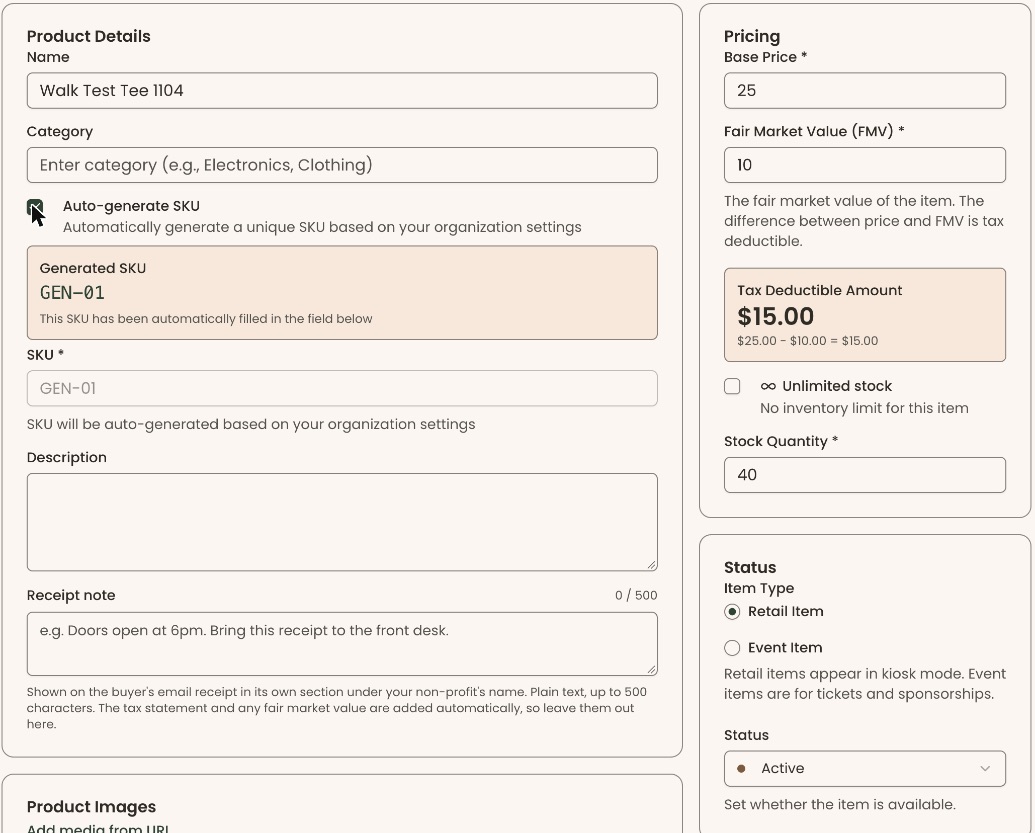
- Under "Product Details", type the product's name in "Name", for example "Spring Gala T-shirt".
- In "Category", type a category if you use them, for example "Clothing". You can leave it empty.
- For the SKU, either check "Auto-generate SKU" (a box called "Generated SKU" shows the code, for example GEN-01), or type your own code in "SKU *".
- In "Description", type a short description. You can leave it empty. "Receipt note", below it, is text added to the buyer's email receipt; you can leave it empty too.
- Below that box, under "Product Images", click "Select images" and choose up to 5 photos. Or drag them onto "Drop your images here".
- On the right, under "Pricing", type the price in "Base Price *", for example 25.
- In "Fair Market Value (FMV) *", type what the item is worth, for example 10. It can't be more than the price. Below it you'll see the "Tax Deductible Amount", for example $15.00.
- If you don't track stock, check "Unlimited stock". Otherwise type how many you have in "Stock Quantity *", for example 40.
- In the "Status" box under "Pricing", leave "Item Type" on "Retail Item". Retail items appear in kiosk mode.
- Leave "Status" on "Active" to sell it now, or choose "Inactive" to save it without selling it yet.
- At the top right of the page, click "Submit".
- You'll see "Product created successfully", and the "Retail Products" list opens. That means it worked.
If the page doesn't save, look for a red message under a box, for example "Product name must be at least 2 characters.", "SKU is required.", "Price must be a positive number.", "Stock quantity is required." or "Fair Market Value should be less than or equal to the price.". Fix that box and click "Submit" again.
Edit a product
Page: /dashboard/retail/products/<productId>/edit
- On "Retail Products", find the product. To search, type its name in "Search products...".
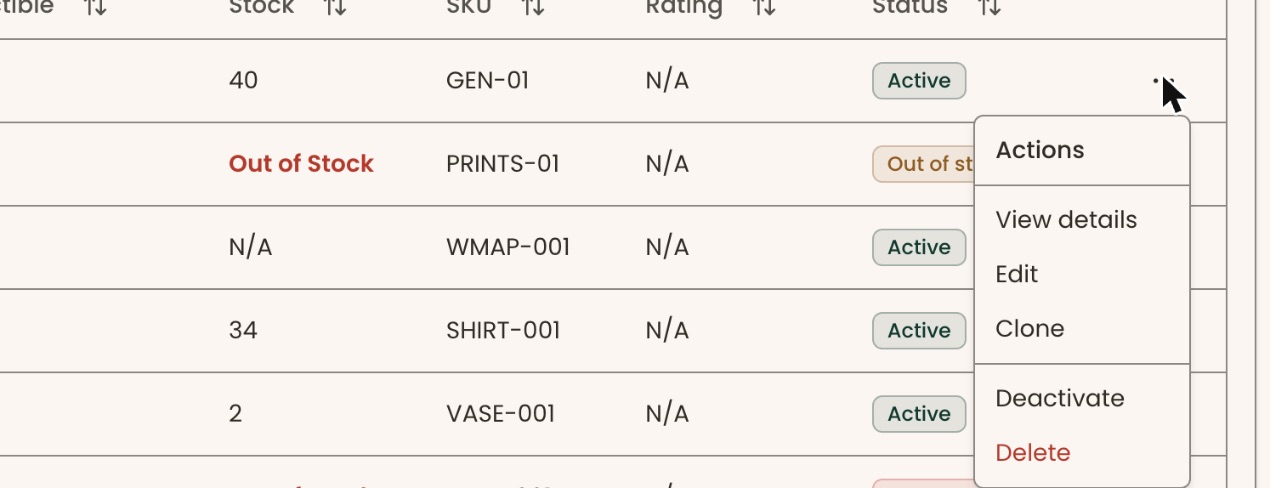
- At the far right of its row, click the three dots (⋯). A menu called "Actions" opens.
- Click "Edit". The "Edit Product" page opens with the same boxes as above.
- Change what you need, for example the price or "Stock Quantity *".
- At the top right, click "Update Product".
- You'll see "Product updated successfully", and the list opens again. That means it worked.
To leave without saving, click "Cancel" at the top right.
Copy a product
Use this for a similar product, for example the same T-shirt in another color.
- On "Retail Products", click the three dots (⋯) at the far right of the product's row.
- Click "Clone" (the menu also has "View details", which shows the product without changing it). The "Clone Product" page opens. The name ends in "(Copy)", "Auto-generate SKU" is checked and the stock is 0.
- Change the name and type the stock in "Stock Quantity *". To use your own SKU, uncheck "Auto-generate SKU" and type it.
- At the top right, click "Create Copy".
- You'll see "Product created successfully".
Take a product off sale
- On "Retail Products", click the three dots (⋯) at the far right of the product's row.
- Click "Deactivate".
- You'll see "Product deactivated successfully". Its "Status" now reads "Closed for sale". The product is hidden from kiosks and forms, and you can still edit it.
To sell it again, open the same menu and click "Activate". You'll see "Product activated successfully".
Add an event item
An event item is a ticket or sponsorship you sell on a donation form, for example "Gold Sponsor". They are kept on their own list, called "Events/Sponsorships".
Page: /dashboard/retail/products/create?itemType=event
- Follow steps 1–11 of "Add a product".
- Under "Status", in "Item Type", click "Event Item".
- Click "Submit".
From the "Events/Sponsorships" page, "Add Event Item" at the top right opens the same form, called "Add Event Item", with "Event Item" already chosen.
- You'll see "Product created successfully", and the "Events/Sponsorships" page opens. The new item is in its list.
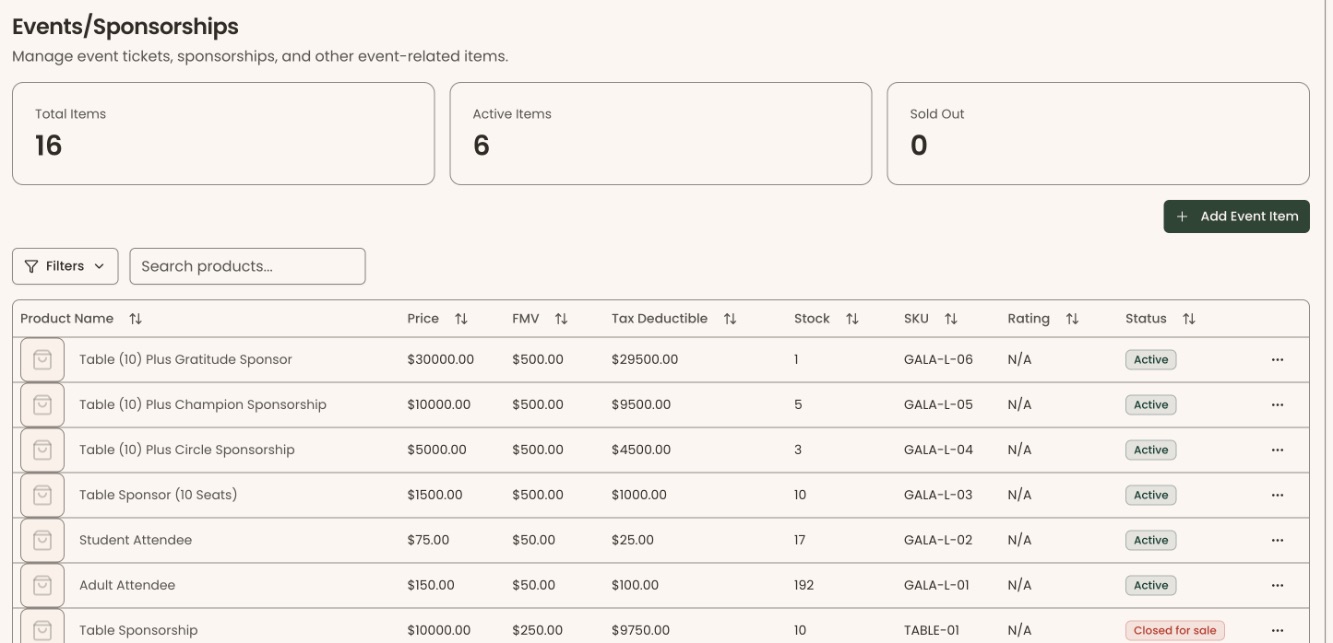
To edit an event item later, open the "Events/Sponsorships" page and use the three dots (⋯) on its row, as in "Edit a product". There is no link to this page in the left-hand menu. You can open it from a donation form's editor, where a form with no event items shows "Create event items →". See Build a donation form (a "campaign"), preview it, and see what a donor sees.
Page: /dashboard/retail/events
Special cases
- Products don't show in the shop. Check the product's "Status" is "Active". An item with no stock left still shows on the list.
- Event items don't appear on "Retail Products". They are only on "Events/Sponsorships".
Buttons to avoid
- "Delete" in the row menu removes the product for good. Use "Deactivate" to stop selling it.
Important: Deleting can't be undone. An event item is removed from every donation form it's on, right away.
To delete anyway: click the three dots (⋯) on the row, click "Delete", read the box, then click "Delete product" (or "Delete event item"). Past sales and reports keep their records.
If you make a mistake
Edit the product again and click "Update Product". A deleted product can't be brought back in the screens. Add it again instead.