

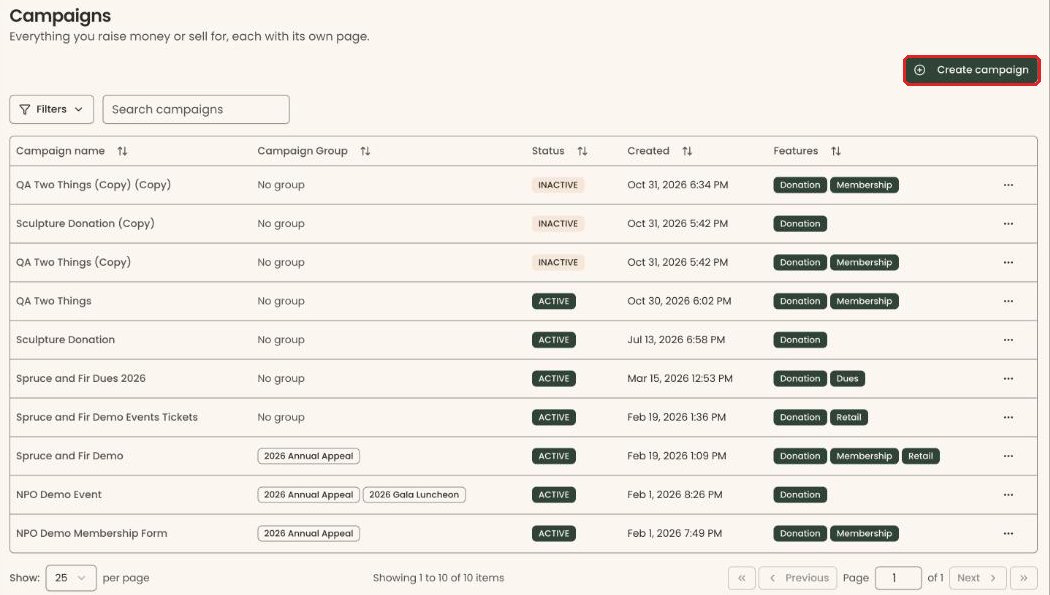
Who can do this: Owner and Administrator can create, edit, clone, activate, deactivate and delete a campaign. Every other role can open the "Campaigns" list and use "Preview Website Form" and "Preview Kiosk Form", but doesn't see "Create campaign", "Edit" or the campaign's "Form" and "Settings" tabs.
Quick steps: Fundraising › "Campaigns" › "Create campaign" › name it, check "Donations" › "Create campaign" › "Form" tab: set amounts › "Save changes" › ⋯ › "Preview Website Form"
Before you start
- You need the Owner or Administrator role to build a form.
- Your payment account must be set up, or the campaign is saved as inactive. See Add a payment account, connect Stripe and set your payout schedule.
- Have to hand: the campaign's name, the gift amounts you want to suggest (for example $25, $50, $100), and any goal.
- A donor is a person giving through the form. A tribute gift is a gift made in memory or in honor of someone.
What the labels mean
- Campaigns: in Clerestory, each donation form is called a campaign. A campaign is one public form with its own web address, plus its own record of the payments and supporters it brings in. The same form can also take memberships, dues or shop items.
- Campaign Groups: a separate menu item. A campaign group bundles several campaigns together so you can see their combined totals, for example a year-end appeal run through three different forms. You don't need a campaign group to build a donation form.
- Website Form: the version of the form for your website or for sharing as a link.
- Kiosk Form: a touch-screen version for a tablet at your front desk or an event. It opens on a "New sale" screen, where the person chooses "Donation" (and anything else your organization sells there).
Create the campaign
Page: /dashboard/donations/manage
- In the left-hand menu, find the Fundraising group and click "Campaigns".
- At the top right of the page, click "Create campaign". (On a phone the button says "Create".)
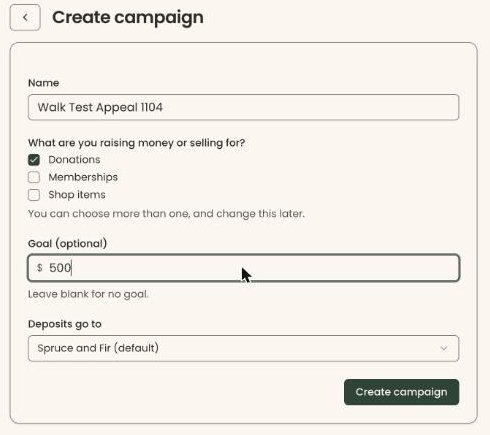
- In "Name", type the campaign's name, for example "Spring Appeal".
- Under "What are you raising money or selling for?", make sure "Donations" is checked. It is checked when the page opens. You can check more than one. "Memberships", "Dues" and "Shop items" appear only if your organization uses them.
- If you checked "Memberships", choose at least one level under "Membership levels". If you checked "Dues", choose one in "Dues tier".
- In "Goal (optional)", type a goal in dollars, for example 25000, or leave it blank for no goal.
- If your organization has more than one payment account, choose one in "Deposits go to".
- Click "Create campaign" at the bottom of the page.
- You'll see "Campaign created successfully". That means it worked. The campaign's own page opens on its "Form" tab.
If your payment account isn't fully set up yet, you'll see "Campaign created as inactive. Finish your payment account setup, then make it active in Settings." The campaign is saved, but donors can't use it until it's active.
Set up what donors see
Page: /dashboard/campaigns/<campaignId>?tab=form
- On the campaign's page, click the "Form" tab in the row of tabs near the top.
- In the "Donation Details" box, on "Basic Info", check "Title", "Slug" and "Description (Optional)". The slug is the end of the form's web address.
- Click "Landing Customization" in the same box. Set the "Display Name", "Headline" and "Form Content" shown at the top of the form.
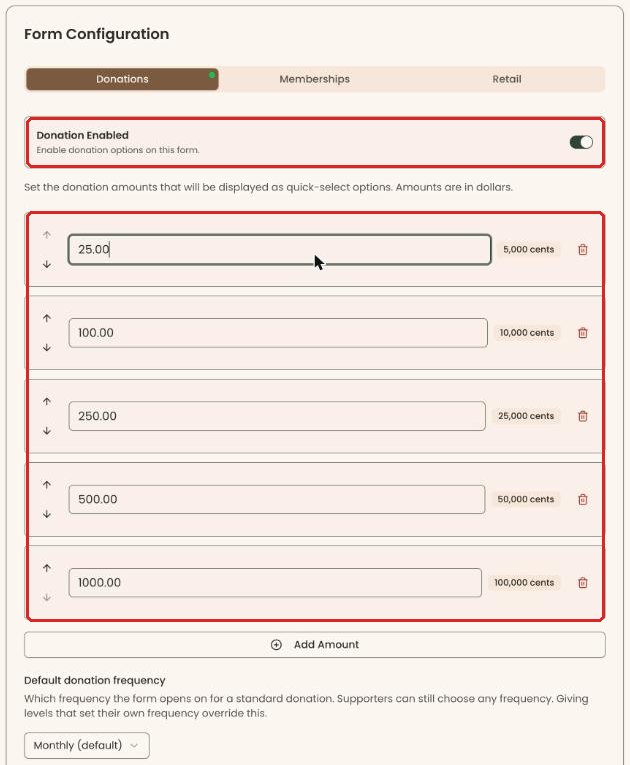
- Scroll down to the "Form Configuration" box and click its "Donations" tab. Make sure "Donation Enabled" is switched on.
- Below that switch is the list of quick-select amounts, the buttons donors click to pick a gift. Type each amount in dollars in its box.
- To add another amount, click "Add Amount" under the list. To remove one, click the red trash can at the right end of its row. The up and down arrows at the left of a row change the order.
- In "Default donation frequency", choose which frequency the form opens on. If you leave it, it opens on "Monthly (default)". Donors can still choose any frequency.
- Scroll back up and click "Save changes" at the top right of the tab.
- You'll see "Campaign updated successfully". That means it worked. If a box at the top says, for example, "1 Error Found", click "Show error details", fix what it lists and save again.
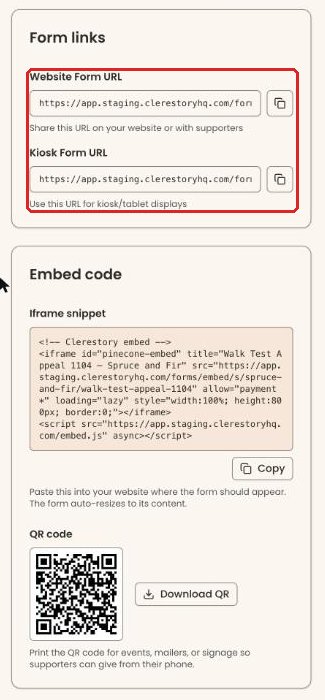
In the right-hand column of the "Form" tab, the "Form links" box shows "Website Form URL" and "Kiosk Form URL", each with a copy button to its right. Below it, the "Embed code" box has the code for adding the form to your website, and a QR code.
Check it is active
Page: /dashboard/campaigns/<campaignId>?tab=settings
- On the campaign's page, click the "Settings" tab in the row of tabs near the top.
- In the "Status" box, the drop-down should say "Active". If it says "Inactive", click it and choose "Active".
- Here you can also change "Deposits go to", the "Goal amount" (and "Show supporters a progress bar"), and the campaign group under "Group (optional)".
- Click "Save changes" at the top right of the tab.
- You'll see "Campaign updated successfully".
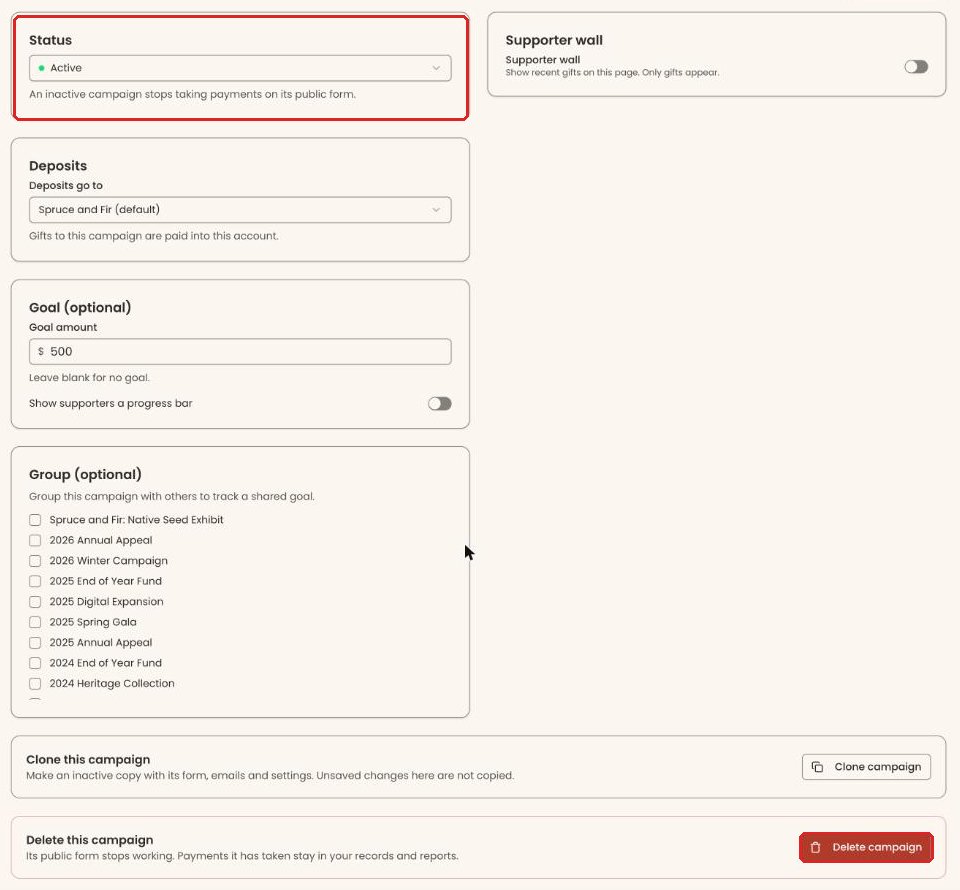
You can also switch a campaign on or off from the list: on the "Campaigns" page, click the three dots (⋯) at the far right of its row, then "Activate" or "Deactivate". You'll see "Status updated successfully".
Preview the form
Page: /dashboard/donations/manage
- In the left-hand menu, find the Fundraising group and click "Campaigns".
- At the far right of the campaign's row, click the three dots (⋯).
- Under "Preview", click "Preview Website Form" or "Preview Kiosk Form".
- The form opens in a new browser tab, exactly as a donor sees it.
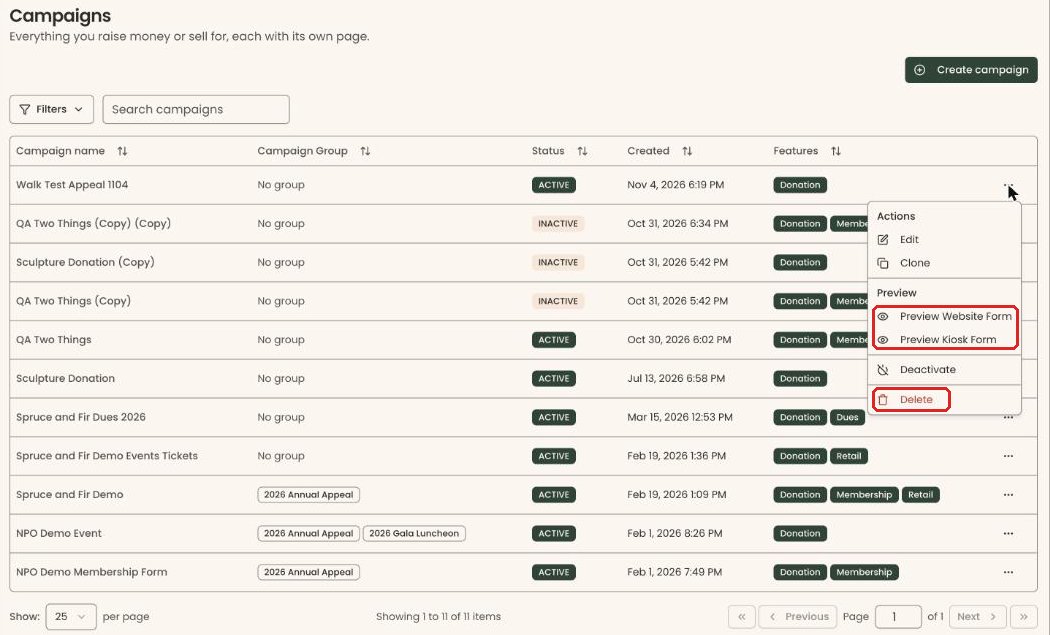
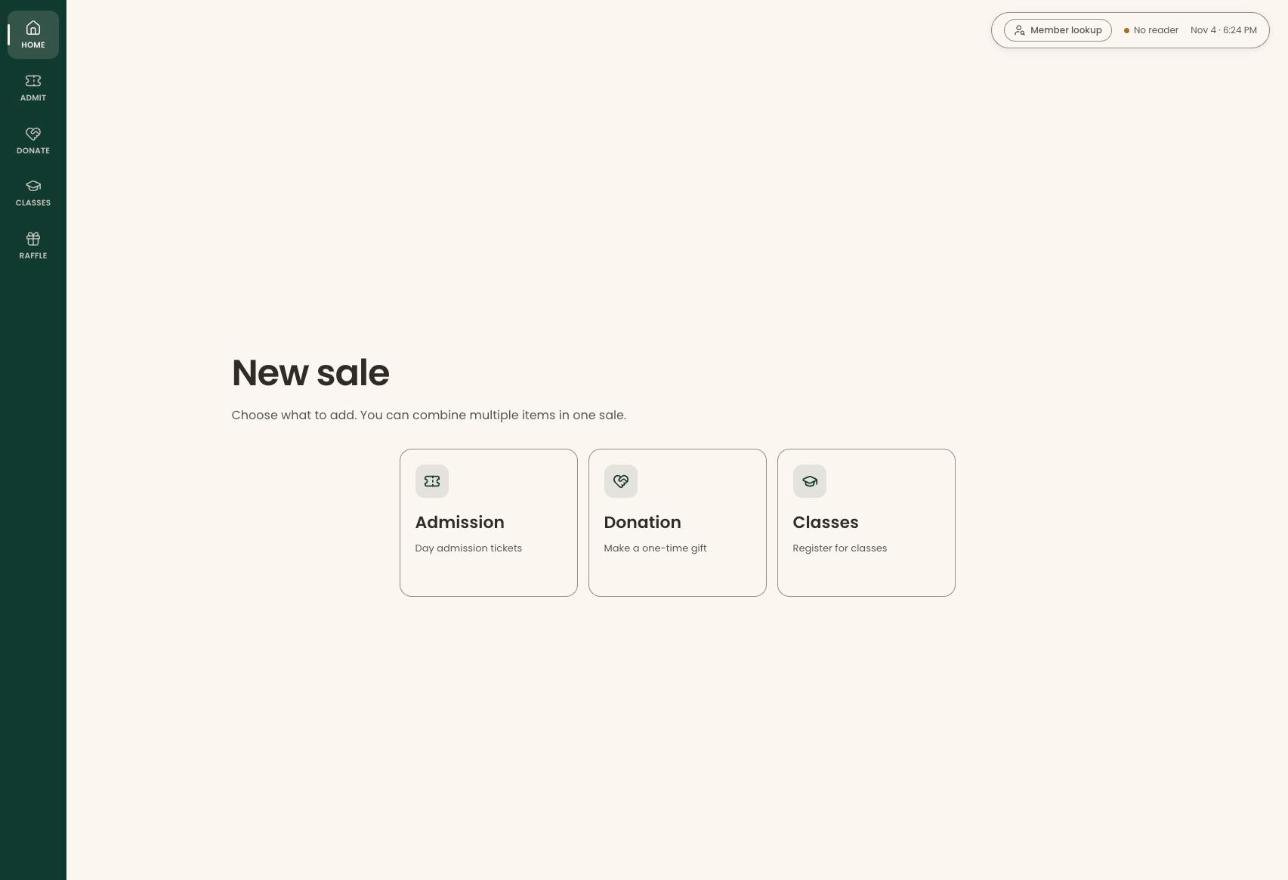
Important: the preview is the real, live form. If you go all the way through and pay, your card is charged for real. Stop before the payment step.
What a donor sees
- At the top of the form, under "Enter your email to get started", they type their email and click "Continue".
- If your records already have that email, they see "How would you like to continue?" and choose "Continue with login" (a code is emailed to them) or "Continue as anonymous" (no sign-in).
- Below, they choose a frequency ("Choose your frequency") and an amount ("Select an amount"), or type their own. Then they click "Continue to Payment".
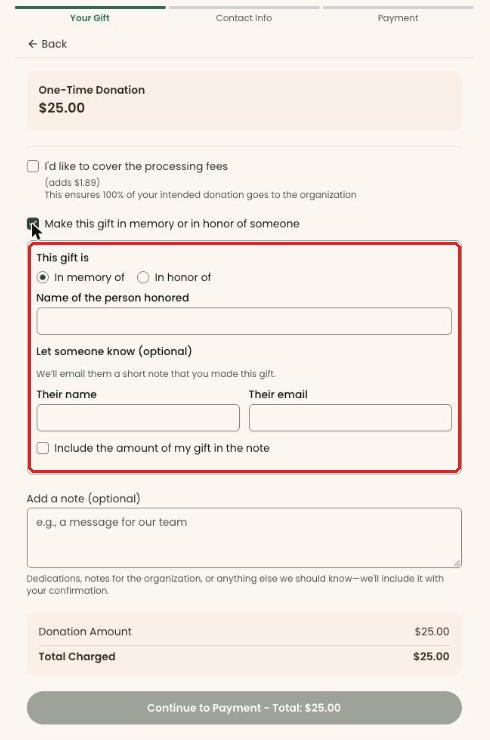
- On the "Your Gift" step, they can check "I'd like to cover the processing fees".
- They can check "Make this gift in memory or in honor of someone". They then choose "In memory of" or "In honor of" and type the "Name of the person honored".
- Under "Let someone know (optional)", they can give "Their name" and "Their email". The form says "We'll email them a short note that you made this gift." They can also check "Include the amount of my gift in the note".
- They can also type in "Add a note (optional)", then click "Continue to Payment" again.
- On the "Contact Info" step ("Your information"), they fill in their name, phone and address and click "Continue".
- On the "Payment" step ("Complete your donation"), they enter their card and click the "Pay" button, which shows the amount.
- They see "Thank you for your donation!" and are emailed a receipt.
Special cases
- Copying an existing form: on the "Campaigns" list, click the three dots (⋯), then "Clone". Or, on the campaign's "Settings" tab, click "Clone campaign". The copy starts inactive, with its form, emails and settings.
- "Another campaign already uses this name. Try a different one." Each campaign needs its own name.
- No "Preview Website Form" or "Preview Kiosk Form" on a row: that version of the form isn't available for that campaign.
- A campaign group: to group campaigns, use "Campaign Groups" in the left-hand menu and "Create campaign group". That's a separate guide.
Delete a campaign
Page: /dashboard/campaigns/<campaignId>?tab=settings
- On the campaign's page, click the "Settings" tab.
- Scroll to the bottom, to the box "Delete this campaign".
- Click "Delete campaign".
- A box asks "Delete this campaign?"
Important: deleting can't be undone. The public form stops working right away. Payments it has taken stay in your records and reports.
- Click "Delete campaign" in that box.
- You'll see "Campaign deleted successfully" and you're taken back to the "Campaigns" list.
Buttons to avoid
Important: "Delete" in the three dots (⋯) menu on the "Campaigns" list deletes the campaign the moment you click it. There is no "Are you sure?" step. Use the "Delete campaign" button on the "Settings" tab instead, which asks you to confirm.
If you make a mistake
- Wrong text, amounts or settings: change them on the "Form" or "Settings" tab and click "Save changes".
- Turned it on too early: click "Deactivate". The form stops taking payments, and nothing else is lost.
- Deleted a campaign: this can't be undone in the screens. Its public form stops working right away. Payments it has taken stay in your records and reports.