


Who can do this: Owner, Administrator and Programs can add questions. Every role can read the answers. Downloading the answers ("Export CSV") is for Owner, Administrator, Finance and Fundraiser.
Quick steps: Programs & Sales › Classes & Camps › Classes › the class › "Applications" tab › click the applicant's name › read "Responses".
Before you start
- You need an Owner, Administrator or Programs login to add questions. To download the answers, you need an Owner, Administrator, Finance or Fundraiser login.
- An application is a short set of questions a family answers while registering, for example "Does this registrant have prior experience?".
- An application is not an approval step. The registration is complete as soon as the family checks out. If someone shouldn't have enrolled, cancel or refund them: see Cancel, refund or transfer a class registration.
- The class must ask application questions. If it doesn't yet, start with "Ask application questions" below.
- The "Reviewed" switch and "Reviewer notes" box on that tab don't save at the moment.
Ask application questions
Page: /dashboard/classes/<classId>?tab=application
- In the left-hand menu, under "Programs & Sales", click "Classes & Camps". Then click "Classes" in the list that opens below it.
- In the list of classes, click the class's name.
- Click the "Application" tab in the row of tabs near the top. (Not "Applications", which is further along.)
- Turn on the switch "Require an application before checkout".
- At the top right of the page, click "Save changes". You'll see "Changes saved.". That means it worked.
- Under "Application questions", click "Add question" on the right.
- In "Question label", type the question, for example "What do you hope to get out of this class?".
- In "Field type", choose the kind of answer: "Short text", "Long text", "Single select", "Multi select", "Yes / No", "Number" or "Date".
- If you chose "Single select" or "Multi select", type the choices in "Options (comma-separated)", for example "Beginner, Intermediate, Advanced".
- In "Scope", choose "Per order" to ask the person paying once, or "Per registrant" to ask once for each person registered.
- To make the question one they must answer, turn on "Required".
- Click "Add question" under the form. You'll see "Question added". That means it worked.
- Repeat steps 6 to 12 for each question.
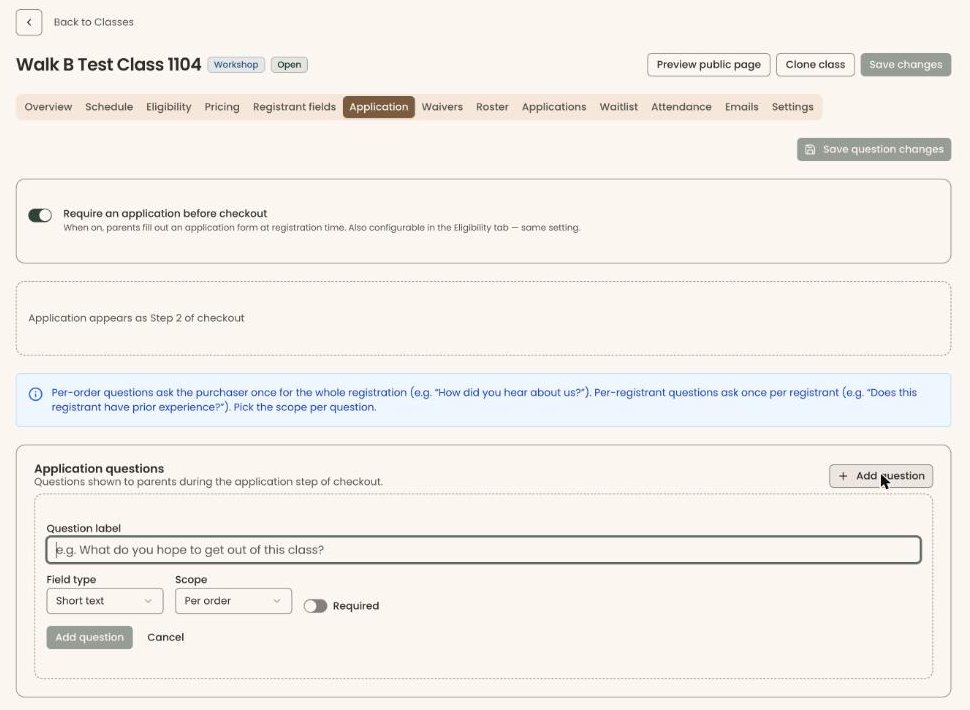
If you later change a question that's already on the list, click "Save question changes" at the top right of the tab. You'll see "Questions saved".
Read an application
Page: /dashboard/classes/<classId>?tab=applications
- Open the class, as in steps 1 and 2 above.
- Click the "Applications" tab in the row of tabs near the top.
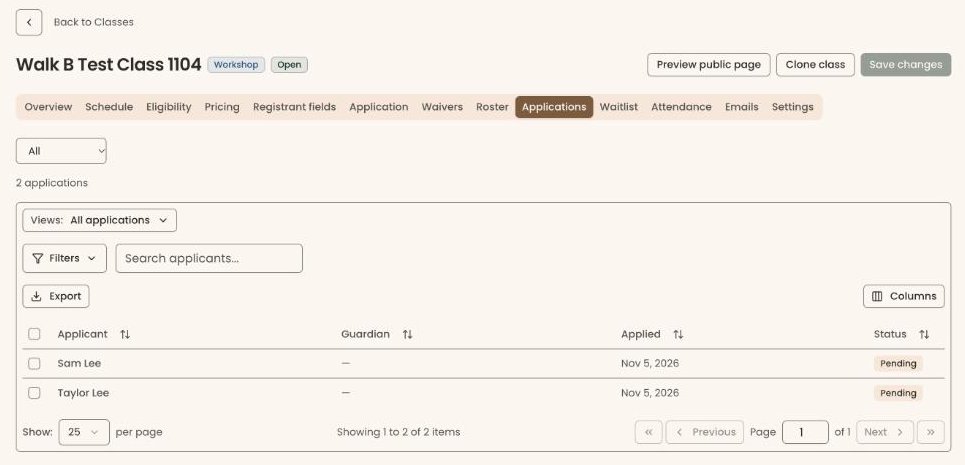
- The list shows one row per applicant, with "Applicant", "Guardian", "Applied" and "Status".
- To find one person, type their name in "Search applicants...".
- Click the applicant's name. Their application opens on the right half of the table.
- Under "Responses", read each question and answer. A file they uploaded shows as "[File attached]".
- To close the panel, click the X at its top right.
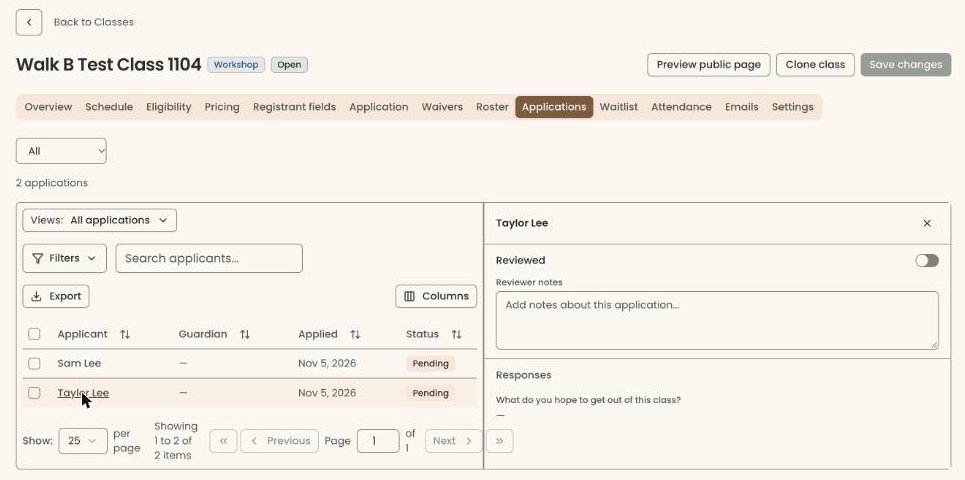
At the moment, answers to a question asked "Per registrant" are not kept. The panel shows "—" under the question instead of what the family typed, and the downloaded file leaves that column blank.
Marking reviewed and notes don't save yet
Near the top of the right-hand panel there is a "Reviewed" switch and a "Reviewer notes" box. At the moment neither one saves.
- If you turn on "Reviewed", you'll see "Failed to update review status". The row's "Status" stays "Pending".
- If you type in "Reviewer notes", you'll see "Failed to save reviewer notes" a moment after you stop typing. The note is not kept.
Marking an application reviewed and keeping notes on it can't be done in the screens right now.
Download the answers
Exporting saves a spreadsheet file (a CSV file, which opens in Excel, Numbers or Google Sheets) with the applicants' answers.
Page: /dashboard/classes/<classId>?tab=applications
- Open the class's "Applications" tab, as in steps 1 and 2 of "Read an application".
- At the top right, click "Export CSV". A box opens called "Export applications".
- Click "Export CSV" at the bottom right of the box.
- You'll see "CSV exported", and the file downloads to your computer. That means it worked.
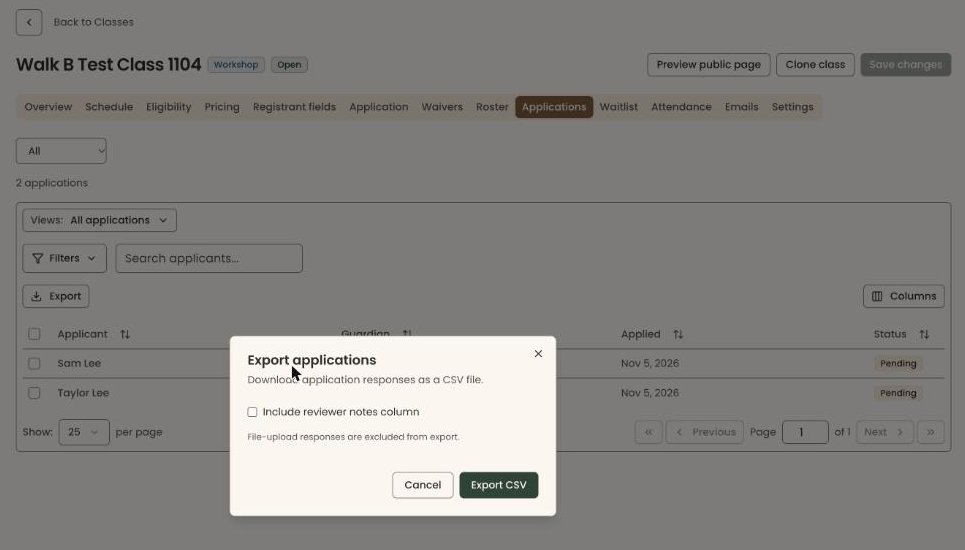
Answers that were uploaded files aren't in the file. The box says "File-upload responses are excluded from export." The box also offers "Include reviewer notes column". Because notes don't save at the moment, that column comes out empty.
If it didn't work, you'll see "Failed to export applications CSV". Try again.
Changes in the next release: the "Export CSV" button at the top right is replaced by "Export" at the top left of the table. Click "Export", then "Export answers (CSV)…" to open the same "Export applications" box. The table also gets "Views", "Filters" and "Columns" buttons and a checkbox on each row.
Special cases
- "No applications yet." means nobody has registered with answers yet.
- With "Require an application before checkout" on and no questions added, families see an empty application step and nothing is collected. Add at least one question.
- The "Export CSV" button is grayed out while there are no applications.
- The same switch, "Require an application before checkout", is also on the "Eligibility" tab. Changing it in either place changes the same setting.
Buttons to avoid
- On the "Application" tab, the trash can next to a question deletes the question. If anyone has already answered it, you'll see "Cannot delete this question — responses already exist for it. Disable it instead." To stop asking it, turn off its "Enabled" switch and click "Save question changes". It then shows "Hidden from checkout".
If you make a mistake
- Turn off "Require an application before checkout" and click "Save changes" to stop asking the questions on new registrations.