


Who can do this: Owner, Administrator, Finance and Fundraiser. Programs and Viewer see Data Management, but the export page tells them "You don't have access to this page — ask an Administrator". Front desk users don't see Data Management.
Quick steps: Data Management › "Start Export" › check the data types › "Export Format" › optional "Date Range (Optional)" › "Start Export" › "Download".
Before you start
- Your role must be Owner, Administrator, Finance or Fundraiser.
- A CSV file is a plain spreadsheet file. It opens in Excel, Numbers or Google Sheets. Excel format makes an .xlsx file. JSON is for technical uses, such as moving data into another system.
- To download one report instead of whole record types, see Export a report, save it as a template, or schedule it by email.
Open the export page
Page: /dashboard/data-management
- In the left-hand menu, under "Tools", click Data Management.
- The page is headed "Data Management".
- Find the box headed "Export Data". At its bottom, click "Start Export".
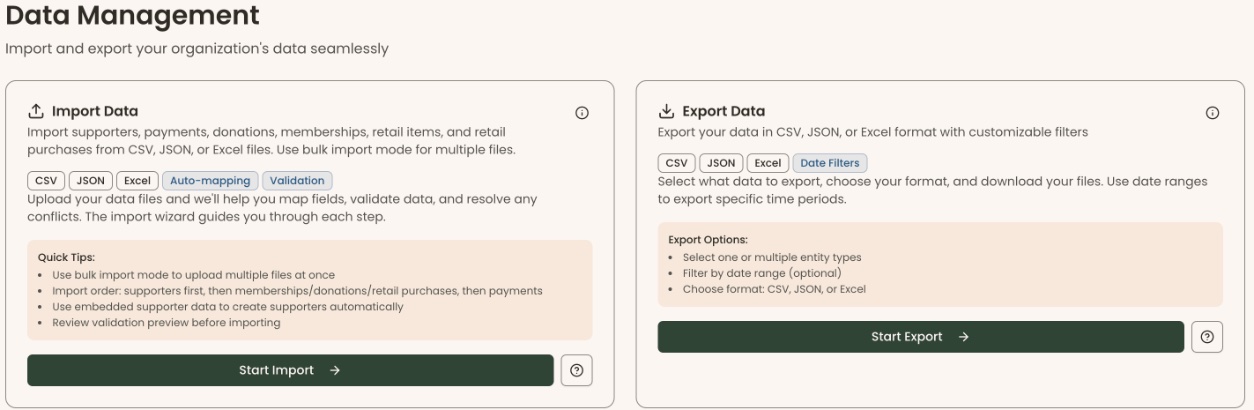
Page: /dashboard/data-management/export
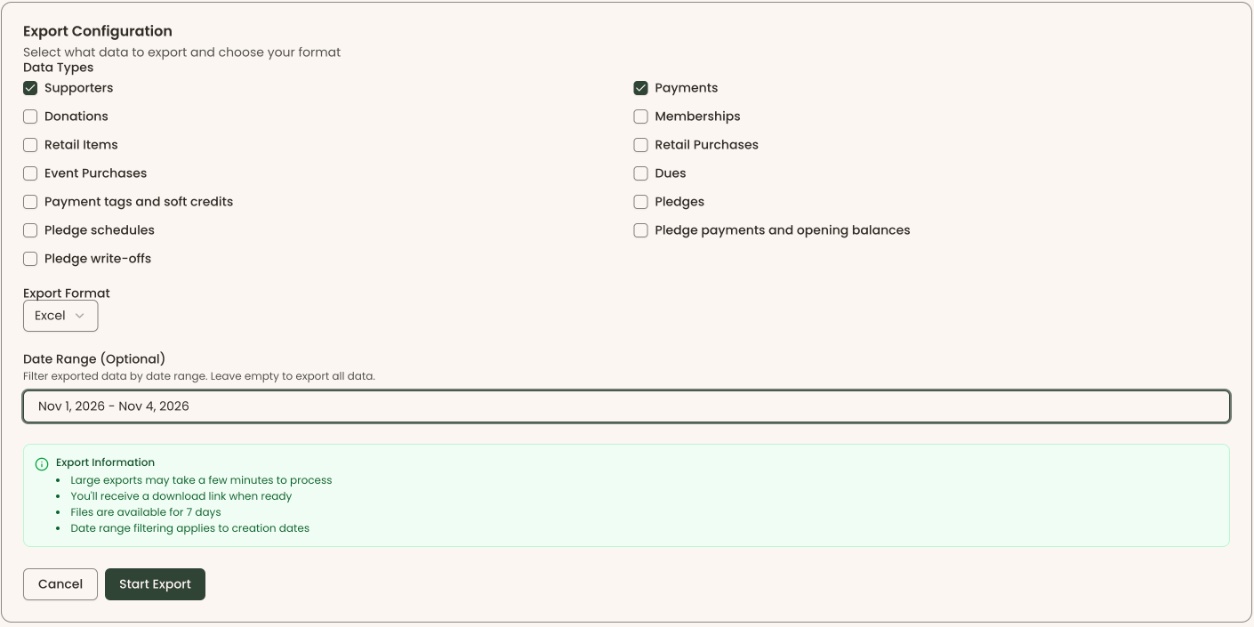
- The page is headed "Export Data", with a box headed "Export Configuration". That means it worked.
Choose what to export
- Under "Data Types", check the box beside each kind of record you want. "Supporters" is checked when the page opens.
The choices are "Supporters", "Payments", "Donations", "Memberships", "Retail Items", "Retail Purchases", "Event Purchases", "Dues", "Payment tags and soft credits", "Pledges", "Pledge schedules", "Pledge payments and opening balances" and "Pledge write-offs". - To leave one out, click its box again to uncheck it.
- Click "Export Format" and choose "CSV", "JSON" or "Excel". It starts on "CSV".
- To limit the export to a period, click the date picker under "Date Range (Optional)" and click the start day and the end day. Leave it empty to export everything.
Start the export and download it
- At the bottom of the box, click "Start Export". It is grayed out if no data type is checked.
- The button shows "Exporting...". A bar may show progress.
- You'll see "Export ready!" and "Click download to get your file". That means it worked.
- Click "Download", at the right of that message.
- The file downloads, and you'll see "Download complete".

The file is named after what you chose. For example, "supporters.csv" for supporters only, or "export-supporters-payment.csv" for two types.
If it didn't work:
- "End date must be after start date": the dates are the wrong way round. Choose them again.
- "Export failed" or "Export failed. Please try again.": nothing was made. Click "Start Export" again.
- "Failed to download export": click "Download" again.
- "Download link has expired. Please create a new export.": the file is more than 7 days old. Start a new export.
Special cases
- Several types in one CSV: they all go into one file, one after another. Each part starts with a line such as "# Entity: payment", then its own column headings. For a separate tab per type, choose "Excel" instead.
- Excel: each record type gets its own worksheet, named for it, for example "Supporters".
- Types with no records are left out of the file.
- A downloaded file holds private information about your supporters. Store it safely and delete copies you no longer need.
If you make a mistake
- Chose the wrong types or format: click "Cancel" to leave, then open the export page again and start over.
- Exporting doesn't change any of your records.