


Who can do this: Owner, Administrator, Finance and Fundraiser. Programs and Viewer can run reports but don't see "Export", "Save as Template" or "Schedule". Front desk users don't see Reporting.
Quick steps: Open a report › "Export" › "Download as CSV" or "Download as PDF". Save: "Save as Template" › name › "Save". Schedule: "Schedule" › name, frequency, time, recipients › "Create Schedule". Manage: Reporting › Scheduled Reports.
Before you start
- Your role must be Owner, Administrator, Finance or Fundraiser.
- Open the report first and set it up the way you want: dates, filters, sorting and columns. See Run a built-in report, then filter, sort and choose columns.
- A CSV file is a plain spreadsheet file. It opens in Excel, Numbers or Google Sheets.
- For a schedule, have the email address of everyone who should receive it.
Download a report
Page: /dashboard/reporting/templates/<templateId>
- Open the report and set the dates, filters, sorting and columns.
- In the row of buttons above the table, click "Export". It has a download icon.
- Click "Download as CSV" for a spreadsheet, or "Download as PDF" for a printable file.
- The file downloads. Its name is the report's name followed by a date, for example "Active-Members-2026-11-05.csv". That means it worked. (In the evening in US time zones, the date in the name can be tomorrow's.)

The file has exactly the rows, columns, column order and sorting you set on screen.
A PDF holds at most 500 rows. If the report has more, the PDF says "Results truncated to 500 rows. Download the CSV for the complete dataset." Use "Download as CSV" for everything.
Save your version as a template
- Set the dates, filters and columns the way you want.
- In the row of buttons, click "Save as Template".
- A box opens headed "Save as Template". Click in "Template Name" and type a name, for example "Family members this year".
- Click "Save", at the bottom right of the box.
- You'll see "Template "[name]" saved successfully". That means it worked. The page now shows your saved version, with its name as the heading.
- It now appears on the "Report Templates" page under "Your Saved Reports".
If you see "Failed to save template", nothing was saved. Try again.
Schedule a report by email
- Open the report and set the filters and columns the way you want. The schedule uses them.
- In the row of buttons, click "Schedule". It has a clock icon.
- A box opens headed "Schedule Report".
- Click in "Schedule Name" and type a name, for example "Weekly Board Summary".
- Click "Frequency" and choose "Daily", "Weekly" or "Monthly". It starts on "Weekly".
- For "Weekly", click "Day of Week" and choose a day. For "Monthly", click "Day of Month" and choose a date from 1 to 28.
- Click "Send at (in your organization's timezone)" and choose a time. It starts on 8:00 AM.
- Under "Recipients", click in "Email address" and type an address. You can also type a name in "Name (optional)".
- Click the plus (+) button at the right of those boxes. The address appears in a list above. Repeat for each person.
- Click "Date Range" and choose the period each email covers, for example "Last 7 Days" for a weekly report.
- Under "Export Format", click "CSV" or "PDF".
- Check the shaded summary box. It shows "Based on:", how many filters are applied, and "Delivers:", for example "Weekly on Monday at 8:00 AM".
Important: Once you click "Create Schedule", your organization's data is emailed as an attached file to every address in the list, on every send. Check each address first.
- Click "Create Schedule", at the bottom right of the box.
- You'll see "Report schedule created successfully". That means it worked.
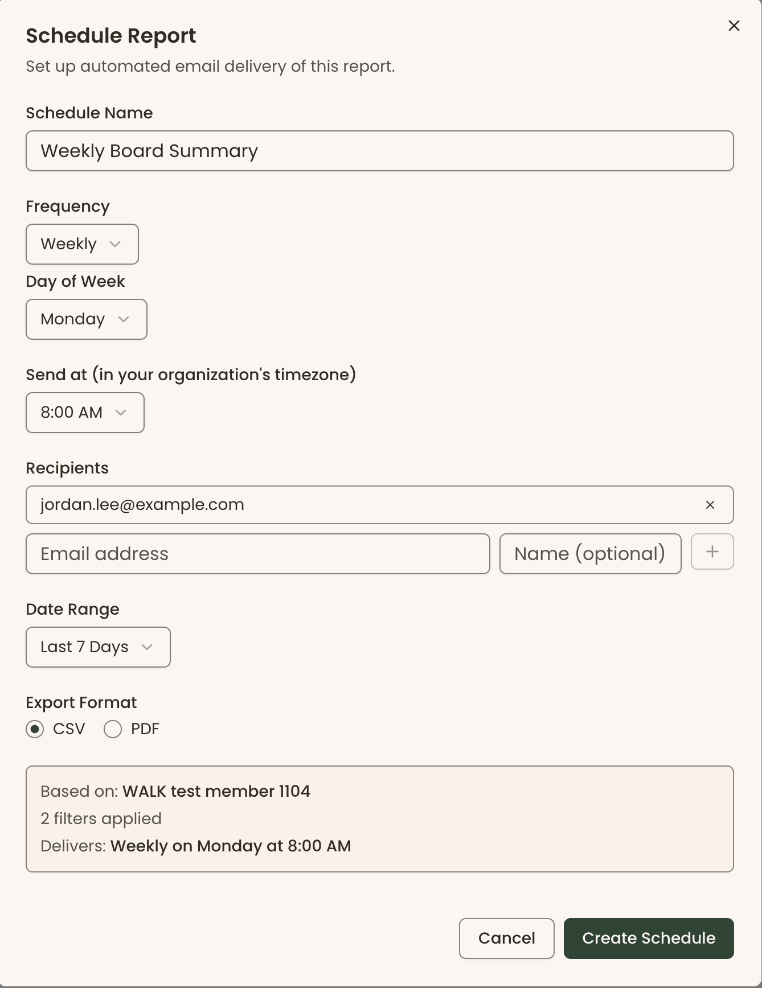
"Create Schedule" stays grayed out until there is a name and at least one recipient. "At least one recipient is required." shows until you add one.
If the date range doesn't suit the frequency, a warning appears under "Date Range", for example that a one-day range on a weekly report skips six days. The warning names a better range. Choose it, or keep yours.
If you see "Failed to create report schedule", nothing was saved. Try again.
What recipients get: an email from Clerestory with the subject "[schedule name] — [date range]", saying "This is an automated report from Clerestory.", with the report attached.
See, pause, change or delete a schedule
Page: /dashboard/reporting/schedules
- In the left-hand menu, under "Tools", click Reporting to open its list.
- Click Scheduled Reports.
- The page is headed "Scheduled Reports". Each schedule shows "Name", "Frequency", "Recipients", "Last Run", "Next Run" and "Status".
Then follow the steps below for what you want to do.
To pause or resume:
- At the far right of the schedule's row, click the pause icon (two short bars). For a paused schedule, the icon is a play triangle.
- You'll see "Schedule paused" or "Schedule resumed".
To change it:
- At the far right of the row, click the pencil icon.
- The "Schedule Report" box opens with the current settings. Change what you need.
Important: The changed schedule emails every address in its list from its next send.
- Click "Update Schedule".
- You'll see "Schedule updated".
To delete it:
- At the far right of the row, click the red trash can icon.
- A box opens headed "Delete "[name]"?".
Important: Clicking "Delete" permanently deletes the schedule. Recipients stop getting it. This can't be undone.
- Click "Delete", or "Cancel" to keep it.
- You'll see "Schedule deleted".
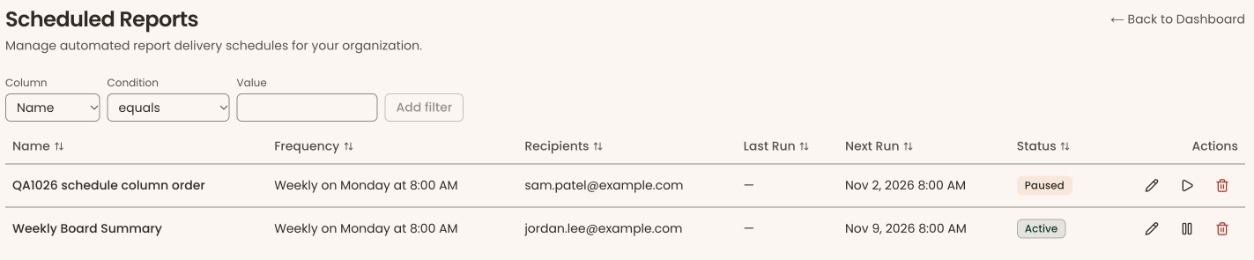
If there are no schedules, the page says "No scheduled reports yet. Open any report template and click Schedule to set up automated delivery."
Special cases
- Programs and Viewer can see the "Scheduled Reports" page but not the pencil, pause or trash icons.
- A scheduled file holds at most 10,000 rows.
- The "Payout Reconciliation" report has extra downloads in each row: "QuickBooks CSV" and "Journal CSV".
If you make a mistake
- Downloaded the wrong thing: change the report and download again. Delete the unwanted file from your computer.
- Saved the wrong template: see "Delete a saved report" in Run a built-in report, then filter, sort and choose columns.
- Wrong recipient or settings on a schedule: click the pencil icon and fix it, or pause it.
- A scheduled email already sent can't be recalled.