


Who can do this: Owner, Administrator, Programs and Front desk. Finance, Fundraiser and Viewer users can see who is checked in but don't see the check-in controls. A volunteer with an emailed link needs no account.
Quick steps: Events › Events › the event › "Orders" tab › check the boxes next to guests › "Check In Selected (n)". Or "Check-in scanner" › "Open scanner here" or "Email a link to a volunteer".
Before you start
- You need an Owner, Administrator, Programs or Front desk login.
- The event needs registrations. To add one yourself, see Register someone by hand.
- For the scanner: a phone, tablet or laptop with a camera, and permission to use it in the browser.
- For a volunteer link: the volunteer's email address. The event must have a date and not be over.
- A guest is one person on an order. One order can have several guests.
Check in from the list
Page: /dashboard/campaigns/<campaignId>?tab=attendees
- In the left-hand menu, under "Fundraising", click "Events". Then click "Events" in the list that opens below it.
- In the list of events, click the event's name.
- Click the "Orders" tab in the row of tabs near the top.
- In the search box at the top ("Search by name, email or order number"), type the guest's or buyer's name.
- Under their order, click "Show the guest" (or "Show the … guests").
Important: a check-in can't be undone in the screens.
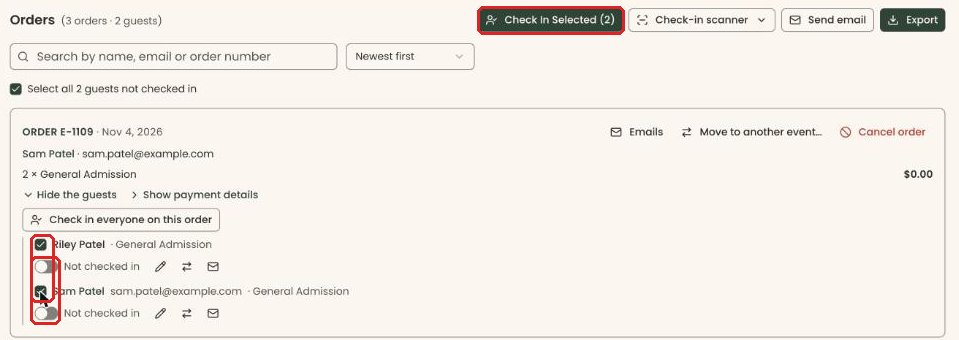
- To check in one person, click the switch under their name, to the left of "Not checked in". You'll see "… checked in".
- To check in the whole party, click "Check in everyone on this order" above the guest list. You'll see "… attendee(s) checked in".
- To check in several people at once, check the box to the left of each name. Or check "Select all … guests not checked in" above the orders.
- A "Check In Selected (3)" button appears at the top right of the tab, to the left of "Check-in scanner". The number is how many you checked. Click it.
- You'll see "3 attendee(s) checked in", and each person shows "Checked In" next to their switch. That means it worked.
If it didn't work:
- "All selected attendees are already checked in" means there was nobody left to check in.
- "Failed to check in selected attendees" means it didn't save. Try again.
Check in with the scanner
Page: /dashboard/check-in/<eventId>
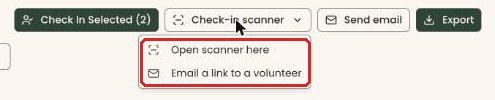
- On the event's "Orders" tab, at the top right, click "Check-in scanner" (it has a small down arrow).
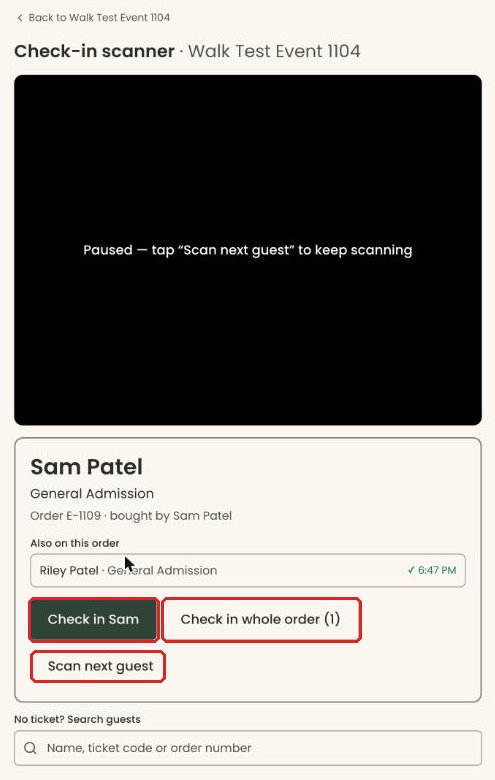
- In the menu that opens, click "Open scanner here". A full-screen "Check-in scanner" page opens for this event, with the camera view at the top.
- If your browser asks, allow the camera. If you see "Scan tickets with the camera", click it first.
- Hold the guest's ticket code up to the camera.
- The guest's card appears. Click "Check in" followed by their first name.
- Or click "Check in whole order (…)" to check in everyone on their order who isn't here yet.
- The card turns green and shows "Checked in at" and the time. That means it worked. If they were checked in earlier, it says "Already checked in" with the time.
- Click "Scan next guest" for the next person.
- No ticket? Under "No ticket? Search guests", type a name, ticket code or order number. Click the guest in the list. Anyone already checked in shows a check mark and the time.
- To leave, click "Back to" followed by the event's name, at the top left.
If it didn't work:
- "That code is not valid for this event. Search for the guest by name instead." means the ticket is for another event, or misread. Search by name.
- "This order was canceled." means the ticket's order was canceled. Don't admit them on that ticket.
- "We couldn't open the camera…" or "This browser can't use the camera here…" means use "No ticket? Search guests" instead.
- "That check-in didn't save. Please try again." means try the button again.
Email a check-in link to a volunteer
- On the event's "Orders" tab, at the top right, click "Check-in scanner".
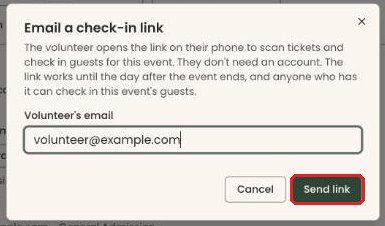
- In the menu that opens, click "Email a link to a volunteer". A box opens called "Email a check-in link".
- In "Volunteer's email", type their address, for example volunteer@example.com.
Important: "Send link" emails the link straight away. Anyone who has it can check in this event's guests until the day after the event ends, so send it only to people you trust.
- Click "Send link".
- You'll see "Check-in link sent to …". That means it worked.
If it didn't work, the box shows the reason in red under the email address:
- "Set the event date before sharing a check-in link." Add the date on the event's "Settings" tab.
- "This event is over, so a check-in link would already have expired."
- "This event is archived. Restore it before sharing a check-in link."
- "We couldn't send the link. Try again."
What the volunteer sees
Page: /checkin/<token>
- The volunteer opens the link from the email on their phone. No sign-in is needed.
- The page shows your organization's name, and "Check-in" with the event's name.
- They use the same scanner as staff: "Scan tickets with the camera", or "No ticket? Search guests".
- They can check in one guest or a whole order. They can't see or change anything else.
- If the link has expired or was copied incompletely, they see "This check-in link isn't working". They should ask you for a new one.
If you make a mistake
This can't be undone in the screens: there is no button to un-check-in a guest. Also, a refund on an order with a checked-in guest won't release its seats, because that would delete their attendance record.