


Who can do this: Owner, Administrator, Finance and Fundraiser. Programs, Front desk and Viewer users don't see "New pledge" or the buttons on a pledge.
Quick steps: Pledges › "New pledge" › supporter, amount, schedule › "Save pledge". On a pledge: click its row › "Apply a gift", "Edit schedule", "Set up automatic payments", "Write off…" or "Cancel pledge".
Before you start
- You need one of the roles above.
- Your organization must have switched "Pledges" on, on the Features settings page (/dashboard/settings/features). If it is off, "Pledges" is missing from the left-hand menu.
- The supporter must already be in Clerestory. To add one, see "Add a supporter or a contact, and move people between Supporters and Contacts".
- Have to hand: the total promised, the date they promised it, and how often they'll pay.
Words used here:
- A pledge is a promise to give an amount over time, for example $1,200 paid monthly for a year.
- An installment is one of the planned payments in the pledge's schedule.
- Applying a gift means counting a gift you've already recorded toward the pledge. A pledge doesn't take money by itself.
- Writing off lowers what the supporter has pledged, when part of it won't arrive.
Record a new pledge
Page: /dashboard/pledges
- In the left-hand menu, under the heading Fundraising, click "Pledges".
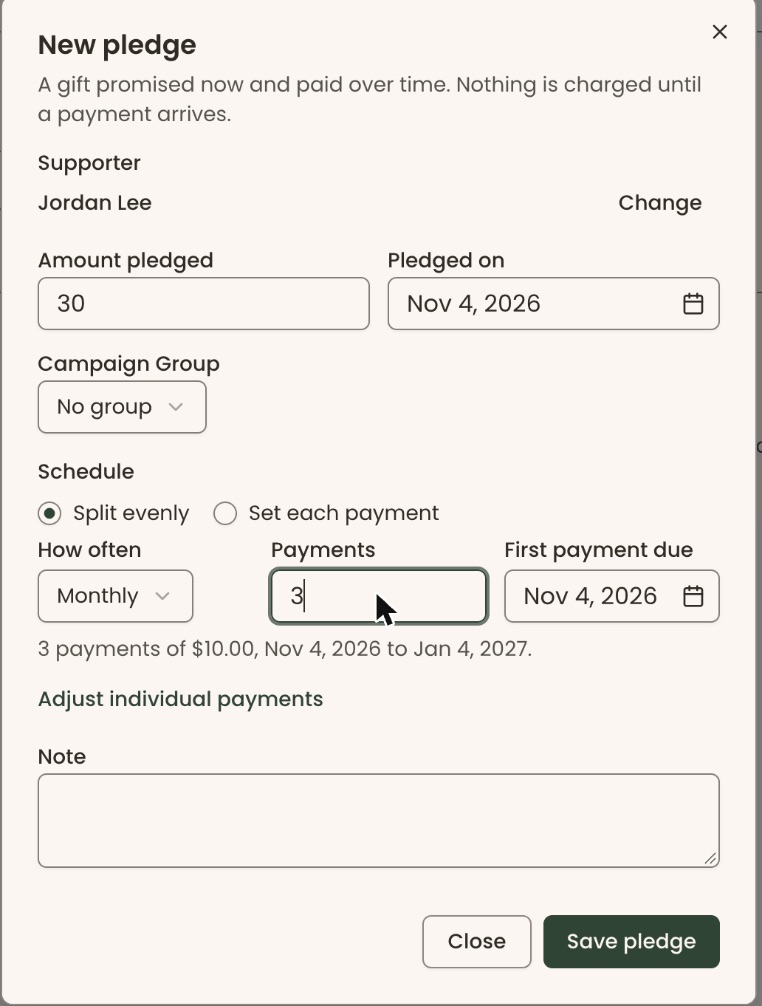
- At the top right of the page, click "New pledge". A box opens called "New pledge".
- Under "Supporter", click in "Search supporters by name", type the name, and click the right person.
- Under "Amount pledged", type the total, for example 1200.
- Under "Pledged on", pick the day they made the promise.
- If your organization uses campaign groups, choose one under "Campaign Group", or leave "No group".
- Under "Schedule", leave "Split evenly" chosen, or choose "Set each payment" to type each amount yourself.
- Under "How often", choose "One payment", "Monthly", "Quarterly", "Every six months" or "Yearly". It starts on "One payment".
- If you chose anything but "One payment", a "Payments" box appears. Type how many payments there will be.
- Under "First payment due" (or "Due on" for one payment), pick the date. A line underneath sums it up, for example "3 payments of $10.00, Nov 4, 2026 to Jan 4, 2027."
- Under "Note", type anything you want to keep.
- At the bottom of the box, click "Save pledge".
- You'll see "Pledge recorded." That means it worked. The pledge's panel opens on the right, and the pledge is listed under "All pledges".
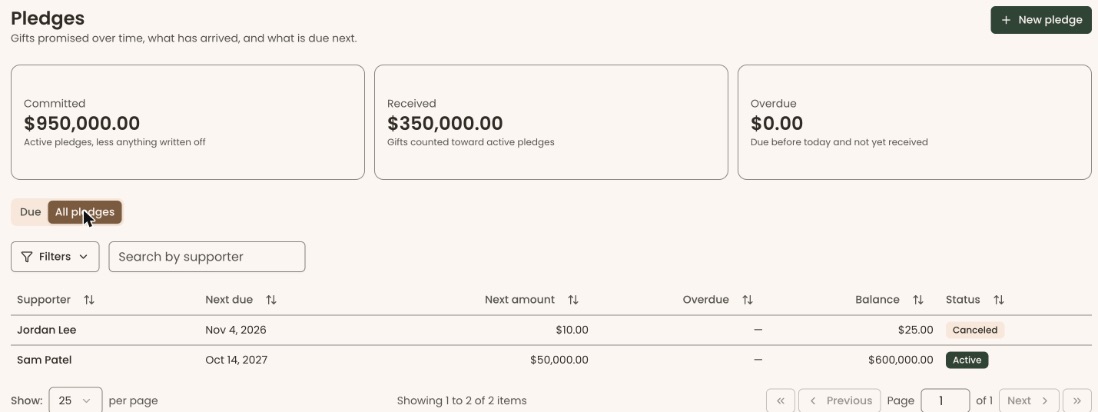
If you see "The pledge could not be saved." followed by a reason, fix what it says and try again.
Open a pledge
- In the left-hand menu, under Fundraising, click "Pledges".
- Near the top, click "Due" (payments overdue or due in the next 60 days) or "All pledges".
- Type the supporter's name in "Search by supporter".
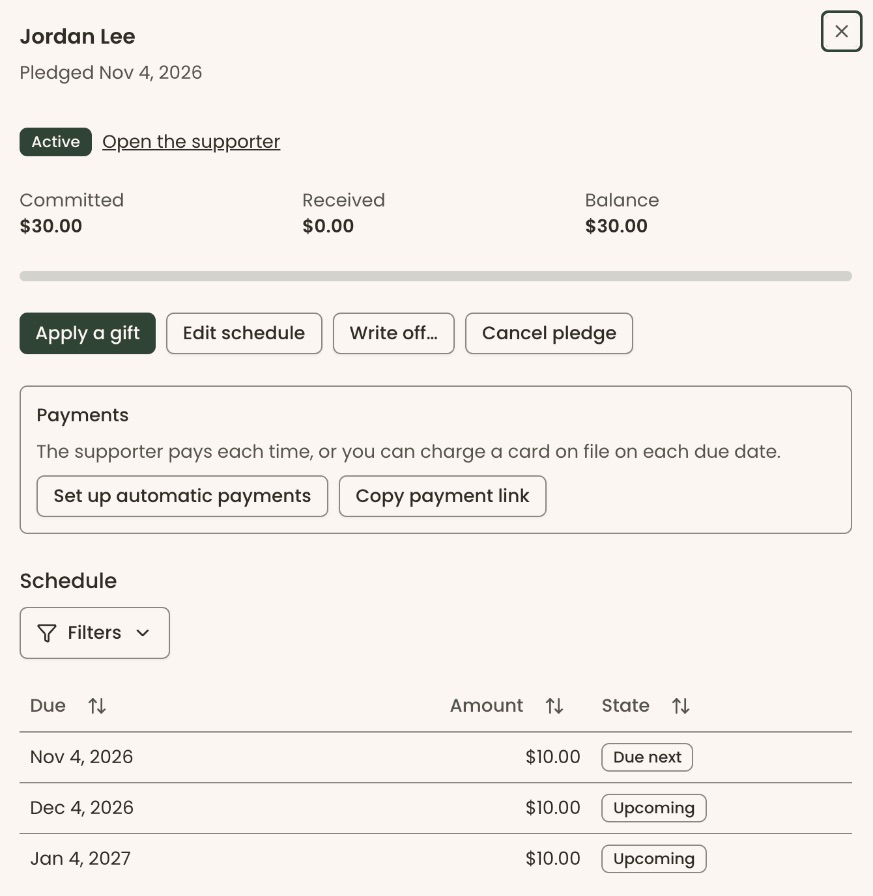
- Click the pledge's row. A panel opens with the supporter's name at the top, the schedule, and the gifts that count toward it.
Count a gift toward a pledge
Record the gift first (see "Record a gift paid by check or cash"). Then:
- Open the pledge, as above.
- Click "Apply a gift". A box opens called "Apply a gift".
- It lists the supporter's completed gifts not yet counted. Find the right one by date and amount.
- If someone else paid (for example a spouse or a company), type their name in "Search for the payer by name" under "Paid by someone else?". Their gifts are listed instead.
- Next to the gift, click "Apply".
- You'll see "The gift now counts toward the pledge." That means it worked.
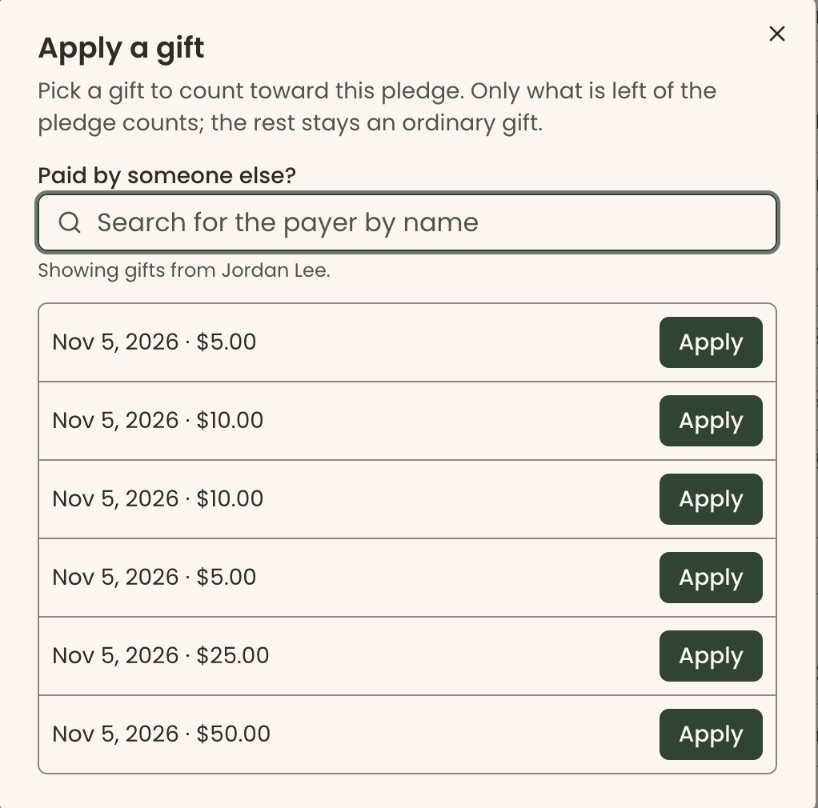
Only what is left of the pledge counts. If the gift is bigger, the rest stays an ordinary gift. If the box says "No completed gifts to apply.", record the gift first.
Tip: when you record a gift with "Record Manual Donation" for someone with an open pledge, you can check "Count this toward their pledge" instead.
Change the schedule
- Open the pledge.
- Click "Edit schedule". A box opens called "Edit schedule". Paid payments stay as they are.
- Change the dates and amounts of the rest. The trash can beside a payment removes it, and "Add a payment" adds one. The amounts must still add up to the pledge: the box shows "Adds up to $…." as you type.
- At the bottom of the box, click "Save schedule".
- You'll see "Schedule saved." That means it worked.
Charge a card automatically on each due date
Do this with the supporter on the phone.
- Open the pledge.
- Under the schedule, find "The supporter pays each time, or you can charge a card on file on each due date."
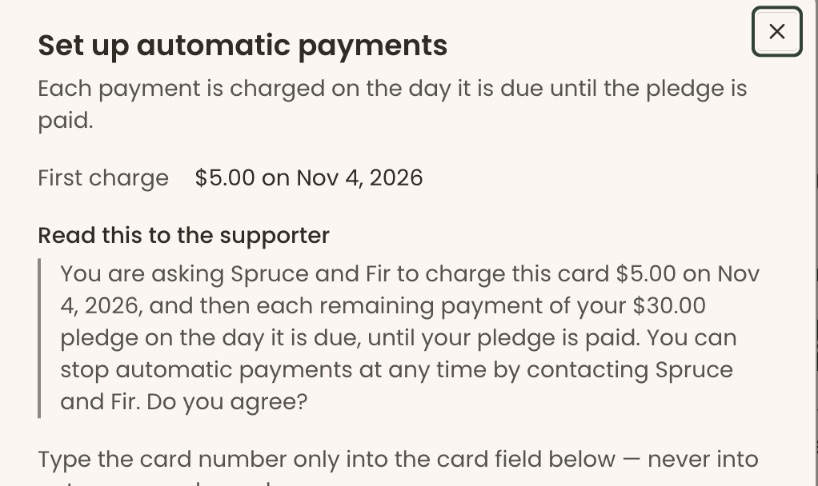
- Click "Set up automatic payments". A box opens with the same title.
- Look at "First charge" (the amount and date of the first charge). If a card is already on file, "Card now" shows it too.
- Read the words under "Read this to the supporter" out loud, word for word.
- Leave "Card" chosen. Type the card details only into "Card number", "Expiration date", "Security code" and "ZIP code". Leave the optional "Save my information for faster checkout" box empty.
- Check "I read the words above to the supporter and they agreed to these automatic payments."
Important: after the next step, the card is charged on each due date without asking again.
- At the bottom of the box, click "Save card".
- You'll see "Automatic payments are on." That means it worked. The "Payments" box on the pledge now says "Automatic payments are on" with the card's last four digits and the next charge date.
To change the card, click "Replace the card". To stop, click "Stop automatic payments". You'll see "Automatic payments stopped."
Write off part of a pledge
- Open the pledge.
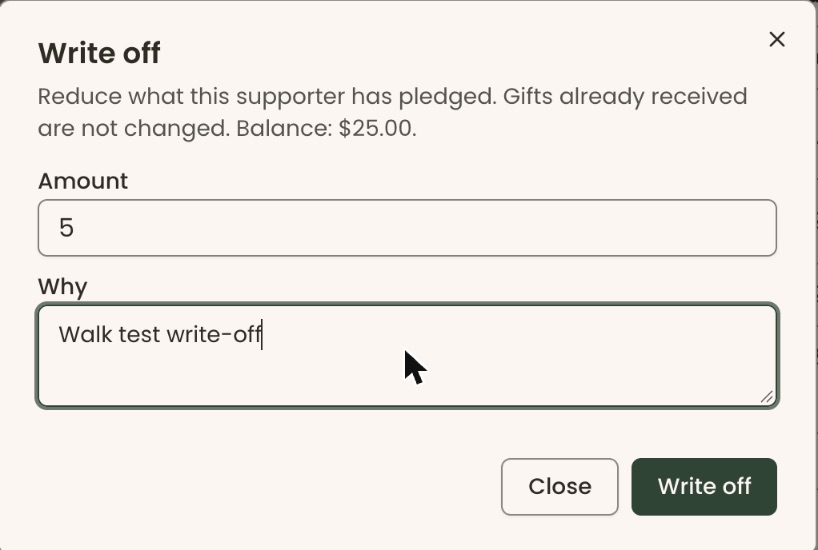
- Click "Write off…". A box opens called "Write off". The text at the top shows the "Balance".
- "Amount" starts filled in with the whole balance. Change it to how much won't arrive.
- Under "Why", type the reason.
Important: the next step lowers what is pledged. It can't be undone in the screens.
- Click "Write off". You'll see "Written off." The amounts pledged go down, later payments in the schedule are removed or reduced, and a "Write-offs" list appears on the pledge.
Gifts already received are not changed.
Cancel a pledge
Use this only for a pledge entered by mistake, or withdrawn before anything arrived. "Cancel pledge" only appears while no gift counts toward it.
- Open the pledge.
- Click "Cancel pledge". A box asks "Cancel this pledge?"
- Under "Why", type the reason. The red "Cancel pledge" button stays faded until you do.
Important: the next step can't be undone in the screens. The pledge stays on the supporter's record as canceled.
- Click "Cancel pledge". You'll see "Pledge canceled." "Keep it" closes the box without canceling.
What the labels mean
- Committed: active pledges, less anything written off.
- Received: gifts counted toward active pledges.
- Overdue: due before today and not yet received.
- Balance: what is still to come on a pledge.
Special cases
- Payment link: "Copy payment link" copies a link the supporter can use to pay. You'll see "Payment link copied." Paste it into your own email.
- Turning Pledges off hides pledges from your dashboard and your supporters' portal and stops automatic pledge payments. Nothing is deleted.
If you make a mistake
- A gift counted toward the wrong pledge can be taken off it: open the pledge and, under "Gifts applied", click "Remove" at the right of the gift. You'll see "Removed from the pledge."
- A wrong schedule: "Edit schedule" again.
- A write-off or a cancellation can't be undone in the screens.