

Who can do this: Owner and Administrator. Viewer sees the same sections read-only: there is no "Edit" button, the switches are grayed out and "Save brand" is hidden. Finance, Fundraiser, Programs and Front desk don't see these sections on the page.
Quick steps: Settings › "Organizations" › "Edit" on "Organization Information" › "Save Changes" · "Brand" card › "Save brand"
Before you start
- You need the Owner or Administrator role.
- Have your logo as a PNG or JPG file, and your contact email, phone and address.
- For the brand, have the web address of the page where your donation form sits. A brand kit is the colors and fonts your forms and emails use.
- The supporter portal is the page where your supporters sign in to manage their membership, payment methods and giving.
All four sections below are on the same page, one under another.
Page: /dashboard/settings/organizations
Edit your organization details
- In the left-hand menu, under Tools, click "Settings". A short list opens under it.
- Click "Organizations".
- Find the "Organization Information" card. At its top right, click "Edit".
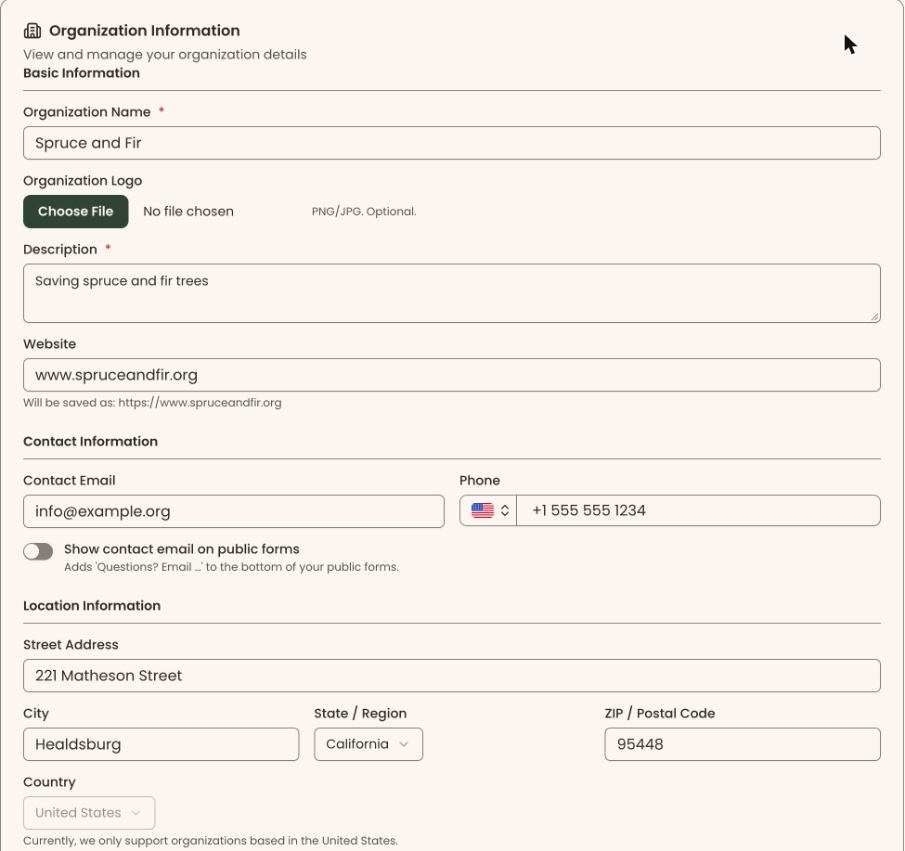
- Under "Basic Information", change "Organization Name", "Organization Logo", "Description" or "Website". "Organization Name" and "Description" are required.
- To change the logo, click "Choose File" under "Organization Logo" and pick a PNG or JPG file. To take the logo off, click the small remove button on the logo preview.
- Under "Contact Information", change "Contact Email" or "Phone".
- To show your contact email at the bottom of your public forms, turn on "Show contact email on public forms". It adds "Questions? Email …" to your forms. It stays off until "Contact Email" is filled in.
- Under "Location Information", change "Street Address", "City", "State / Region" or "ZIP / Postal Code". "Country" is grayed out and stays "United States": "Currently, we only support organizations based in the United States."
- Under "Regional Settings", change "Timezone", "Fiscal Year Start Month" or "Email language".
Important: If "Show contact email on public forms" is on when you save, your contact email shows to the public on every form.
- At the bottom right of the card, click "Save Changes", next to "Cancel".
- You'll see "Organization information updated successfully". That means it worked.
- If you see "Please fill in all required fields correctly", check that "Organization Name" and "Description" are filled in. Also check the website, email and phone are typed correctly.
Set your brand colors and fonts
- On the same page, find the "Brand" card.
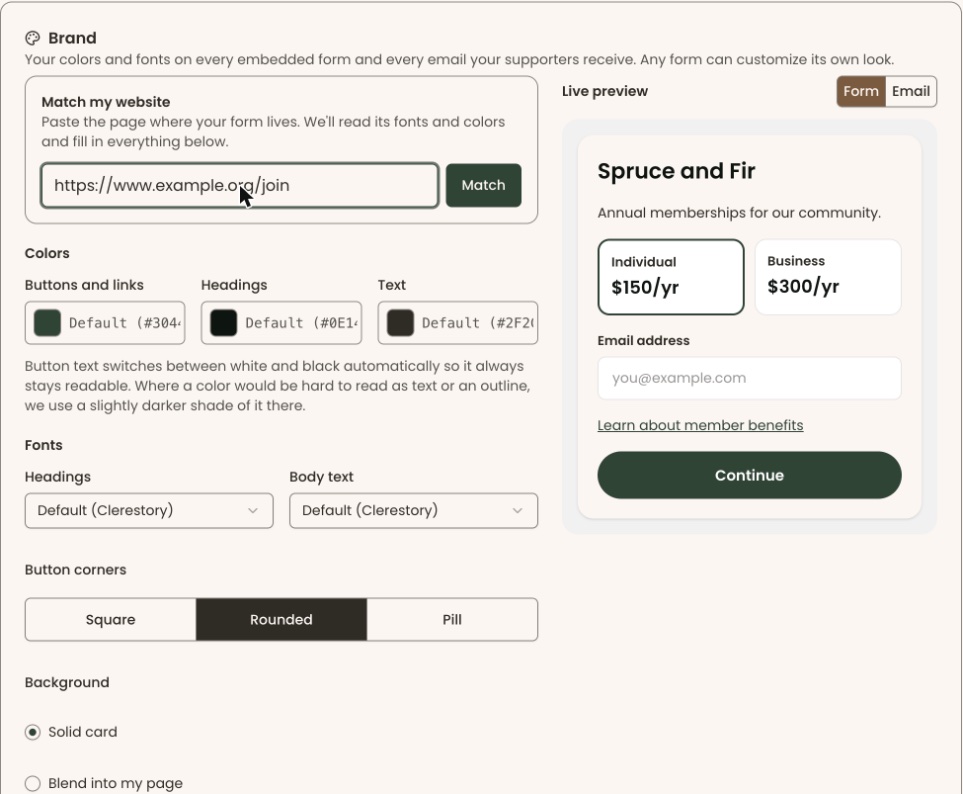
- The quickest way: under "Match my website", paste the address of the page where your form lives into "Website address" and click "Match". Clerestory reads that page's fonts and colors and fills in the fields below. If it can't, a message says why, for example "The site answered with an error (404)." or "We couldn't find fonts or colors on that page. Choose them below."
- Or set them yourself:
- Colors: "Buttons and links", "Headings" and "Text".
- Fonts: "Headings" and "Body text".
- "Button corners": "Square", "Rounded" or "Pill".
- "Background": "Solid card" or "Blend into my page".
- Click "More options" for the rest: card, field and email colors, "Heading weight", "Text size", "Card and field corners", and "Show logo and form header image".
- Use "Form" and "Email" above the preview to see how a form or an email will look.
Important: The next step changes the look of every form and email your supporters see, straight away.
- Click "Save brand", at the bottom right of the "Brand" card. It stays grayed out until you change something.
- You'll see "Brand saved. Your forms and emails use it now." That means it worked. If you see "Could not save your brand.", try again.
Share your supporter portal link and QR code
- On the same page, find "Supporter portal link & QR code".
- Below the link, at the right, click "Copy" to copy the address. The button reads "Copied" for a moment.
- Click "Download QR" to save the QR code as an image for membership cards, mailers or signs.
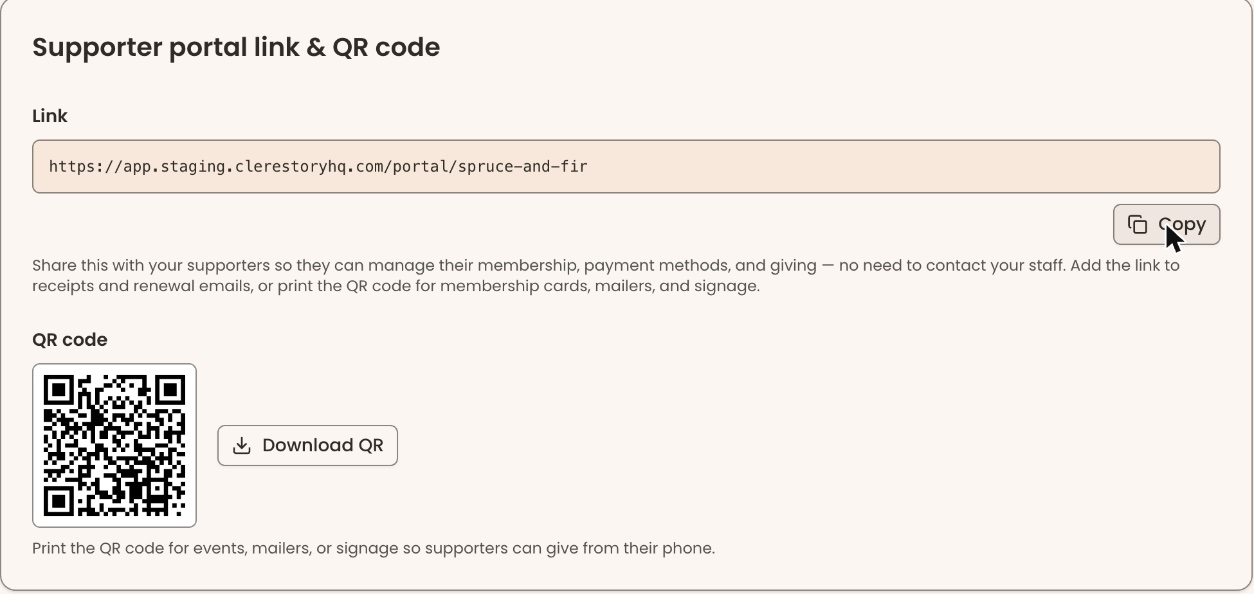
Supporters use the portal to manage their membership, payment methods and giving without contacting your staff.
Choose whether shop prices include tax
- On the same page, find "Retail Tax Settings".
Important: Clicking the switch saves at once, with no Save button or "Are you sure?" box. It changes what customers pay at checkout from that moment on.
- Click the switch at the far right of the "Tax-inclusive pricing" line. The box below it shows what customers will pay.
- On: the price you set is what the customer pays. For example, a product priced at $25.00 costs exactly $25.00, and the receipt shows the base price plus a tax breakdown.
- Off: tax is added at checkout. A $25.00 product costs $25.00 plus tax.
- You'll see "Tax-inclusive pricing enabled" or "Tax-inclusive pricing disabled". That means it worked.

Special cases
- "Email language" is the language you write your own emails and letters in, so screen readers pronounce them correctly. It doesn't translate anything: receipts and other emails Clerestory writes stay in English.
- One form needs a different look. The "Brand" card sets the look for every form and email. Any single form can be customized on its own, and keeps its own changes.
- "Show logo and form header image" off hides your logo and header image at the top of donation and membership forms. Event and class pictures still show.
- Your EIN and legal name aren't in "Organization Information". They are in the payment accounts section of this page (see the guide "Add a payment account, connect Stripe and set your payout schedule").
- More than one organization. Use the organization picker at the top of the page to choose which one you are editing.
If you make a mistake
- Organization details: before saving, click "Cancel" to put everything back. After saving, click "Edit" again and change it back.
- Brand: click "Reset to Clerestory default", then "Reset" in the box that asks "Reset to the Clerestory default?". Your forms and supporter emails go back to Clerestory's colors and fonts. Forms you customized keep their own changes. You'll see "Back to the Clerestory default look."
- Tax-inclusive pricing: turn the switch back.