


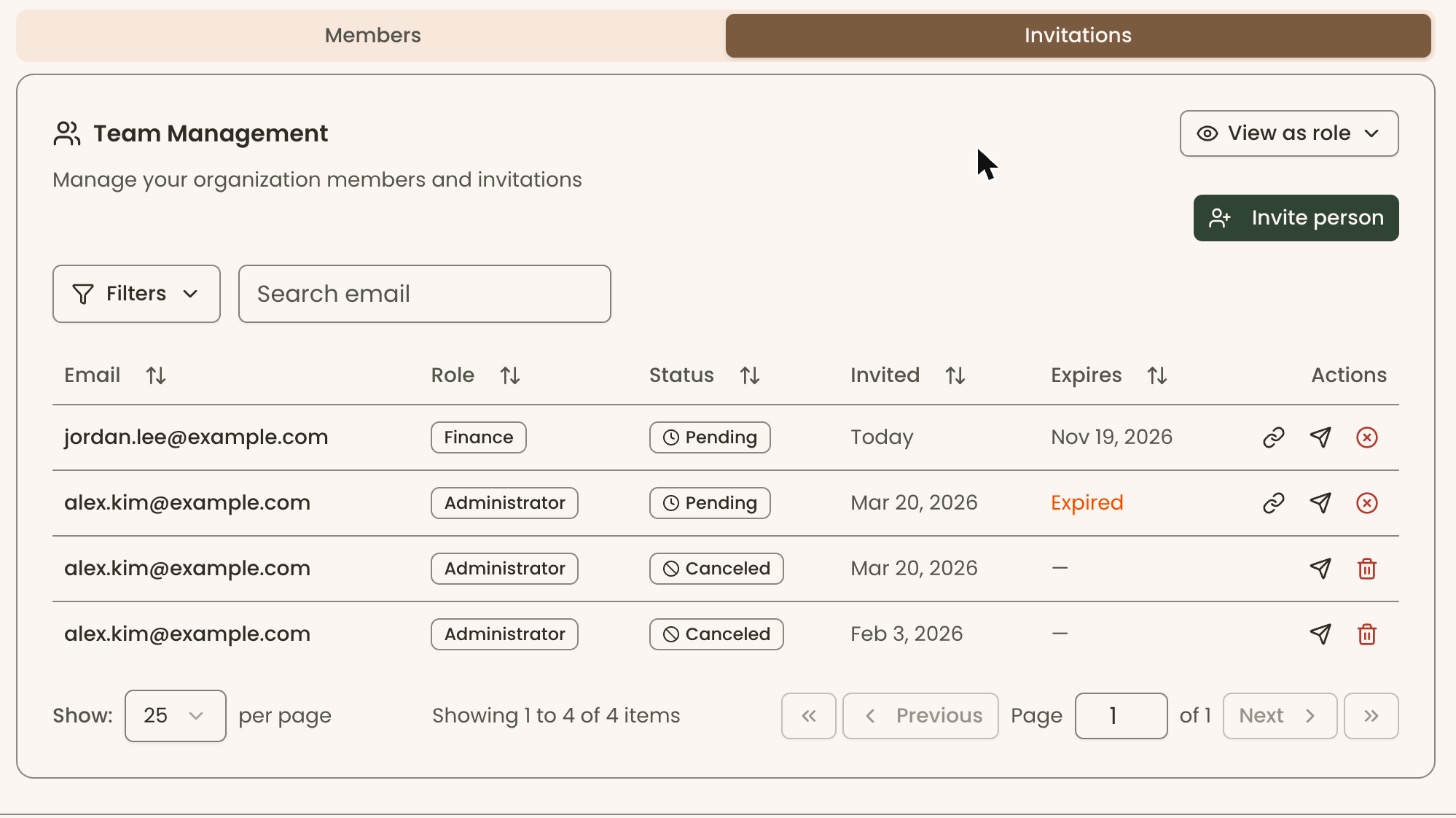
Who can do this: Owner, Administrator. Everyone else can see the "Members" and "Invitations" tabs, but not the "Invite person" button or the invitation buttons.
Quick steps: Settings › Organizations › "Team Management" › "Invitations" tab › "Invite person" › "Email" and "Role" › "Invite".
Before you start
- Your role must be Owner or Administrator. A role is the set of permissions a person has in Clerestory.
- Have to hand: the person's email address, and which role fits their job (see "The roles you can choose" below).
- The person needs access to that email inbox to accept.
Invite someone
Page: /dashboard/settings/organizations
- In the left-hand menu, under "Tools", click Settings to open its list. If you can't see the items under it, scroll the left-hand menu down.
- Click Organizations.
- Scroll to the bottom of the page, to the box headed "Team Management".
- Just above that box are two wide tabs, "Members" and "Invitations". Click "Invitations", the one on the right.
- Click "Invite person", at the top right of the "Team Management" box, above the list.
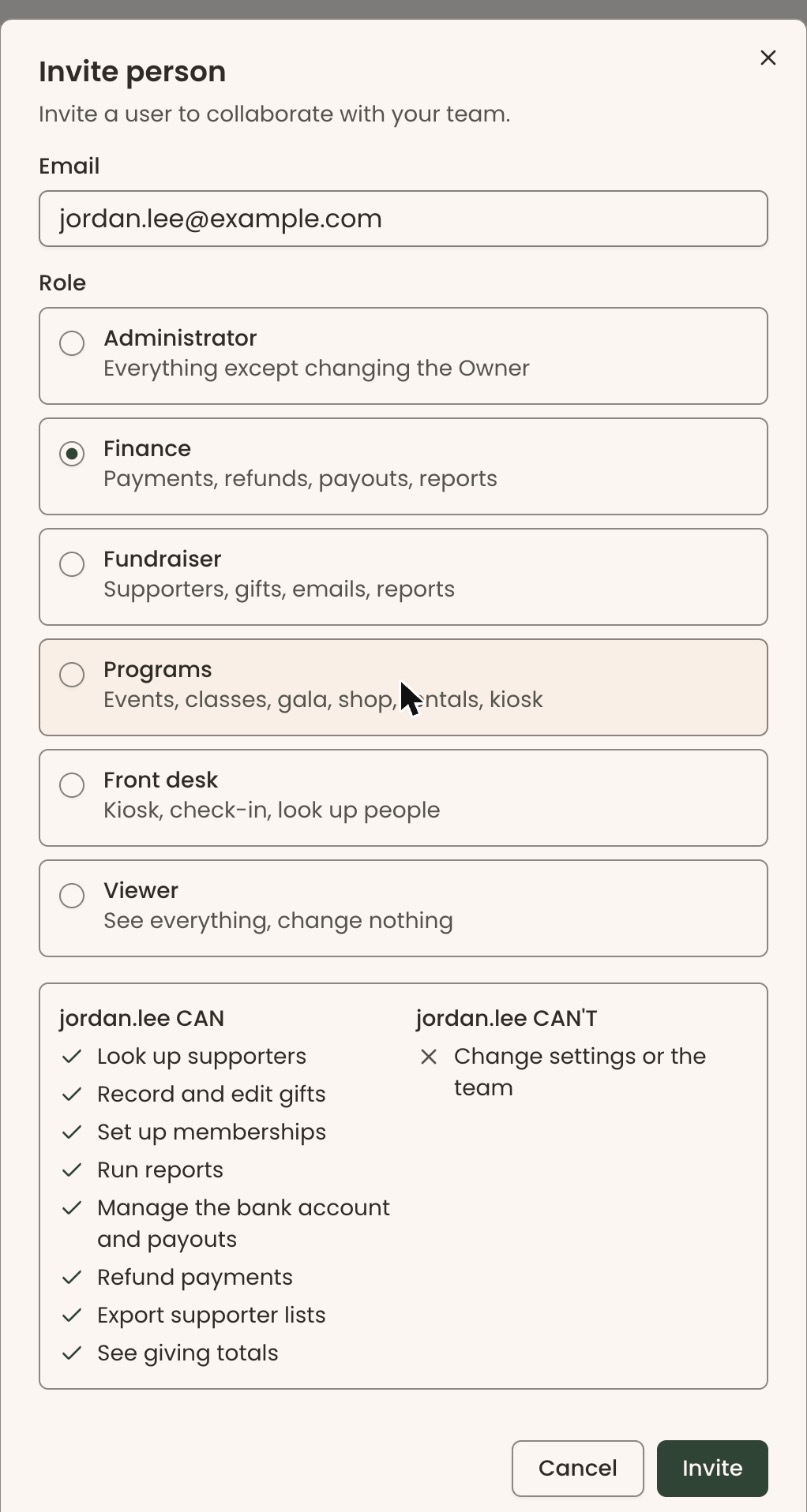
- A box opens headed "Invite person".
- Click in the "Email" box and type the person's email address, for example jordan.lee@example.org.
- Under "Role", click the role that fits their job. Each choice shows the role's name, with a one-line description underneath.
- Read the box that appears below. It lists what this person CAN and CAN'T do with that role.
Important: Clicking "Invite" sends an email to that address straight away.
- Click "Invite", at the bottom right of the box.
- You'll see "Invitation sent." at the top of the page. That means it worked.
- Refresh the page in your browser, then click the "Invitations" tab again. The person now appears at the top of the list with the status "Pending". (The list doesn't update by itself.)
The person gets an email with the subject "You're Invited to Join [your organization]". It has an "Accept my invitation →" button. They don't need an account first. The link helps them create one.
The roles you can choose
| Role | Description shown |
|---|---|
| Administrator | Everything except changing the Owner |
| Finance | Payments, refunds, payouts, reports |
| Fundraiser | Supporters, gifts, emails, reports |
| Programs | Events, classes, gala, shop, rentals, kiosk |
| Front desk | Kiosk, check-in, look up people |
| Viewer | See everything, change nothing |
You can't invite someone straight in as Owner. To compare the roles side by side, click the "Members" tab and then "Compare roles".
What the invited person does
- They open the email and click "Accept my invitation →".
- A page opens headed "Join [your organization] on Clerestory". It shows "Organization", "Invited by", "Your email" and "Expires".
- If they're not signed in, they click "Sign in or create your account". Their email address is filled in.
- Once signed in, they click "Join [your organization]".
- They land on the Overview page. On your "Invitations" tab, their status changes to "Accepted".
The invited person's own steps are in Join your organization on Clerestory.
Copy, resend or cancel an invitation
Page: /dashboard/settings/organizations
- In the left-hand menu, click Settings, then Organizations.
- Scroll to the bottom of the page. Just above the "Team Management" box, click the "Invitations" tab.
- Find the person's row. The "Status" column shows "Pending", "Accepted", "Expired" or "Canceled". On a pending row, the "Expires" column shows when the invitation runs out. An invitation that ran out can still say "Pending", with "Expired" in red or orange in the "Expires" column.
- At the far right of a "Pending" row there are three small icon buttons:
- A chain-link icon, "Copy invitation link". It copies the invitation's web address. You'll see "Invitation link copied." Send the link to the person another way, such as a text message.
- A paper-plane icon, "Resend invitation". It emails the invitation again. You'll see "Invitation resent successfully".
- A red circle with an X, "Cancel invitation". See the warning below.
Important: "Cancel invitation" stops the link working straight away. There's no "Are you sure?" step.
- To cancel, click the red circle with an X. You'll see "Invitation canceled successfully". The status changes to "Canceled".
- At the far right of an "Expired" or "Canceled" row, click the paper-plane icon to send a new invitation. The red trash can icon next to it is "Remove invitation"; at the moment clicking it leaves the row in the list. On a row that says "Pending" but "Expired" under "Expires", the paper-plane icon is in the same place and sends it again.
Special cases
- Invited the same person twice. If they already have a live invitation, clicking "Invite" sends it again instead. You'll see "We've sent them another invitation."
- "That person is already on your team." They're already a member. Look for them on the "Members" tab.
- "We couldn't send that invitation. Please try again." Something went wrong. Wait a moment and click "Invite" again.
- The email never arrived. Ask them to check their spam folder. Then use the chain-link icon to copy the link and send it another way.
- "This invitation isn't available". The person sees this if the invitation was used, canceled or has expired. Send them a new one with the paper-plane icon.
- Signed in as someone else. If the person is signed in with a different email, the join page says so and shows "Switch account". They must sign in with the invited address.
- Resending too quickly. Wait about a minute between resends to the same person.
Buttons to avoid
- On an "Accepted" row, the red trash can icon ("Remove invitation") only clears the invitation from this list. To take someone off your team, see Remove a user, answer access requests, and set staff alerts.
If you make a mistake
- Wrong email address: cancel that invitation, then invite the right address.
- Wrong role, not yet accepted: cancel the invitation and invite them again with the right role.
- Wrong role, already accepted: see Change someone's role, compare the roles, and see the app as a role.
- Canceled by mistake: click the paper-plane icon on the "Canceled" row to send it again.