


Who can do this: Owner, Administrator and Fundraiser. Finance, Programs, Front desk and Viewer can open the "Profile" and "Communication" tabs, but every field and switch there is grayed out.
Quick steps: Supporters › All Supporters › open the person › "Profile" tab › "Edit" on "Email, Phone & Address" › "Save"
Before you start
- You need one of the roles above.
- Have the new details to hand: email, phone, address, or the date of death.
- If the person asked to stop getting emails or mail, note what they asked for and when.
Change email, phone or address
Page: /dashboard/supporters/<donorId>
- In the left-hand menu, under People, click "Supporters". A short list opens under it.
- Click "All Supporters".
- Find the person. (See the guide "Find, search and filter supporters".) At the far right of their row, under "Actions", click the eye button. Clicking the name doesn't open the record.
- Below the giving totals, click the "Profile" tab.
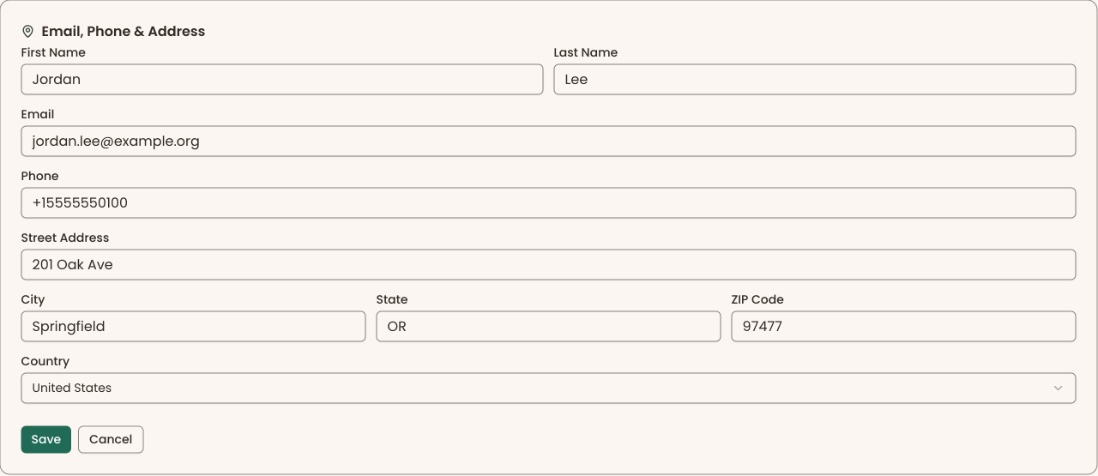
- Find the card "Email, Phone & Address". At its top right, click "Edit".
- Change "First Name", "Last Name", "Email", "Phone", "Street Address", "City", "State", "ZIP Code" or "Country".
- Click "Save", at the bottom left under the fields.
- You'll see "Contact information updated". That means it worked. The card may still show the old details until you refresh the page.
- If you see "Email address cannot be empty.", put the email back. A saved email can be changed but not removed.
Change their other details
The "Contact Enrichment", demographics and work cards on the "Profile" tab are edited one field at a time.
- On the "Profile" tab, scroll down to the "Contact Enrichment" card. Click the value next to the field you want, for example "Preferred Name". An empty field says "Not set".
- Type the new value.
- Press Enter, or click the check mark (✓) at the right of the box.
- You'll see "Field updated". That means it worked. If you see "Failed to update field", try again.
- To stop without saving, press Esc or click the × at the right of the box.

Fields with a list of choices, such as "Communication Pref.", show "Not set" below the name instead. For these, point at the row and click the pencil at its far right. Click each choice you want, then click "Save" below the choices.
Useful fields here:
- "Informal name (salutation)": the name after "Dear" in a letter, for example "Jordan".
- "Formal name (addressee)": the name on the envelope, for example "Mr. Jordan Lee".
- "Communication Pref.": how they like to be contacted: "Email", "Phone", "Mail", "Text" or "Do not contact".
Fill in your profile fields
Profile fields are extra questions your organization adds for its own records.
- On the "Profile" tab, scroll to the bottom to find the card "Profile Fields". It only shows if your organization has set some up.
- Fill in the answers.
- At the top right of the card, click "Save".
- You'll see "Member fields saved". That means it worked.
Choose which emails and mail they get
- Below the giving totals, click the "Communication" tab.
- Find "Mail and email preferences", on the left. There are three switches:
- "Appeal emails": requests for gifts, renewal invitations and other asks.
- "Newsletter emails": news and general updates, including Mailchimp newsletters.
- "Postal mail": printed letters and mailing labels.
- To stop one, click its switch so it turns off. It saves straight away.
- You'll see "Saved". That means it worked. The line under it changes, for example to "Unsubscribed from appeals", and a label such as "No appeal emails" appears at the top of the record.
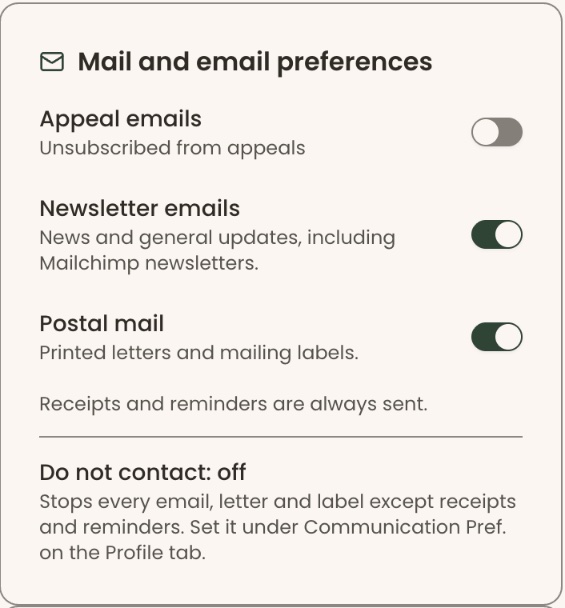
Receipts and reminders are always sent, whatever these switches say.
Turn one back on
Important: Only do this if the person asked, or it was turned off by mistake. The reason you choose is saved on their timeline.
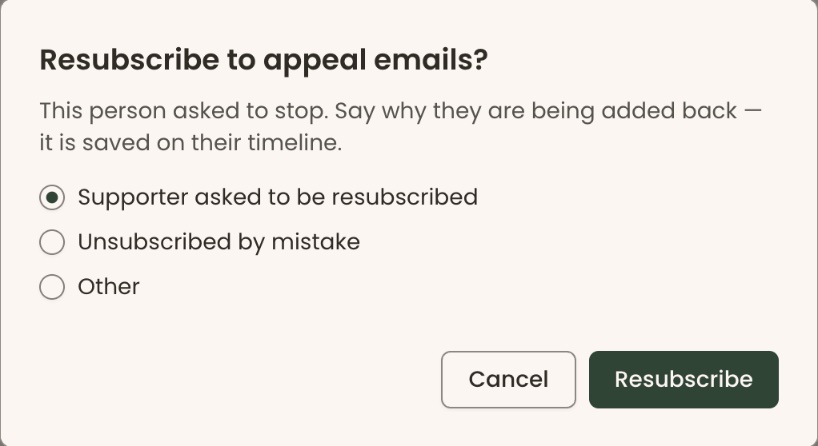
- Click the switch so it turns on. A box opens, for example "Resubscribe to appeal emails?".
- Choose "Supporter asked to be resubscribed", "Unsubscribed by mistake" or "Other". The first is already chosen. For "Other", type the reason.
Important: For "Newsletter emails", if your organization uses Mailchimp, clicking "Resubscribe" makes Mailchimp email the person once to confirm.
- Click "Resubscribe".
- You'll see "Saved". That means it worked.
Mark someone as do not contact
"Do not contact" stops every email, letter and label except receipts and reminders.
- On the "Profile" tab, in the "Contact Enrichment" card, point at the "Communication Pref." row and click the pencil at its far right.
- Click "Do not contact" in the list of choices, then click "Save" below them.
- You'll see "Field updated". A "Do not contact" label appears at the top of the record.
To remove it, click "Do not contact" again to unselect it, then click "Save". A box opens: "Remove do not contact?". Choose a reason and click "Remove do not contact". The reason is saved on their timeline.
Mark someone as deceased
- On the "Profile" tab, find the "Deceased" switch, below the "Email, Phone & Address" card and the "This record is a" list.
- Click the switch.
- A box opens: "Mark this person as deceased?".
Important: After the next step they will be left out of every email, letter and mailing label. They will show as Deceased wherever their name appears. Their giving history stays as it is.
- Click "Mark as deceased".
- You'll see "Marked as deceased". That means it worked.
- A "Date of death (optional)" box appears. If you know the date, type it, for example Sep 24, 2026, and press Tab. You'll see "Date of death saved", and the label by the name shows the date.

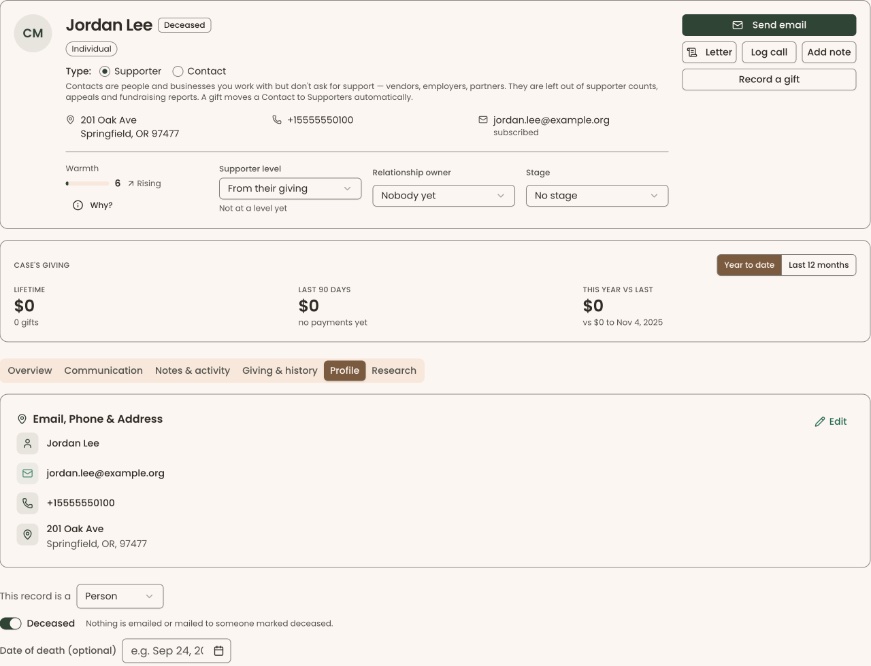
The "Communication" tab now shows "Not contacted: deceased". If you see "We couldn't save that change.", try again.
Special cases
- A business record has no "Deceased" switch.
- The Deceased switch is grayed out for Finance, Programs, Front desk and Viewer.
If you make a mistake
- Contact details: before saving, click "Cancel". After saving, click "Edit" and change them back.
- Deceased: click the "Deceased" switch again. In "Remove the deceased mark?", click "Remove the mark". They can get emails and letters again, subject to their other preferences. Any date of death is removed. You'll see "Deceased mark removed".
- Email or mail switches: see "Turn one back on" above.